Updated May 2020
Charts are often used to provide instructions on how to create intarsia or stranded colour work motifs. This T-torial explains how to interpret and use these charts.
Continue reading “Reading charts for colour knitting (T201908)”
Knitting the world together
Posts containing t-torials.

Updated May 2020
Charts are often used to provide instructions on how to create intarsia or stranded colour work motifs. This T-torial explains how to interpret and use these charts.
Continue reading “Reading charts for colour knitting (T201908)”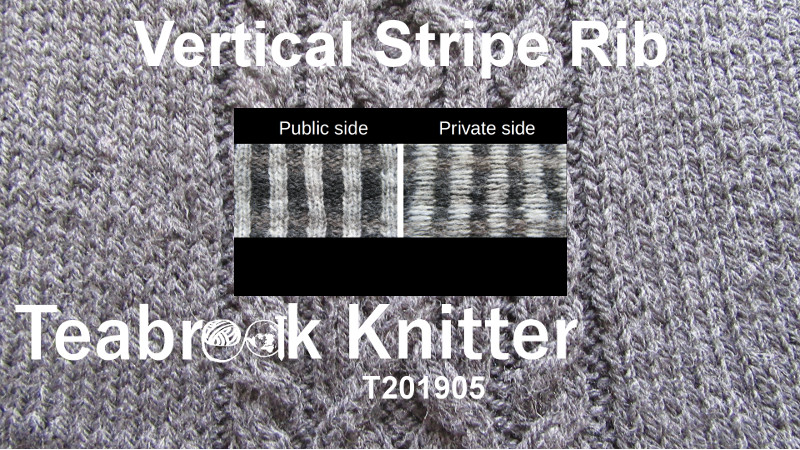
Vertical stripe rib is a form of stranded knitting. It is often used for the edging of stranded knitting projects, such as cuffs and neck bands. Like standard rib it does not curl, but it does not stretch either.
Continue reading “Vertical stripe rib (T201905)”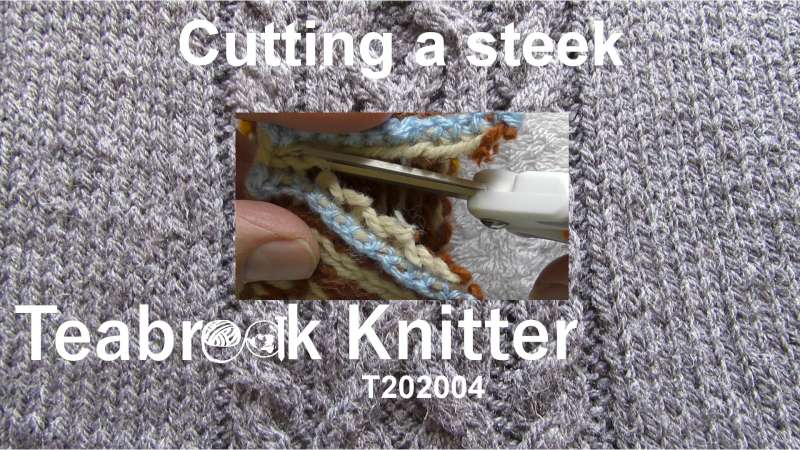
A steek is an area of knitted fabric that is designed to be cut. This allows, for example, a sweater to continue to be knit in the round (circular knitting) after the start of the armholes. The last step in making fabric with a steek is to cut the central stitches of the steek. This T-torial shows you how to make that cut for steeks that have an even number of stitches, and for steeks that have an odd number of stitches.
Continue reading “Cutting a steek (T202004)”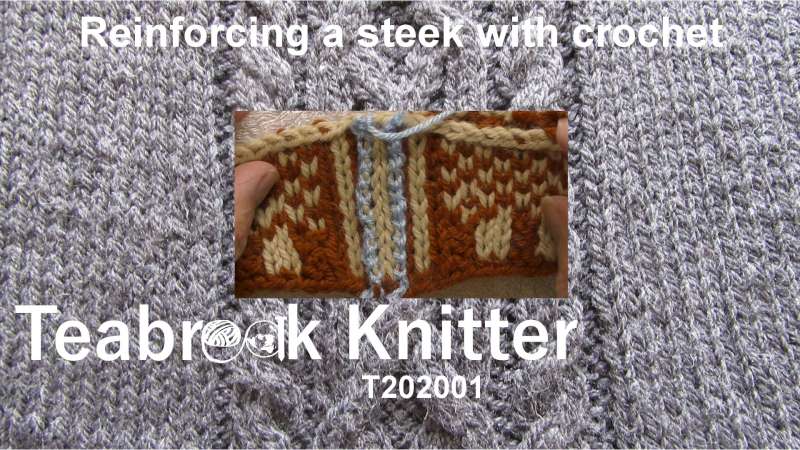
Steeks are used when knitting in the round to allow arm holes, cardigan openings and other cuts to be made in the fabric. This T-torial explains how to use the crochet technique to reinforce steeks, so that the loose ends at the cut do not pull loose.
Continue reading “Reinforcing a steek with crochet (T202001)”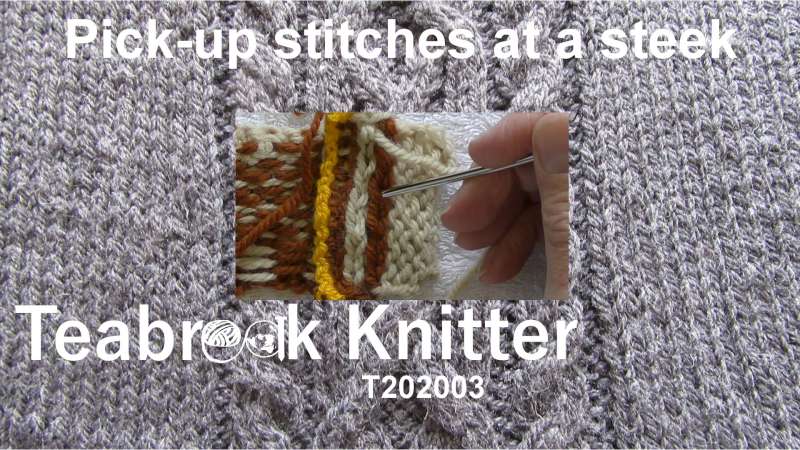
This T-torial shows how to pick-up and knit stitches along the edge stitches of a steek. It shows how to do this using two needles, a crochet hook and a needle, and with a single needle. This method helps the steek stitches to lie flat against the body of the fabric.
Continue reading “Pick-up stitches at a steek (T202003)”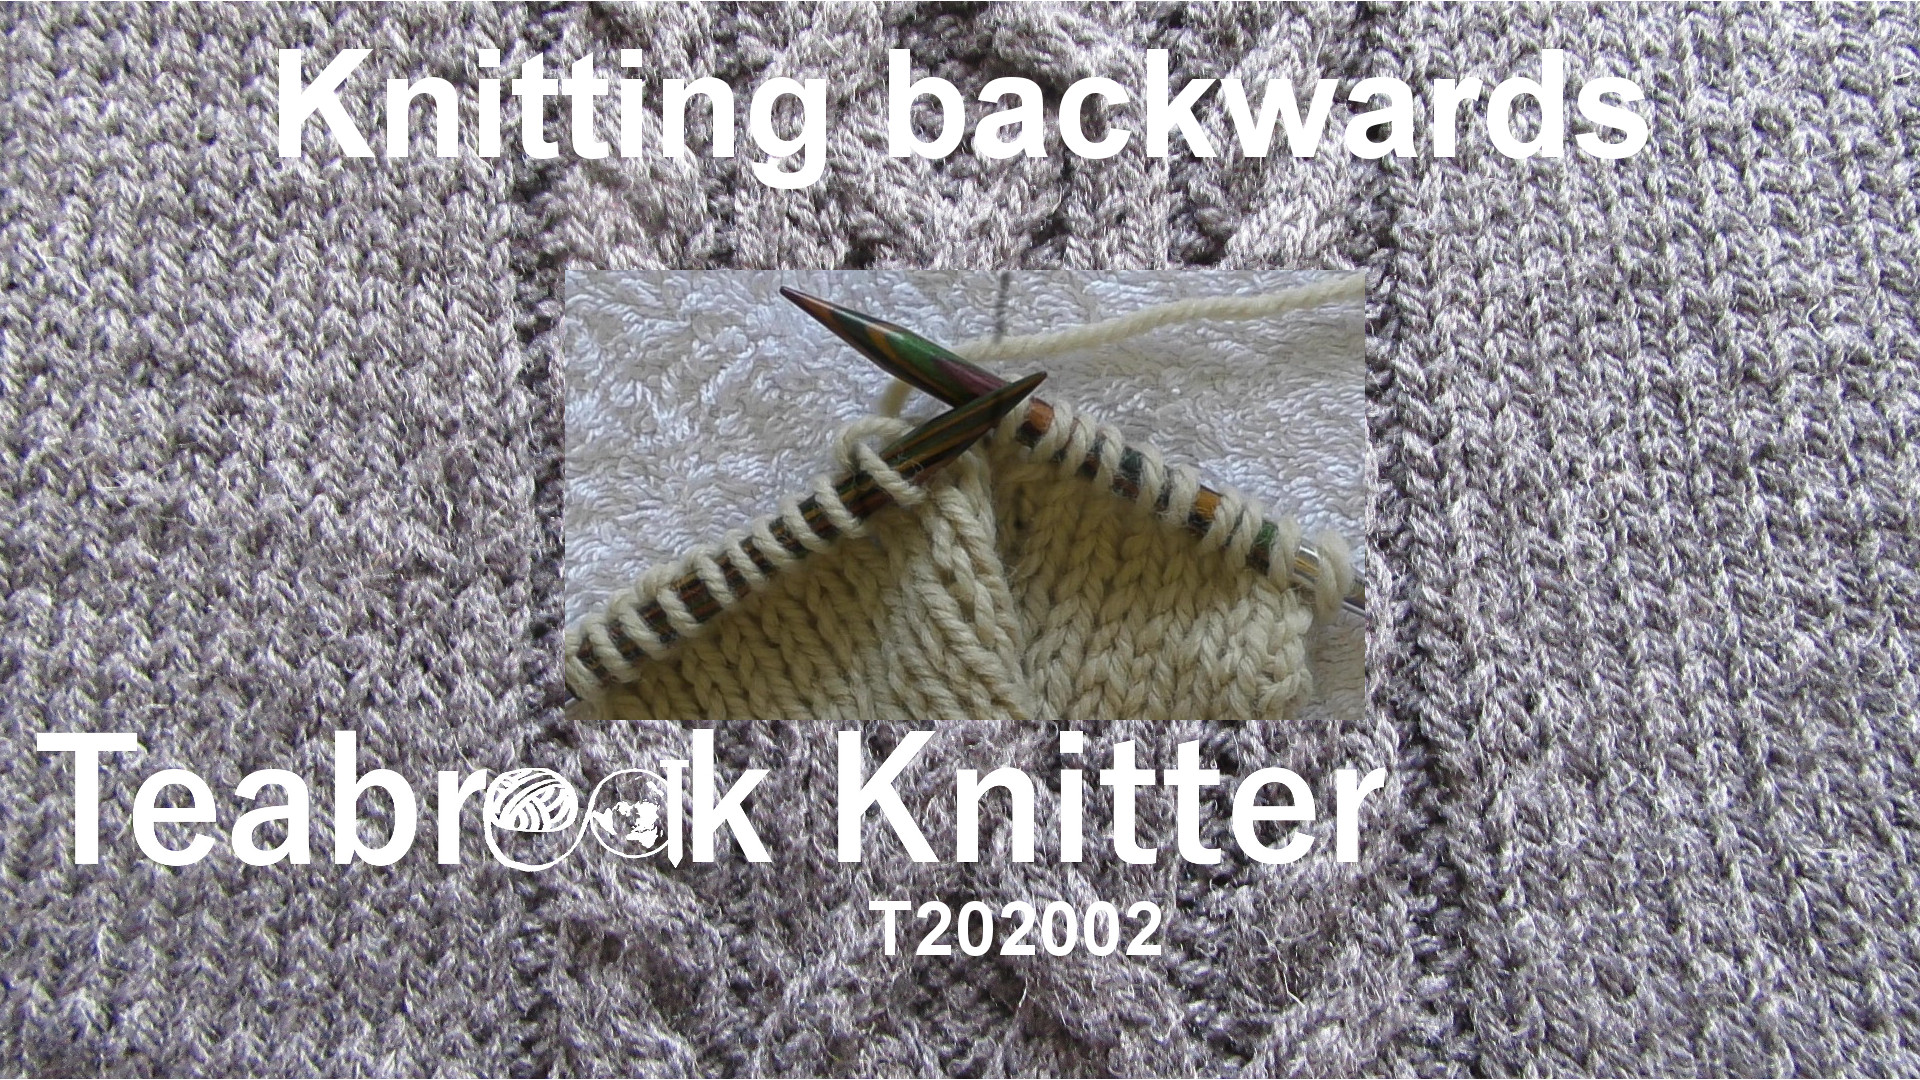
Knitting backwards (or mirror knitting) is a technique that allows you to keep the public (right) side of your work facing you while you knit. This T-torial shows how to make knit and purl stitches while taking stitches from the right hand needle to make the new ones on the left hand needle.
Continue reading “Knitting backwards (T202002)”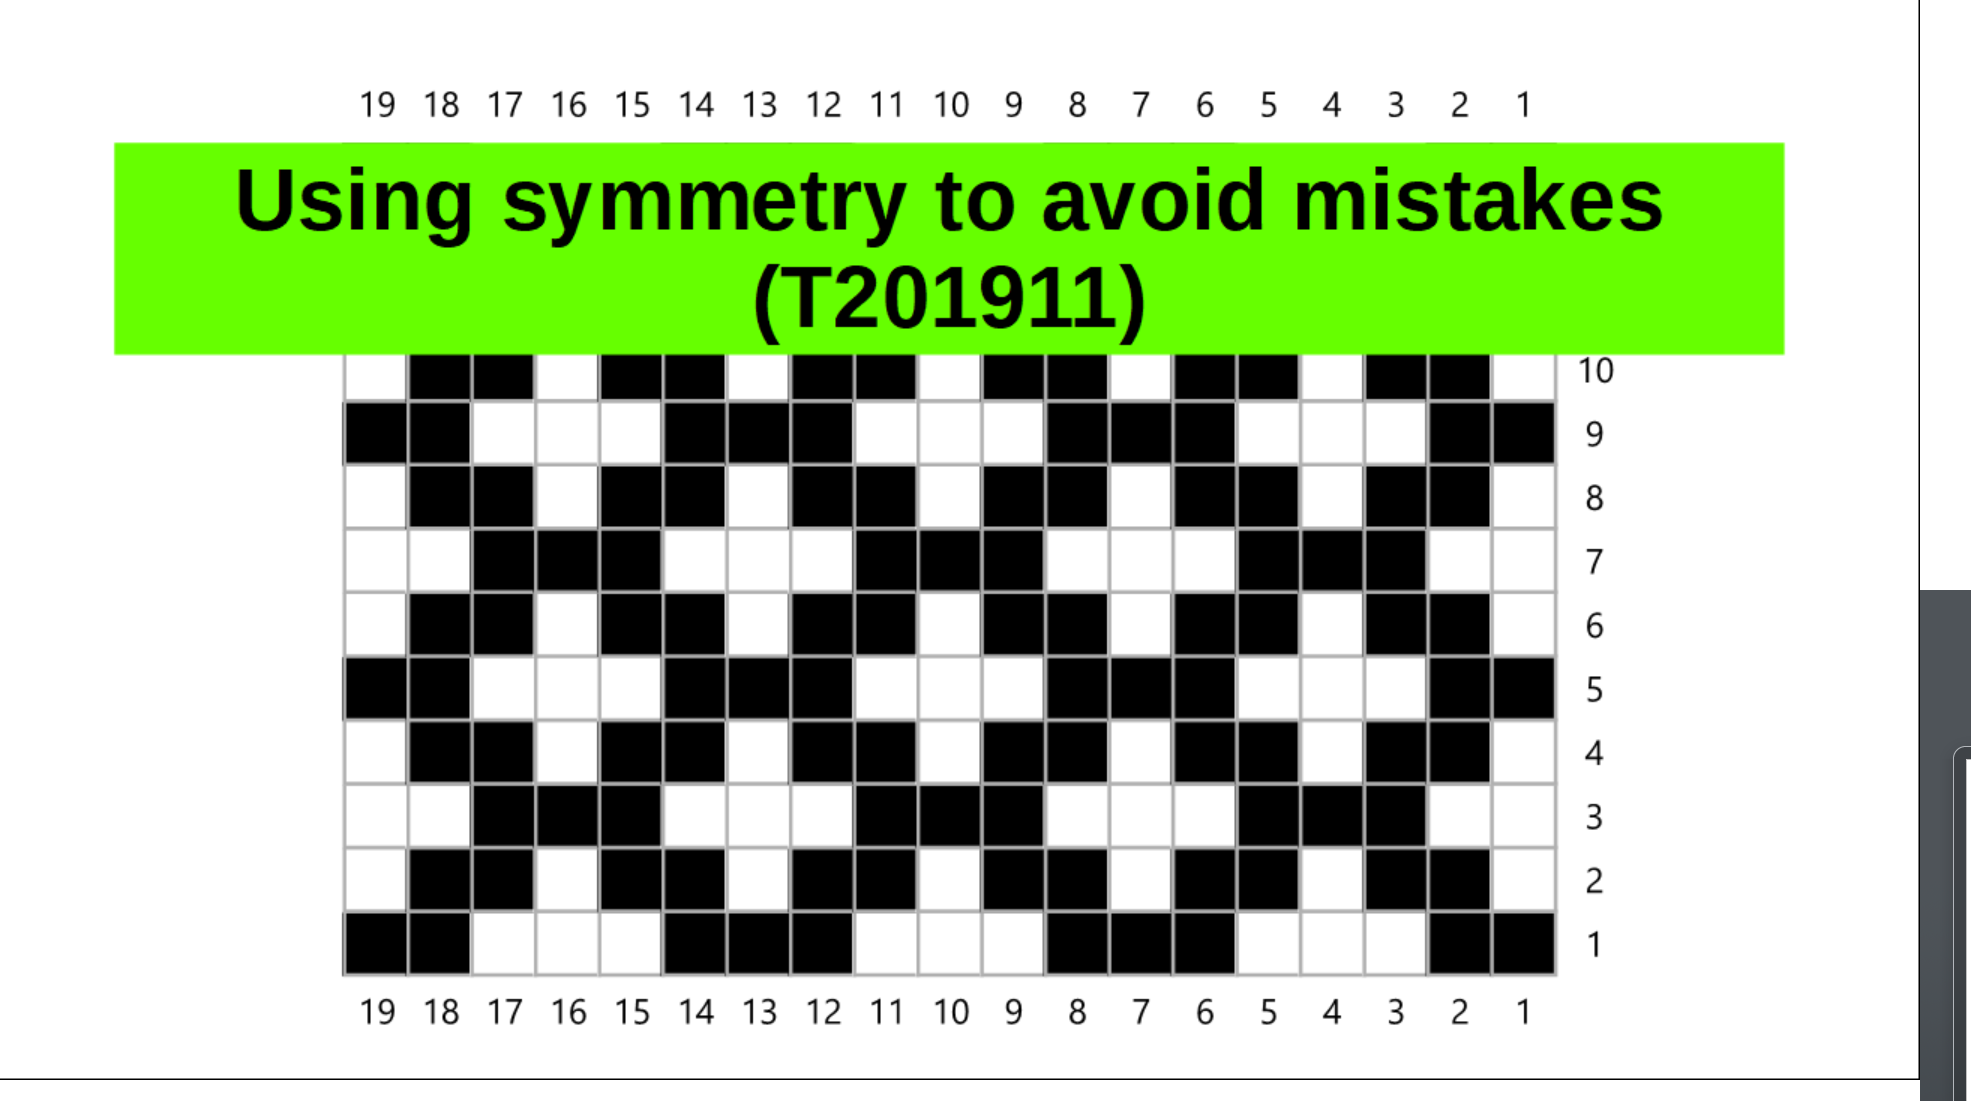
The underlined headings below are links that take you to that section in the YouTube video for this tutorial.
Hello. I’m Steve, also known as Teabreak Knitter on social media.
In this T-torial I want to tell you how I use the ideas of symmetry to help me spot when I make mistakes in my knitting early, so that I can go back and repair them there and then, rather than waiting until I’ve got a lot further on in the knitting.
Although I will be using colour work to explain my ideas, they apply equally to textured knitting, where you use different types of stitch, to cables, and also to open work (often known as lace knitting or knitted lace).
I’ll show you how I use symmetry.
I’d like to start by talking about the different types of symmetry. You have translation symmetry and reflection symmetry. These are particularly helpful to knitters. There are also other symmetries called rotation and scaling, that I won’t talk about in this T-torial, but designers might be particularly interested in those.
In terms of translation symmetry, this is where a shape is repeated either horizontally or vertically.
In this case you can see the triangle is repeated as you go across a line. You might see minor variations, in this case in the colour, but basically we’re interested in the things that are common.
In a written knitting pattern, translation symmetry could show up as a repetition:
So this is a repeat within a round or row, and this is a repetition of a group of rows.
If you do one of these repetitions, you can compare your current repetition with earlier ones to see that they’re the same. If they’re not the same, you can work out where you made your mistake before it is covered up by more complicated patterns coming on later.
Looking at that another way, you might have your knitting represented in a chart, and a a chart would often have a motif that is then repeated as you go along a row or you go up a row, just like this one. And what’s not necessarily obvious from the motif itself is what the overall pattern looks like, where you will often see see other symmetries appearing that you weren’t obviously aware of.
Here we have got the 1,2,3 horizontal repeats and the 1, 2, 3 vertical repeats. As the original motif is repeated you can see that it’s forming an overall systematic design which is of set of crosses on a background or, if you prefer, a set of diagonal lines with the crosses between them. And so you can use this as you are knitting to be able to compare what’s happening in this repeat with what’s happening it that repeat.
The other type of symmetry [that I will discuss] is reflection (as things would appear in a mirror).
So what happens as we move from left to right is the opposite of what happens as you move from right to left.
This can useful in knitting when you’ve got something like an armhole or a v-neck. Coming back to our pattern, you can see this vertical [reflection] symmetry here. If you come up column 10, if you look to its right, on the top row you’ve got a white, black, black, black and on the left you got a white, black, black, black. What’s happening on one side of the line of symmetry is the opposite (is happening in the opposite order) to what’s happening on the other side.
Translating that into knitting, and say we’re here, and we have got a v-neck that we’re doing in the middle of the front of a jumper [sweater in the USA].
What happens if you have a v-neck? The V is normally placed along a line of symmetry in your design, so that the left-hand side of the garment looks like the right hand side of the garment, and everything is nice and symmetrical – balanced left and right. As you do your decreases, what you actually see here, starting at the bottom, is that what’s happening on the right hand side (as you look at it in your knitting) things are happening in the opposite sequence to on the left, and the same as you go up through all these [rows].
As you knit across your [armhole] V-neck, once you get to the far side you can check that you have the same sequence black, white, white, as you move away from the V. You can also use this as a way of working out where [in your pattern] you should start knitting again after the V [not pattern]. As you have got the chart, you’re working your way across and often this [the starting point] will be set in from the edge of the motif as is it shown in your pattern. When you pick up the other side of the V-neck you can just say “where am I in the pattern? I’ve got to be looking for where it goes white, white, black, black, black” and you can look for that sequence on the other side just to check you are picking up and knitting your chart from the right place.
As for armholes, often you’ll find the armholes are symmetrical. You’ve got the same pattern as you leave the armhole on what to you as you knit is the right hand side as you looking at it as you have on the opposite side. So again, you can check that at the beginning of the part of the garment you are knitting you have got the same sequence in reverse as you have on the opposite side.
That doesn’t always work, though. This [example pattern] is offset slightly. It isn’t symmetrical. [For example, if you] take this line you’ve got one black there and 2 blacks there. However you will often find that the front and the back of the garment are the same, so if you’re looking at the front as you knit it and you’ve got the sequence two blacks and a white on this round then as you’re knitting the back and you come away from the armhole you’d also expect to see two blacks and a white. And the same [principle] the at other armhole.
So that’s another way in which you can do the checking, even if an individual part of the garment isn’t symmetrical, you often see a symmetry with a different part of the garment that you can check as you are knitting.
I’ve been talking about this in terms of colours, colour work. It applies equally if you are using stitch patterns, such as knits and purls, and for lace work and other open work where things can get a bit more complicated. Certainly as you knit one repeat of your pattern you can check that with the next repeat immediately you have finished the second repeat to make sure you have the same sequence of stitches. At that stage it is easier to go back and correct what you’ve done. Once you’ve done a few more stitches, and even gone on to the next row [or round] of your knitting, it becomes far more difficult to correct your open work.
Let’s have a look at what that means in practice. Here’s an example of where we can use translation to find a mistake in our knitting. In this swatch you’ve got a front which has a v-neck opening and armholes that you can see on the front and on the back.
What we have here, if you look in the vertical, we have the pattern repeating there and there, is that that cross has got a white centre, and that cross has got a brown centre. So there’s a mistake. This repeat is not the same as that repeat. That centre is wrong.
Things get a bit more complicated as we try and find the mistakes on the front here. Just to help you orientate yourself, here is the front of the knitting, and I have highlighted the edges of the steeks with those blue threads. You can see here if you got the v-neck and you’ve got the two steeks on either side.
With that to help us, what can we see?
First of all if we look at what’s happening here and what’s happening here in this sequence, we see quite clearly that there are two white stitches as we come away from the edge. And here, we appear to have a brown and a white. If you compare what’s happening, this is where I’ve used a knit two together which is sloping towards the interior of the fabric, instead of an ssk which would have been sloping away. If it had been sloping away, the white stitch would have been dominant, not the brown stitch.
We have got a difference here, that as we are coming in, you have got two clear white stitches here, and we have got two stitches being joined together here. I forgot to decrease on this side.
On this, down here, is another sequence that if you look is incorrect. In this one I have used a slip, slip, knit (ssk) which is a right leaning stitch, instead of a left leaning stitch. You are getting a different appearance down on this bottom part, here.
Looking on the back and the front at these armholes now.
You see here that we’ve got two stitches in white and one white below them and a brown above that. Here you’ve got the two [white] stitches, the one [white] stitch and a white above. That should be the same [as on the other side], of course.
We have got the armhole here. We are starting the pattern away from the armhole should be the same, but it’s not. Here you have got the mistake – that round should be a white.
On the left here you have part of a cross up against the steek, Here I have got a full cross against the steek. There must be a mistake there. In this particular case, the mistake was that I forgot to decrease.
Again, we are using the translational symmetry of comparing the front and the back.
So by understanding that you can use the various repeats in your pattern to see where things should be the same, so you can compare them, and understanding how the shaping of your pattern is symmetrical, either side of a centre line in a symmetrical pattern, or between front and back, when you are knitting your piece, you can see where there are differences where there should be no difference at all, and you can go back and correct those problems before they get buried under the next few rows [or rounds].
That’s how I use symmetry to help me spot mistakes in my knitting. I hope you found this useful.
Until the next time, happy knitting!
You can see a pictorial tutorial on using symmetry to help you knit in the T-reference section of this website

Steeks allow you to knit in the round even when the finished item may not be continuous (for example a cardigan, or any garment with armholes). This t-torial suggests one way of casting-on the extra stitches for a steek that takes account of how the steek will be reinforced.
Continue reading “Casting on for steeks (T201909)”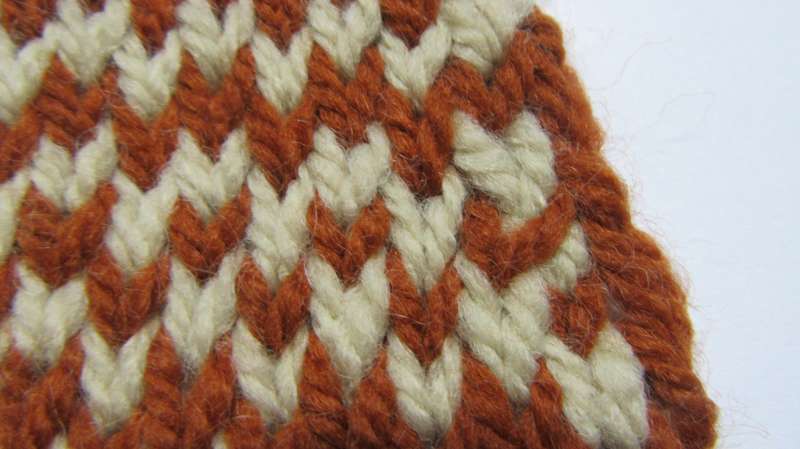
How you work your decreases makes a difference to the appearance of your colour work.
Continue reading “Decreases in colour work (T201910)”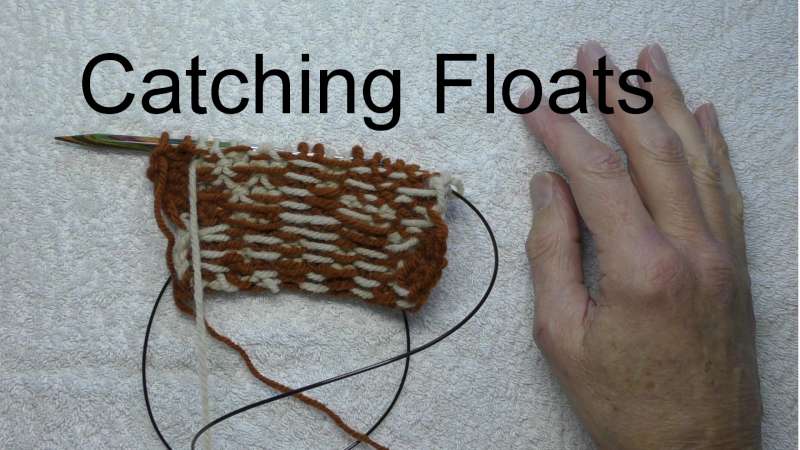
You may want to avoid long floats when there are several stitches of the same colour together in a stranded knitting project . This t-torial explains one way of doing this by catching (or trapping) the floats.
Continue reading “Catching floats in stranded knitting (T201907)”