Meeting names can often be guessed, and meeting organisers may need to limit who can attend a meeting. Some meetings are set up with a password before they start, but others may have a password added while the meeting is running. If your host tells you the password, make a note of it even if you are already in the meeting. If leave the meeting and want to rejoin (for example, if you have internet problems), you may find that you cannot rejoin without the password.
Join by web broswer (On desktop, laptop, smartphone or tablet)
Your meeting organiser will have sent you a link. Follow that link using Chrome or Edge Chromium as your browser.
If you are using a smartphone or tablet and choose not to download the app, you are likely to be directed to a page that shows dial-in phone numbers. If you are, go to the Chrome menu (at the top right of the Chrome window – three vertical dots for Andriod and three horizontal lines stacked on top of each other for Apple). Then scroll down and select ‘desktop site’. The page should then reload and show the video conference screen (though the icons will be very small). You can rotate your phone to landscape mode to give more separation between the buttons.
You will be asked to confirm that the site can access your microphone and video camera. Accept both.
You do not need to install the extension to Chrome.
If your meeting host has set a password for the meeting, you will be asked to enter it. Press enter when you have done so.
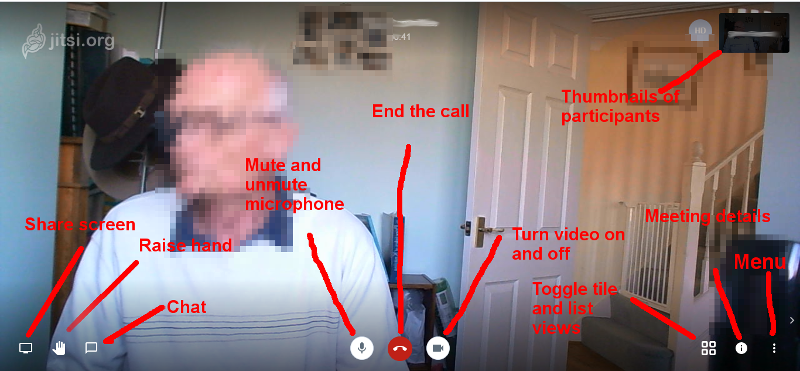
You may then be asked for your name and email address (unless you already did this for an earlier meeting). These are optional, but it will be easier for other participants if you put in the name you want to be known as during the meeting. If you click elsewhere on the screen, this pop-up will disappear (but you can still enter it using the menu button [three vertical dots] at the bottom right of the screen and going to the settings option).
You can mute and unmute your microphone with the microphone button, and turn your video camera on and off using the camera button.
You leave the meeting using the red telephone button.
You can choose which participant to see full size by clicking on their thumbnail to the right of the screen, or you can use the symbol with four squares to toggle between a full screen of one participant and a grid with all participants.
Join by telephone (landline or mobile)
Your meeting invitation will include a telephone number that you can call to join the meeting. If this is not local to the country you are in, there should be a link to a list of numbers to dial included in your meeting invitation.
When your call is connected, you will be asked to dial your “Meeting ID followed by the pound key”. This ID should also be in your invitation. Dial the number and then #.
Your meeting might have been assigned a password for privacy – if so, your meeting organiser should have told you what it is and you should dial this (followed by a #) if you are askedfor it.
Join by smartphone or tablet
If you find the Chrome interface too fiddly on your smartphone or tablet, you can used the “Jitsi Meet” application to join (or start) a meeting. Search for this in your device’s store: Google Play (Android) or Apple App Store (iPhone/iPad) and install it.
To go to the meeting, enter its name in the “Enter room name” box on the main screen – or just click on the link you have been sent. You may need to enter a password if the organiser has set one up (you should have been told what it is).
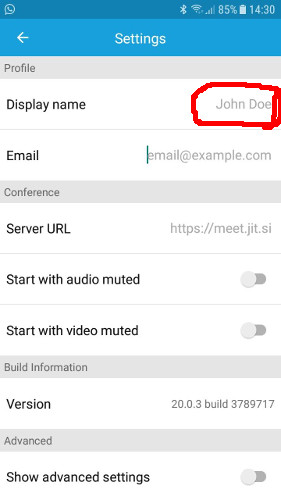
Open the Jitsi Meet app and go to Settings in the Menu. The menu is shown by the three horizontal lines (the screenshot shows the Android version).
It will help others in your meetings if they can see your name. You can add this by using the three horizontal bars (the Menu) at the top left of the screen and going to “Settings”.
Type your name in the “Display name” box. This will be the name that is shown to others in the conference. You do not have to put in your full name If you want to use only your given name, remember that there may be others in the meeting who share your name and consider adding the initial of your family name.
Tap the left-arrow to return to the main screen.
If your meeting is at https://meet.jit.si/????, then all you have to do is click on the link to the meeting that you were sent. You may be asked for a password. Your meeting organiser should have told you this.
If you were only told the meeting name (not starting with https://meet.jit.si or just meet.jit.si) , open the Jitsi Meet app and type the meeting name you were given into the “Enter room name” box and press go. You may be asked for a password. Your meeting organiser should have told you this.
If your meeting is not at https://meet.jit.si, then open the Jitsi Meet app and type the URL you were given into the “Enter room name” box and press go. You may be asked for a password. Your meeting organiser should have told you this.
The controls during a meeting are similar to those for the web version. You will need to touch the screen to unhide them.
This is the fourth podcast in a series that shows how I am knitting the Nahanni River sleeveless pullover, and describes techniques used in knitting the Nahanni River project: casting on for a steek, decreasing in colour work, and using symmetry to spot mistakes. It shows progress at the end of the second vertical pattern repeat.
Audio only version:
T-break
Nahanni River 4. Up to the armholes in the Nahanni River (P202001)
/
RSS Feed
Share
Link
Embed
Transcript
The headings in this transcript link to the point in the podcast where that topic starts. This transcript has been edited to correct errors and to clarify phrasing.
Hello. I’m Steve, also known
as TeabreakKnitter on social media.
This is the fourth in a
series of podcasts in which I’m talking about how I am knitting the Nahanni
River vest. The pattern is by Simply Shetland, and the author is Betts Lampers.
I’m knitting it in Shetland wool from Jamieson’s of Shetland (in spindrift).
In the previous podcasts I’ve
talked about how I planned this project, how I cast on this project and how I’m
knitting the project in stranded knitting. In this podcast I want to show you
how I cast-on for the steeks (for the arms and the neck), how I’m doing the
decreases in the colour work to make sure I maintain the pattern, and how I’m
using symmetry to check whether I’ve made mistakes in the pattern or in a
decreases.
I will start off talking
about how I cast on for the steeks. I will do this by showing you a more detailed
view, using not the yarn for the project but a larger yarn so that you’ll be
able to see what I’m doing.
The steek that I’m going to
make is to cover these four stitches here, that I’ve marked with a pin, that
will be put on waste yarn, and might later be used to pick up an armhole, for
example. I’m going to use an eight stitch steek. I’m using an even number of
stitches, so that should I have to change the colour yarn in the middle of the
steek, I can be sure of catching both colours of the old yarn, and both colours
of the new yarn. I’m also going to be adding an edge stitch to each side of the
steek in the background colour, which would normally be used for picking up armholes
for the arms or button bands.
This is how I do it. I’m
going to be knitting up in pattern, so keeping this pattern with 2, 4, 4, 4, 4,
2 colours. Two dark stitches before the 4 stitches I want to pick up, so here
are the four stitches I’m going to take onto this yarn. You can see that I’ve
already threaded it through.
Here’s the stitch before the {first
steek} one, and what I want to do is to make an edge stitch, tied into this
one. So, knit that stitch as normal but leave the loop on the needle so I can
knit into the back of that. That’s the edge stitch. I want to mark that
position, because that’s actually the start of the steek. That stitch is always
going to be in knit in the background colour.
Now, before I do anything
with those other stitches, I’m going to make the stitches for the steek. The
first stitch in the steek is going to be contrasting with this one, so it’s
going to be in the light colour yarn. I make a loop with a dark colour yarn, and
knit into it with the light colour yarn. I’ve now got the first steek stitch.
I now use the light colour
yarn to form of the loop, {and} the dark colour yarn to form the stitch. That’s
two steek stitches.
Loop in one colour, knit in
the next {other colour}. {There are now} three steek stitches.
The fourth steek stitch is
going to be in the dark colour. Now, I want to be able to spot the middle of
the steek very easily, because it’s the middle of the steek that I’m going to
cut. So, I make another loop with the light colour, and knit with the dark
colour. I’ve now got those two dark colour stitches next to each other. They’re
what I’m going to look for when I cut the steek.
I now knit another three
steek stitches, starting off with a stitch in the light colour.
I’ve now got one edge stitch
and 1, 2, 3, 4, 5, 6, 7, 8 {steek} stitches. I want to make another edge
stitch.
Now I return back to the main
fabric. Here are the four stitches that I’m going to put on hold, and here’s
the first stitch of the fabric that’s going to be knit as a light coloured
stitch.
However, I want to create a
new edge stitch, so I’m going to knit into that with the dark yarn, put in a
placeholder {stitch marker} for the start of the steek, and then I’m going to
knit through the back of the loop {in the light yarn} to give me the light
stitch that I want.
And continue to the end of
the row. So, that’s my cast on. I’ve got the two edge stitches that were knit
into to the last stitch the fabric {before the start of the steek}. That ties
them in quite closely to that, and then I’ve got the alternating steek
stitches. As you can see each stitch is formed from a loop of the opposite
colour. This means that when I come to reinforce the steek I can make sure that
very bottom of the cast on edge and the stitches themselves are reinforced so
they don’t pull back.
The reason I used the eight
stitch steek is so that when I reinforce I’ll be tying those two stitches together
and those two stitches together so if I change colour in the middle, the two
old colours are going to be held together and the two new colours are going to
be held together, so that the whole fabric is reinforced even if I’m changing
colour.
In this next section, I want
to show you how I do decreases in the colour work so that I maintain the colour
pattern. The idea for this came from Roxanne Richardson, and the URL of her
video is shown in the list of “useful links” at the bottom of this page.
I’m going to show you what I
do, again by cutting away and using a larger yarn so that you can see more
easily what I’m doing.
I’m going to show you how I
do decreases when I’m {knitting} stranded colorwork, and I’m going to show you how
I decrease around this steek in the middle here.
So I’ve got an 8 stitch
steek, with 2 edge stitches on it. I’m going to decrease here, in these two
stitches, and in these two stitches in just the same way as I would for an
armhole. I’m working in a chequerboard pattern that makes it very easy to see
see how the stitches are lying. I’ll just work up towards the decrease. One
more stitch.
And we have a light and a
dark stitch that we going to do the decrease on. Now, if I was working in a
single plain colour, I would do a knit two together (k2tog) here, so that the {decrease}
stitch was lying parallel to the seam. So I’ve got a right leaning stitch so
that it will look neatly lined up against the seam, which will actually be made
into the edge stitch. But look what happens now in the colour work if I do
that. (I’ll just pull this back stitch tight a bit so that you can see what is
happening here). So you can here that you’ve got your colour work. You’ve got
white, brown, white, brown, white and when the next stitches tighten, those
stitches lie over each other each other, so we get two white stitches next to
each other – which is not what we want.
If we undo that, and instead
of doing a right-leaning knit two together, I do a left-leaning ssk {slip,
slip, knit} (I’m succeeding in making the stitches quite loose by re-working
them!) you can see what’s happened here now. We’ve got white, brown, white,
brown, white, brown, white and the dominant stitch here is the brown.
Let’s work our way over to
the other side {of the steek}.
On the other side the seam
will be leaning the other way, so it’s where I would normally do an ssk {slip,
slip, knit}. I’ve got a left-leaning stitch so that it follows the line of the
seam. Let’s see what happens if we do an ssk on the left-hand side of this.
Slip, slip, and it’s going to
end up with a dark stitch. And {now knit} the light stitch next to it.
Once again, when things are
tightened up, what do we find? We have two dark stitches next to each other.
Let’s see what happens if we
do knit 2 together {k2tog}, a right leaning stitch. Knit 2 together brings that
left hand light stitch on top. And again, I’ll knit through it so it is easier
to see what’s happening here.
Using the right-leaning knit
two together {k2tog} we have kept the light, dark, light, dark, light pattern. And
you can see that there’s a dark stitch tucked underneath.
If you look on the other
side, again the light stitch is tucked underneath the dark stitch, so you’ve
kept the continuity of pattern going better.
So, in colour work, when you come to an area of decrease at the
edge of the fabric, you want to use a decrease that leans TOWARDS the edge.
So if you’re coming up the
fabric and to the left you’ve got an edge of the fabric at which you will be
decreasing, you decrease using the ssk {slip, slip, knit} left-leaning stitch to
do a decrease there. On the other side, where you are at the edge of the fabric
and moving in towards the centre of the fabric as you knit, you want a
right-leaning decrease, the {k2tog} knit 2 together. That way you lay the
correct colour on top on the public side of your work. This keeps {colour}
continuity of the row before the one you are knitting at the moment.
So that’s the rule: to do a
decrease in colour work lean the decrease TOWARDS the edge of the fabric.
In a previous video I talked
about how I follow the chart and make sure I can see what the pattern was on
the previous row when I’m knitting the current row as a way of finding out
whether I’ve made mistakes or not quite early on. Something else I use is
symmetry.
Patterns are quite
symmetrical in this and most other stranded knitting, and you find what happens
at one arm hole happens at the other. What happens either side of a V-neck
tends to be symmetrical across the two sides. I can use that to spot whether I
have made mistakes in the colour work, whether I have done the right number of
decreases and things like that.
I’d like to start by talking
about the different types of symmetry.
You have translation symmetry
and reflection symmetry. These are particularly helpful to knitters. There are
also other symmetries called rotation and scaling, that I won’t talk about in this
podcast (or the T-torial whose link is in the “useful links” section below), but
designers might be particularly interested in those.
In terms of translation
symmetry, this is where a shape is repeated either horizontally or vertically. In
this case you can see the triangle is repeated as you go across a line. You
might see minor variations, in this case in the colour, but basically we’re
interested in the things that are common.
In a written knitting
pattern, translation symmetry could show up as a repetition in a row knit 2,
repeat (purl 2, knit 2) three more times, or
repeat (rows 3 to 5) 10 more times that would be a vertical repeat.
So this is a repeat within a
round or row, and this is a repetition of a group of rows. If you do one of
these repetitions, you can compare your current repetition with earlier ones to
see that they’re the same. If they’re not the same, you can work out where you
made your mistake before it is covered up by more complicated patterns coming
on later.
Looking at that another way, you
might have your knitting represented in a chart, and a chart would often have a
motif that is then repeated as you go along a row or you go up a row, just like
this one.
What’s not necessarily
obvious from the motif itself is what the overall pattern looks like, where you
will often see other symmetries appearing that you weren’t obviously aware of.
Here we have got the 1,2,3
horizontal repeats and the 1, 2, 3 vertical repeats. As the original motif is
repeated you can see that it’s forming an overall systematic design which is of
set of crosses on a background or, if you prefer, a set of diagonal lines with
the crosses between them.
You can use this as you are
knitting to be able to compare what’s happening in this repeat with what’s
happening it that repeat.
The other type of symmetry {that
I will discuss} is reflection (as things would appear in a mirror).
What happens as we move from
left to right is the opposite of what happens as you move from right to left. This
can useful in knitting when you’ve got something like an armhole or a v-neck.
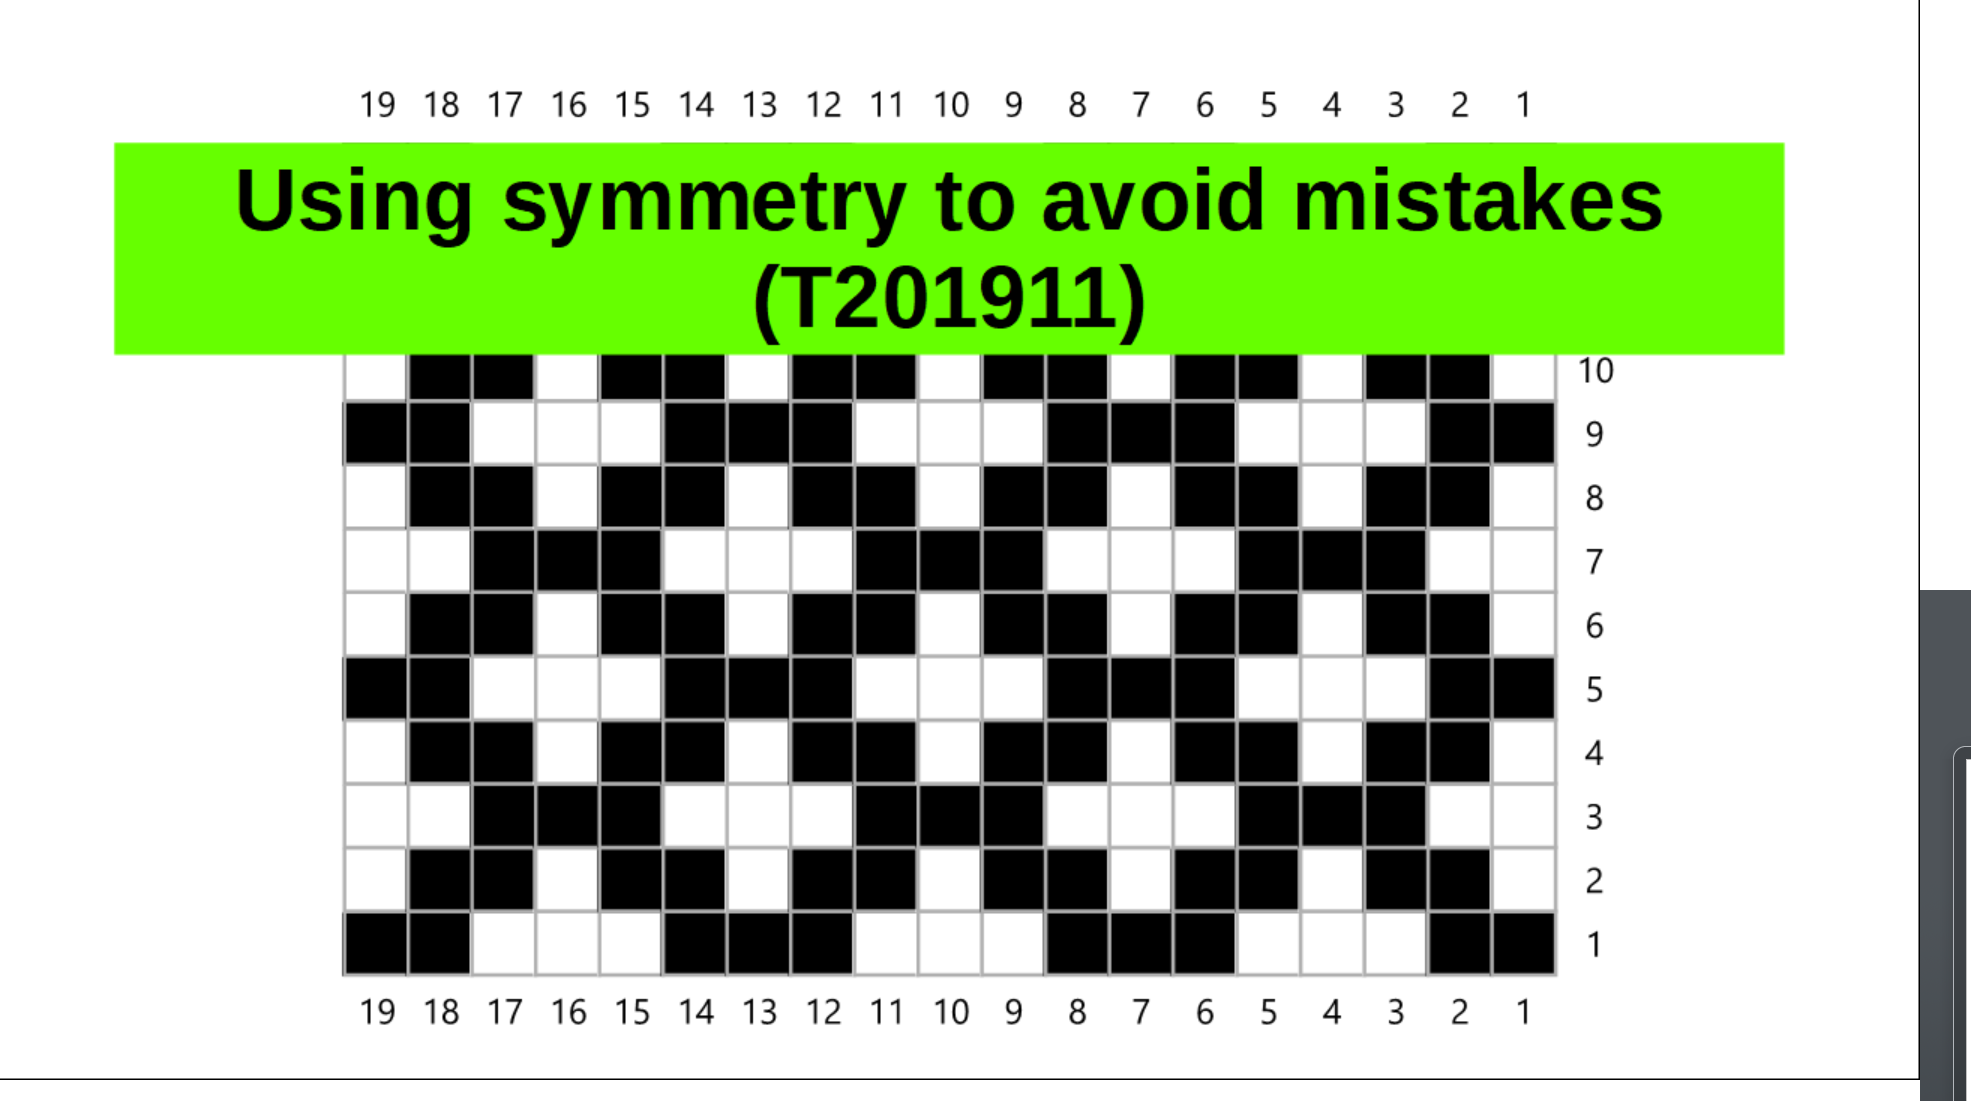
Coming back to our pattern,
you can see this vertical {reflection} symmetry here. If you come up column 10,
if you look to its right, on the top row you’ve got a white, black, black,
black and on the left you got a white, black, black, black. So what’s happening
on one side of the line of symmetry is the opposite (is happening in the
opposite order) to what’s happening on the other side.
Translating that into
knitting, and say we’re here, and we have got a v-neck that we’re doing in the middle
of the front of a jumper {sweater in the USA}. What happens if you have a
v-neck? The V is normally placed along a line of symmetry in your design, so
that the left-hand side of the garment looks like the right hand side of the
garment, and everything is nice and symmetrical – balanced left and right.
As you do your decreases,
what you actually see here, starting at the bottom, is that what’s happening on
the right hand side (as you look at it in your knitting) is that things are
happening in the opposite sequence to on the left, and the same as you go up
through all these {rows}. As you knit across your V-neck, once you get to the
far side you can check that you have the same sequence black, white, white, as
you move away from the V.
You can also use this is as a
way of working out where {in your pattern} you should start knitting again after
the V. As you have got the chart, you’re working your way across and often this
{the starting point} will be set in from the edge of the motif as is it shown
in your pattern. When you pick up the other side of the V-neck you can just say
“where am I in the pattern? I’ve got to be looking for where it goes white,
white, black, black, black” and you can look for that sequence on the
other side just to check you are picking up and knitting your chart from the
right place.
As for armholes, often you’ll
find the armholes are symmetrical. You’ve got the same pattern as you leave the
armhole on what to you as you knit is the right hand side as you looking at it,
as you have on the opposite side. So again, you can check that at the beginning
of the part of the garment you are knitting you have got the same sequence in
reverse as you have on the opposite side.
That doesn’t always work,
though. This {example pattern} is offset slightly. It isn’t symmetrical. {For
example, if you} take this line you’ve got one black there and 2 blacks there. However
you will often find that the front and the back of the garment are the same, so
if you’re looking at the front as you knit it and you’ve got the sequence two
blacks anda white on this round then as you’re knitting the back and you come
away from the armhole you’d also expect to see two blacks and a white. And the
same {principle} the at other armhole.
So that’s another way in
which you can do the checking, even if an individual part of the garment isn’t
symmetrical, you often see a symmetry with a different part of the garment that
you can check as you are knitting.
I’ve been talking about this
in terms of colours, colour work. It applies equally if you are using stitch
patterns, such as knits and purls, and for lace work and other open work where
things can get a bit more complicated. Certainly as you knit one repeat of your
pattern you can check that with the next repeat immediately you have finished
the second repeat to make sure you have the same sequence of stitches. At that
stage it is easier to go back and correct what you’ve done. Once you’ve done a
few more stitches, and even gone on to the next row {or round} of your
knitting, it becomes far more difficult to correct your open work.
Let’s have a look at what
that means in practice. Here’s an example of where we can use translation to
find a mistake in our knitting.
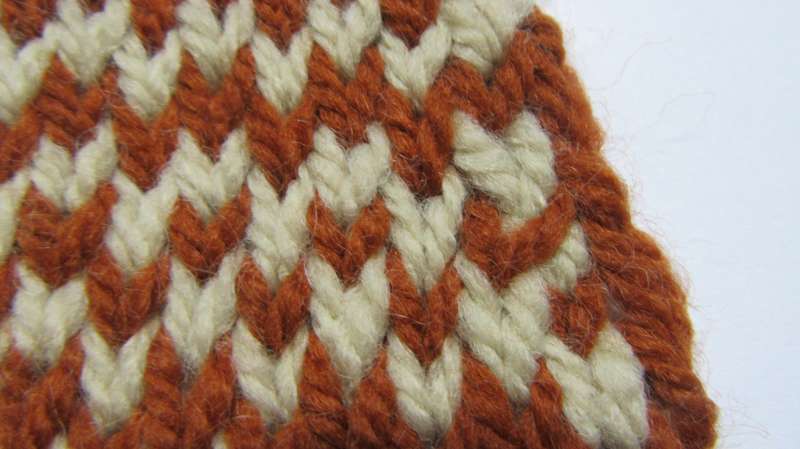
In this swatch you’ve got a
front which has a v-neck opening and armholes that you can see on the front and
on the back. What we have here, if you look in the vertical, we have the
pattern repeating there and there, is that that cross has got a white centre, and
that cross has got a brown centre. So there’s a mistake. This repeat is not the
same as that repeat. That centre is wrong.
Things get a bit more
complicated as we try and find the mistakes on the front here. Just to help you
orientate yourself, here is the front of the knitting, and I have highlighted
the edges of the steeks with those blue threads. You can see here if you got
the v-neck and you’ve got the two steeks on either side.
With that to help us, what
can we see?
First of all if we look at
what’s happening here and what’s happening here in this sequence, we see quite
clearly that there are two white stitches as we come away from the edge. And
here, we appear to have a brown and a white. If you compare what’s happening,
this is where I’ve used a knit two together which is sloping towards the
interior of the fabric, instead of an ssk which would have been sloping away. If
it had been sloping away, the white stitch would have been dominant, not the
brown stitch.
We have got a difference
here, that as we are coming in, you have got two clear white stitches
here, and we have got two stitches being
joined together here. I forgot to decrease on this side. On this, down here, is
another sequence that if you look is incorrect. In this one I have used a slip,
slip, knit (ssk) which is a right leaning stitch, instead of a left leaning
stitch. You are getting a different appearance down on this bottom part, here.
Looking on the back and the
front at these armholes now.
You see here that we’ve got
two stitches in white and one white below them and a brown above that. Here
you’ve got the two {white} stitches, the one {white} stitch and a white above. That
should be the same {as on the other side}, of course.
We have got the armhole here.
We are starting the pattern away from the armhole should be the same, but it’s
not. Here you have got the mistake – that round should be a white.
On the left here you have
part of a cross up against the steek, Here I have got a full cross against the
steek. There must be a mistake there. In this particular case, the mistake was
that I forgot to decrease. Again, we are using the translational symmetry of comparing
the front and the back.
So by understanding that you
can use the various repeats in your pattern to see where things should be the
same, so you can compare them, and understanding how the shaping of your
pattern is symmetrical, either side of a centre line in a symmetrical pattern, or
between front and back, when you are knitting your piece, you can see where
there are differences where there should be no difference at all, and you can
go back and correct those problems before they get buried under the next few
rows {or rounds}.
That is how I use symmetry to
help me find mistakes in what I’ve done early, so that I can correct them.
Now I’d like to show you the
progress I’ve made with this project.
I’m about halfway up the arm
holes at the moment. It’s a good time to take stock because I’ve knit the body,
I’ve started knitting the steeks so I can show you where the steeks are, what
they look like while I’m knitting them, and I can also show you something about
how I’m planning to do deal with the ends of the yarn.
So here it is.
This is the project so far,
and the first thing I want to show you is this, the steek at the front. You can
see that here is the gap at the start of the steek, and the stripes up here are
where I will actually cut the steek.
The other steeks are at the
edge of the arm holes. Here, the gaps how much are larger at the bottom because
I’m holding more stitches for the underarm, but the width of the steek switches
themselves, the banding here that I’m going to cut, is the same.
If you look inside, you’ll
see the ends. As I said {in an} earlier {podcast} I didn’t weave in the ends as
I went along. I’m going to weave in these ends later on. We then come to the
steek for the armhole. Above the arm hole all those ends are actually in the
middle of the steek, so once I’ve secured, reinforced, the edges of that steek
and cut down the middle, all those ends there will be exactly the same as the
knitted rows, in that there will be a cut down the middle there, and for every
single row the strand of wool will be finishing at the middle there, so this
set of ends I won’t need to weave in because they’re held by the reinforcement
of the steek.
So this is where I am. The
reason I stopped at this particular point is that I have reached the vertical
repeat in in the pattern. So it is a convenient place to stop, do the filming, and
remember where I got to.
So that’s my progress on the
Nahanni River vest, and in the next podcast, which I expect to be the final
podcast in the series, I’ll show you the last few techniques that I’m going to
have to use in order to knit it. I’m going to have to reinforce the steeks to
stop them unravelling, and I’m going to have to cut the steeks to make the arm
holes to make the V of the neck, and I’m going to have to pick up and knit the
arm bands and the neck band.
Hello. I’m Steve, also known as Teabreak Knitter on social media.
In this T-torial I want to tell you how I use the ideas of symmetry to help me spot when I make mistakes in my knitting early, so that I can go back and repair them there and then, rather than waiting until I’ve got a lot further on in the knitting.
Although I will be using colour work to explain my ideas, they apply equally to textured knitting, where you use different types of stitch, to cables, and also to open work (often known as lace knitting or knitted lace).
I’d like to start by talking about the different types of symmetry. You have translation symmetry and reflection symmetry. These are particularly helpful to knitters. There are also other symmetries called rotation and scaling, that I won’t talk about in this T-torial, but designers might be particularly interested in those.
In terms of translation symmetry, this is where a shape is repeated either horizontally or vertically.
In this case you can see the triangle is repeated as you go across a line. You might see minor variations, in this case in the colour, but basically we’re interested in the things that are common.
In a written knitting pattern, translation symmetry could show up as a repetition:
in a row knit 2, repeat (purl 2, knit 2) three more times, or
repeat (rows 3 to 5) 10 more times (that would be a vertical repeat).
So this is a repeat within a round or row, and this is a repetition of a group of rows.
If you do one of these repetitions, you can compare your current repetition with earlier ones to see that they’re the same. If they’re not the same, you can work out where you made your mistake before it is covered up by more complicated patterns coming on later.
Looking at that another way, you might have your knitting represented in a chart, and a a chart would often have a motif that is then repeated as you go along a row or you go up a row, just like this one. And what’s not necessarily obvious from the motif itself is what the overall pattern looks like, where you will often see see other symmetries appearing that you weren’t obviously aware of.
Here we have got the 1,2,3 horizontal repeats and the 1, 2, 3 vertical repeats. As the original motif is repeated you can see that it’s forming an overall systematic design which is of set of crosses on a background or, if you prefer, a set of diagonal lines with the crosses between them. And so you can use this as you are knitting to be able to compare what’s happening in this repeat with what’s happening it that repeat.
The other type of symmetry [that I will discuss] is reflection (as things would appear in a mirror).
So what happens as we move from left to right is the opposite of what happens as you move from right to left.
This can useful in knitting when you’ve got something like an armhole or a v-neck. Coming back to our pattern, you can see this vertical [reflection] symmetry here. If you come up column 10, if you look to its right, on the top row you’ve got a white, black, black, black and on the left you got a white, black, black, black. What’s happening on one side of the line of symmetry is the opposite (is happening in the opposite order) to what’s happening on the other side.
Translating that into knitting, and say we’re here, and we have got a v-neck that we’re doing in the middle of the front of a jumper [sweater in the USA].
What happens if you have a v-neck? The V is normally placed along a line of symmetry in your design, so that the left-hand side of the garment looks like the right hand side of the garment, and everything is nice and symmetrical – balanced left and right. As you do your decreases, what you actually see here, starting at the bottom, is that what’s happening on the right hand side (as you look at it in your knitting) things are happening in the opposite sequence to on the left, and the same as you go up through all these [rows].
As you knit across your [armhole] V-neck, once you get to the far side you can check that you have the same sequence black, white, white, as you move away from the V. You can also use this as a way of working out where [in your pattern] you should start knitting again after the V [not pattern]. As you have got the chart, you’re working your way across and often this [the starting point] will be set in from the edge of the motif as is it shown in your pattern. When you pick up the other side of the V-neck you can just say “where am I in the pattern? I’ve got to be looking for where it goes white, white, black, black, black” and you can look for that sequence on the other side just to check you are picking up and knitting your chart from the right place.
As for armholes, often you’ll find the armholes are symmetrical. You’ve got the same pattern as you leave the armhole on what to you as you knit is the right hand side as you looking at it as you have on the opposite side. So again, you can check that at the beginning of the part of the garment you are knitting you have got the same sequence in reverse as you have on the opposite side.
That doesn’t always work, though. This [example pattern] is offset slightly. It isn’t symmetrical. [For example, if you] take this line you’ve got one black there and 2 blacks there. However you will often find that the front and the back of the garment are the same, so if you’re looking at the front as you knit it and you’ve got the sequence two blacks and a white on this round then as you’re knitting the back and you come away from the armhole you’d also expect to see two blacks and a white. And the same [principle] the at other armhole.
So that’s another way in which you can do the checking, even if an individual part of the garment isn’t symmetrical, you often see a symmetry with a different part of the garment that you can check as you are knitting.
I’ve been talking about this in terms of colours, colour work. It applies equally if you are using stitch patterns, such as knits and purls, and for lace work and other open work where things can get a bit more complicated. Certainly as you knit one repeat of your pattern you can check that with the next repeat immediately you have finished the second repeat to make sure you have the same sequence of stitches. At that stage it is easier to go back and correct what you’ve done. Once you’ve done a few more stitches, and even gone on to the next row [or round] of your knitting, it becomes far more difficult to correct your open work.
Let’s have a look at what that means in practice. Here’s an example of where we can use translation to find a mistake in our knitting. In this swatch you’ve got a front which has a v-neck opening and armholes that you can see on the front and on the back.
What we have here, if you look in the vertical, we have the pattern repeating there and there, is that that cross has got a white centre, and that cross has got a brown centre. So there’s a mistake. This repeat is not the same as that repeat. That centre is wrong.
Things get a bit more complicated as we try and find the mistakes on the front here. Just to help you orientate yourself, here is the front of the knitting, and I have highlighted the edges of the steeks with those blue threads. You can see here if you got the v-neck and you’ve got the two steeks on either side.
With that to help us, what can we see?
First of all if we look at what’s happening here and what’s happening here in this sequence, we see quite clearly that there are two white stitches as we come away from the edge. And here, we appear to have a brown and a white. If you compare what’s happening, this is where I’ve used a knit two together which is sloping towards the interior of the fabric, instead of an ssk which would have been sloping away. If it had been sloping away, the white stitch would have been dominant, not the brown stitch.
We have got a difference here, that as we are coming in, you have got two clear white stitches here, and we have got two stitches being joined together here. I forgot to decrease on this side.
On this, down here, is another sequence that if you look is incorrect. In this one I have used a slip, slip, knit (ssk) which is a right leaning stitch, instead of a left leaning stitch. You are getting a different appearance down on this bottom part, here.
Looking on the back and the front at these armholes now.
You see here that we’ve got two stitches in white and one white below them and a brown above that. Here you’ve got the two [white] stitches, the one [white] stitch and a white above. That should be the same [as on the other side], of course.
We have got the armhole here. We are starting the pattern away from the armhole should be the same, but it’s not. Here you have got the mistake – that round should be a white.
On the left here you have part of a cross up against the steek, Here I have got a full cross against the steek. There must be a mistake there. In this particular case, the mistake was that I forgot to decrease.
Again, we are using the translational symmetry of comparing the front and the back.
So by understanding that you can use the various repeats in your pattern to see where things should be the same, so you can compare them, and understanding how the shaping of your pattern is symmetrical, either side of a centre line in a symmetrical pattern, or between front and back, when you are knitting your piece, you can see where there are differences where there should be no difference at all, and you can go back and correct those problems before they get buried under the next few rows [or rounds].
Steeks allow you to knit in the round even when the finished item may not be continuous (for example a cardigan, or any garment with armholes). This t-torial suggests one way of casting-on the extra stitches for a steek that takes account of how the steek will be reinforced.
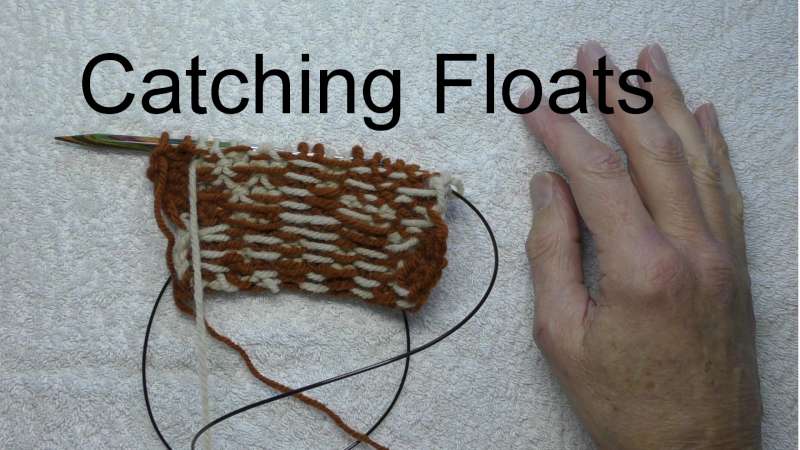
You may want to avoid long floats when there are several stitches of the same colour together in a stranded knitting project . This t-torial explains one way of doing this by catching (or trapping) the floats.
We use cookies on our website to give you the most relevant experience by remembering your preferences and repeat visits. By clicking “Accept”, you consent to the use of ALL the cookies.
This website uses cookies to improve your experience while you navigate through the website. Out of these, the cookies that are categorized as necessary are stored on your browser as they are essential for the working of basic functionalities of the website. We also use third-party cookies that help us analyze and understand how you use this website. These cookies will be stored in your browser only with your consent. You also have the option to opt-out of these cookies. But opting out of some of these cookies may affect your browsing experience.
Necessary cookies are absolutely essential for the website to function properly. These cookies ensure basic functionalities and security features of the website, anonymously.
Cookie
Duration
Description
__cfduid
1 month
The cookie is used by cdn services like CloudFare to identify individual clients behind a shared IP address and apply security settings on a per-client basis. It does not correspond to any user ID in the web application and does not store any personally identifiable information.
cookielawinfo-checbox-analytics
11 months
This cookie is set by GDPR Cookie Consent plugin. The cookie is used to store the user consent for the cookies in the category "Analytics".
cookielawinfo-checbox-functional
11 months
The cookie is set by GDPR cookie consent to record the user consent for the cookies in the category "Functional".
cookielawinfo-checbox-others
11 months
This cookie is set by GDPR Cookie Consent plugin. The cookie is used to store the user consent for the cookies in the category "Other.
cookielawinfo-checkbox-advertisement
1 year
The cookie is set by GDPR cookie consent to record the user consent for the cookies in the category "Advertisement".
cookielawinfo-checkbox-necessary
11 months
This cookie is set by GDPR Cookie Consent plugin. The cookies is used to store the user consent for the cookies in the category "Necessary".
cookielawinfo-checkbox-performance
11 months
This cookie is set by GDPR Cookie Consent plugin. The cookie is used to store the user consent for the cookies in the category "Performance".
DYNSRV
session
This cookie is used for load balancing purposes to decide which server to send the visitor.
viewed_cookie_policy
11 months
The cookie is set by the GDPR Cookie Consent plugin and is used to store whether or not user has consented to the use of cookies. It does not store any personal data.
Functional cookies help to perform certain functionalities like sharing the content of the website on social media platforms, collect feedbacks, and other third-party features.
Performance cookies are used to understand and analyze the key performance indexes of the website which helps in delivering a better user experience for the visitors.
Cookie
Duration
Description
YSC
session
This cookies is set by Youtube and is used to track the views of embedded videos.
Analytical cookies are used to understand how visitors interact with the website. These cookies help provide information on metrics the number of visitors, bounce rate, traffic source, etc.
Cookie
Duration
Description
_ga
2 years
This cookie is installed by Google Analytics. The cookie is used to calculate visitor, session, campaign data and keep track of site usage for the site's analytics report. The cookies store information anonymously and assign a randomly generated number to identify unique visitors.
_gid
1 day
This cookie is installed by Google Analytics. The cookie is used to store information of how visitors use a website and helps in creating an analytics report of how the website is doing. The data collected including the number visitors, the source where they have come from, and the pages visted in an anonymous form.
Advertisement cookies are used to provide visitors with relevant ads and marketing campaigns. These cookies track visitors across websites and collect information to provide customized ads.
Cookie
Duration
Description
IDE
1 year 24 days
Used by Google DoubleClick and stores information about how the user uses the website and any other advertisement before visiting the website. This is used to present users with ads that are relevant to them according to the user profile.
test_cookie
15 minutes
This cookie is set by doubleclick.net. The purpose of the cookie is to determine if the user's browser supports cookies.
VISITOR_INFO1_LIVE
5 months 27 days
This cookie is set by Youtube. Used to track the information of the embedded YouTube videos on a website.