Symmetry – helping to avoid mistakes

Knitting the world together
Updated August 2020.
This T-torial suggests several ways of holding the yarn when using two colours for stranded knitting.
Continue reading “Holding yarn for stranded knitting (T201906)”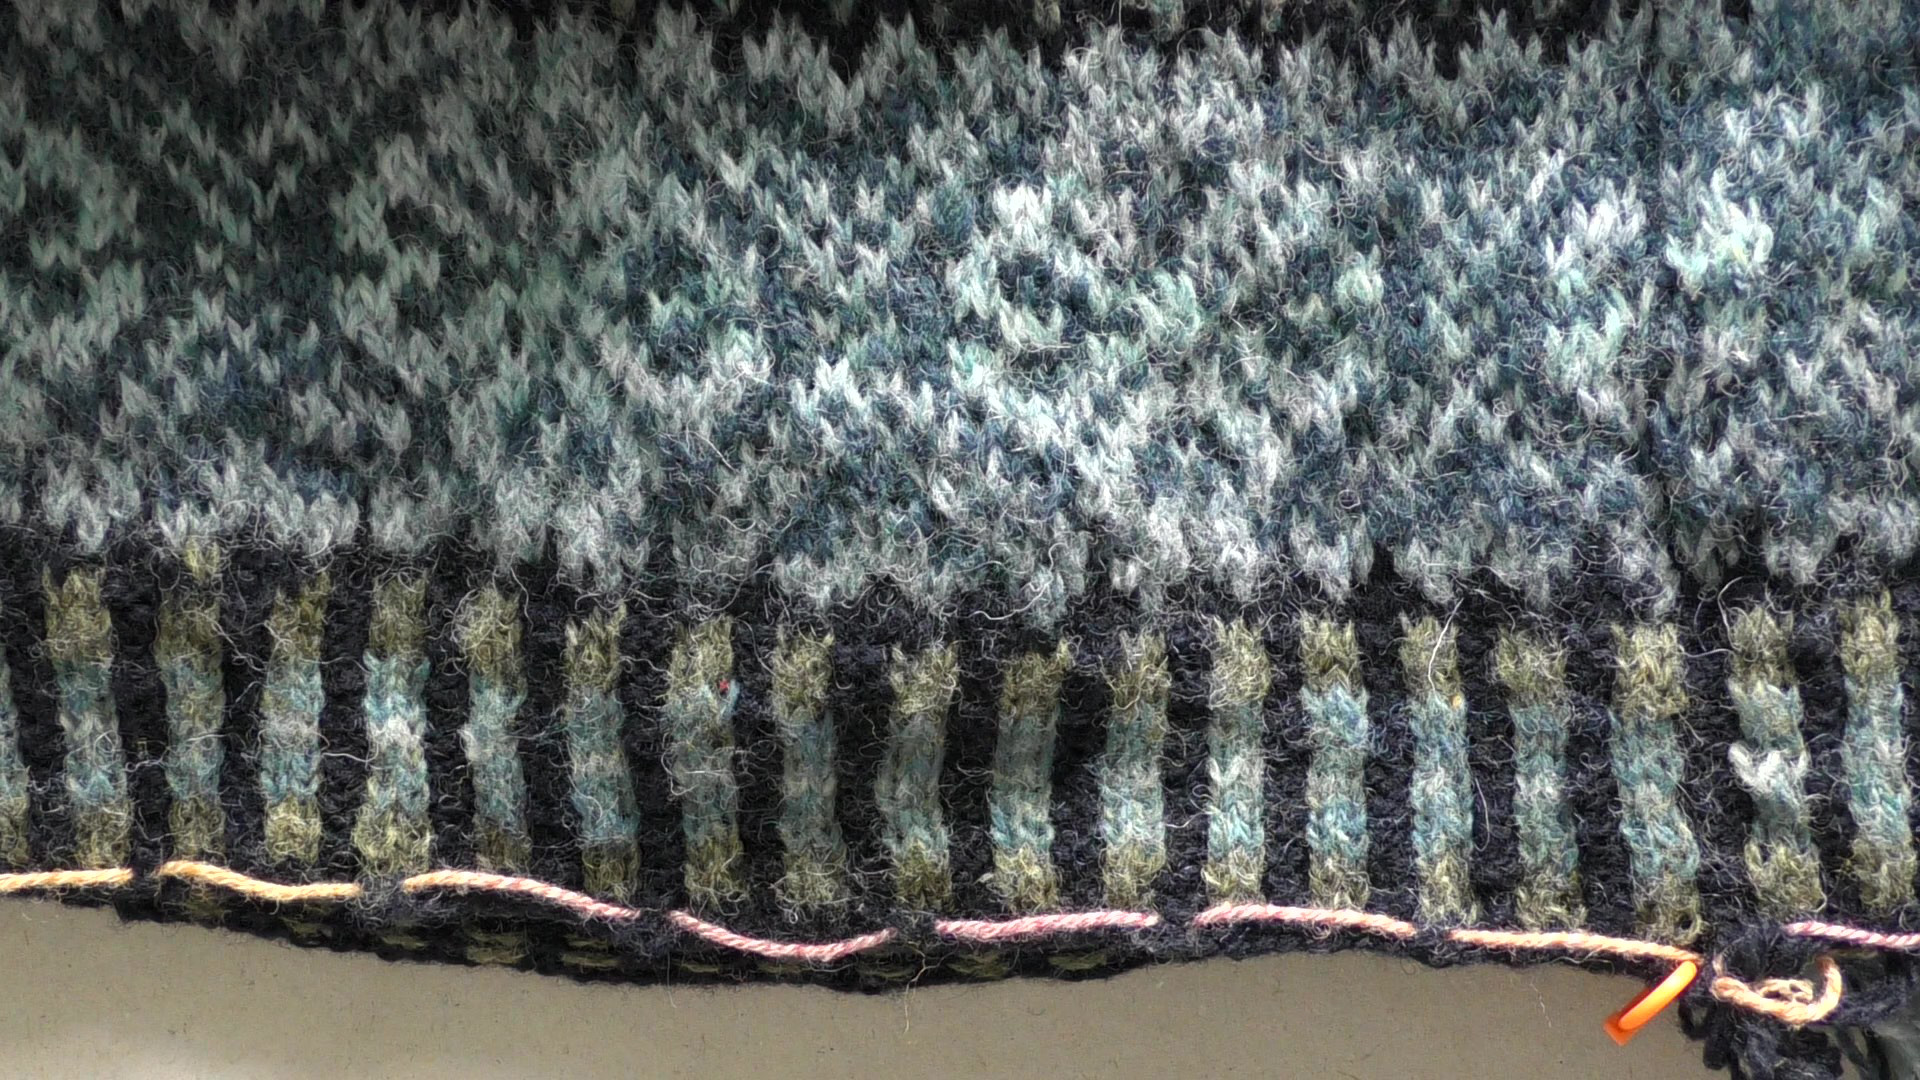
This is my third podcast in a series that shows how I knit my Nahanni River vest stranded knitting project. I talk about using charts for the colour work, how I knit with two colours, cartridge rib, and knitting the Fair Isle pattern.
This is a video. There is also an audio only version:
The headings in this transcript link to the point in the podcast where that topic starts. This transcript has been edited to correct errors and to clarify phrasing.
I’m Steve, also known as Teabreak Knitter on social media. This is my third podcast in a series on how I’m knitting the Nahanni River vest. This is based on a pattern by Betts Lampers that’s published by Simply Shetland, and I’m using wool called Spindrift from Jamieson’s of Shetland.
In the first podcast I talked about how I read the pattern to find out what I would need for the project, the wool, the techniques, the tools, things like that.
In the second podcast I talked about the cast-on and showed you how I was doing that.
In this the third podcast I’ll show you how I’m getting on with actually knitting the project, which means I’ll be talking about how I’m using the charts for the colour work, how I’m knitting with two colours, how I have have done the cartridge rib, and how I’m knitting the Fair Isle pattern.
In most of this video I’ll be showing you overhead shots because I’ll actually be showing the charts, and showing you the knitting as I’m doing it.
Before I show you how I interpret and use charts for colour work, there’s just a couple of things I want to say about charts for knitting in general. T
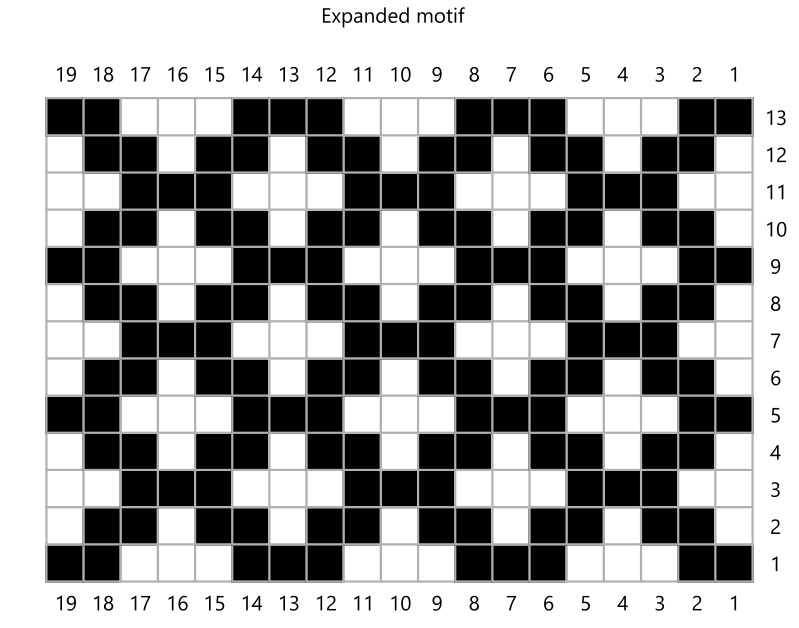
The first point is that the purpose of a chart is to give you a visual impression of how that knitting is going to be knit, and how it’s going to look when the final fabric is made. And so you can see on this chart that you can see the basic shapes that are going to be formed by the stitches. And it’s useful to remember that what you’re looking at is a picture, it might be simplified, of what your knitting is going to look like when it’s finished. That should help you remember some of the basics of a chart.
Charts are numbered up the side side for each of the rows. Whether you are knitting flat or rounds (if you are knitting in the round), you will often have the numbers repeated up the sides here. If you are knitting flat you might find odd numbers on the right hand side of the chart and even numbers on the left-hand side of the chart. That would be to remind you that when you’re on an odd number you’ll be working your way in stitches along in that order [right to left], and when working flat you’ll be working back along the [even numbered] row in the other direction. Because when you are knitting flat and you are knitting from your left needle to the right needle, then the first stitches you do will actually appear on the right hand side of the fabric, and the last stitches of that [row] will appear on the left-hand side of fabric (if you working on the front side of the fabric, on the outside of fabric). On the return, typically a purl row, you will actually be starting at the opposite side. You’ll be starting on the side that when the fabric is finished will be the the left hand side of the fabric and so you need to work your way across the chart in the other direction. Knitting flat you work one way then the other, then the other, then the other. And that’s why in many charts you’ll see the odd numbers written on the right hand side and the even rows numbered on the left-hand side, to remind you which side of chart you’ve got to start. If you are knitting in the round, you always go from right to left because you’re just keeping going knitting in the same direction. You don’t reverse knitting (the direction of knitting) when you working in the round, so you don’t reverse the direction on the chart. And that’s something that’s very important to bear in mind. A lot of people when they start knitting with charts can be confused about which way [direction] you are kintting.
These columns are also numbered, and that’s the stitch into the patern repeat. It is not necessarily the same as the number of a stitch in the row. That’s basic information about all charts used for knitting. That’s the basic difference between reading them for in the round when we are always going right to left, and when we are knitting in the flat where we’re going from the right side row to a wrong side row, going from right to left then from left to right. It is just like remembering that you’ve got to knit, if you are in stockinette, you knit on the outside, and purl on the inside of your fabric.
So, that’s the generic bit about knitting with charts, and I now I’ll talk a bit about knitting with colour in charts.
This is the style of chart used in the Nahanni River pattern. It is very clear, and it’s very easy to reproduce in black and white. It’s also very useful if you’re not good at distinguishing between different colours.
In the chart area, these are the various rounds from 1 to 20, and in the Nahinni River pattern and many others these will repeat several times as you work your way up the project. Across the way you have got the various stitches, and in almost every project these will repeat as you go round. The X represents a colour [stitch] in the motif colour. In this column here, this, the blank, represents a background colour.
In the pattern it will tell you what motif colour to use for each of those rounds, and which background colour to use for each of the rounds. There is no indication on the chart itself of where those changes take place. So you need have a system for reminding yourself when you need to change colour.
There are other ways of representing information on the chart, and here’s another example, perhaps a bit more obvious. In this the grid, as before, shows you which colour to knit in, but here the colours are represented by the shading of each square, so you’ve got light green, dark green, blue, red, and for each of those colours there will be a key to tell you which colour each coloured square represents. Here I have just recoloured the monochrome one [chart]. This is quite easy to read if you using a few colours, however if you are using many different colours (7, 8, 9, 10 colours) you won’t get enough contrast in the pattern to be able to put in a close representation of the yarn you are using into the colour pattern, and you’ll find the patterns not only have colours on, but also have different styles of shading to help you distinguish between them [the colours] and, of course, the colour in the chart isn’t necessarily the same colour as the yarn. This may happen with a designer publishing a pattern, but it will almost certainly happen if you choose to change the colour scheme of the item you are [making]. Then you’ll need to remember that a red square represents a white yarn, for example.
This is the principle you are using: each square represents the colour.
Let’s go back to the monochrome one [chart]. The Nahanni River pattern is like most Fair Isle patterns in that as you work your way up then the motif yarn changes. As you can see here in this pattern there are 3 [rounds of] colour A, 3 of colour B, 3 of colour C. Three colour B, 3 colour A, 3 colour B, etc. And these repeat as you go up. If you have more than 20 ROUNDS, then you go back from ROUND 20 to round 1 when you reach that stage. Similarly, almost every project has more stitches in a round than you have stitches shown in the chart, and in that case you go from 1 to 20, 1 to 20, 1 to 20, just repeating them round as they go.
Now, when you are knitting this yourself, you’re going to need to remember when to change your motif colour and when to change your background colour. The method I use do this is to actually mark up the chart, like this. What I done here is that I’ve highlighted between the various rounds when I’ve got to change one of the colours. I used the convention that a red line means I’m changing the motif colour and a green line means I’m changing the background colour. In this chart they don’t both change at the same time, but that thick line there, I use to tell me “look and see what colours you’ve got to change”. It’s a way of reminding me.
That’s the first thing I do to make it simple to use.
The other thing that you’ve got to work out is where you start in the chart.
If your pattern is for only one size, then you would normally be starting at column 1 and going through to 20 like that. But as soon as you get any shaping you start to run into the issue of where you start in the pattern, and if your pattern has multiple sizes, you’ll often find that some of the sizes start at column one, and others might start at column 10 depending on the size. So you may want to put on markings to show where you need to start. For example, I might want to put a mark there to show that in the size I’m making I’m actually starting in column 6 every time I start a new round.
Similarly, you may not start at the first row in the chart as you start your knitting. Some sizes of the pattern might, others might not, so you might want to mark on the chart where it is that you are going to be starting, and perhaps also mark where you’re finishing in the chart, both up and down and as you work your way around the round.
It’s your chart, your copy. You can mark it up in ways that are useful to you. And of course you can mark up the colour chart in exactly the same way.
Here I have still got those colour boundaries, they don’t necessarily show up as well, but just there as a reminder saying “hey, you’ve got to change the colours”, because even as you’re working your way up you may not notice that you change colours. Unbelievable as it seems, you may not notice while you are knitting, because you get so into the pattern that you forget how to do these things.
That’s the basic way I use the [chart] pattern.
The next thing is how on Earth do you remember where you are in the pattern? That’s why I use a board. I use a magnetic board, like this one, that I can put markers on to. Or, if I am travelling and more likely to knock things, because magnets can move, I would tend to use a clipboard, and ([I keep a supply ] on the back of here) put a transparent sticky label on to show where I’m up to.
Now how do I show where I’m up to? I’ll come back to the monochrome one [chart], because it is less fussy and so easier to see, and I will hold that steady on the board with a few magnets (and, of course, the board’s on a slope so it keeps slipping).
I have this transparent magnetic marker, so if I am about to start working row [round] 8, I’ll put the marker on so that it is showing me round 8. Because this is transparent I can also see the rows that are coming up, but they’re not as important as seeing the round that I am knitting and the rounds that came before it. I’ll explain why these are important.
First of all, it should be obvious why I need to show the round that I am knitting, because I have to remember that’s where I am on the chart.
It is important to see the row [round] below because that will help you avoid making mistakes, because as I’m coming across here, I could just count 1 motif, 3 background, 4 motif, 3 background, 4 motif. What comes next? Where am I? Is it that 4 motifs, or that 4 motifs? You can then look at the round below, and you can make sure your 4 motifs there are covering the background 2 motifs, a background underneath, and the same there. So that you can check that you’ve not missed out a stitch, or put in an extra stitch. So by being able to look back a round as you are knitting on you can check that you haven’t lost your place and that you are still matching up the pattern.
Moving up the marker, either the magnetic marker on a magnetic board, or transparent sticky marker if you are not using a magnetic board, that will show you which row you’re working on. But both the transparent magnetic marker and the transparent sticky marker can fall off.
When I’m working on a pattern I will often just [make] a check [mark] against each [round] row as I am going up, and each time I do a row I’ll add a check to it, and then use a bar-gate marker, so that I can see easily which round I’m on next. Many patterns will repeat many times as you go up and, of course, the one advantage of remembering to mark it in pencil on the side is that if you do move the marker (grandchildren, pets move the marker) then you can find where you are again.
Another way of helping you remember where you are is to use a row counter, and because we’re knitting in the round the row counter won’t fit neatly onto your needle. It will push the stitches apart. You want don’t want to do that, so I just tie mine onto a piece of yarn and put that at the start of the round, so as I move through the knitting and I come across this strand of yarn, I know I’m at the start of another round and I can advance the counter. So [that way] I know how many rounds I’ve done. It’s also useful to [set the counter] so that you’re counting where you are on the chart [remembering that you may not start on the first row and may cycle through the chart several times] rather than necessarily the number of rows, because it’s where you are on the chart that’s the important thing. How many times you’ve been through the chart is quite easy to count. That’s how I can remember where I am – a bit of belt and braces approach, I use two methods of counting. You definitely need a row marker on the chart you can see where you are on the chart, and you could either keep a record of where you are by writing in pencil on the chart or you can use a stitch counter. Of course you could use all three methods.
That is the basics of how I use a chart when I’m knitting a Fair Isle pattern.
One other thing to mention is that this is not the actual pattern for the Nahanni River, this is just a simple Fair Isle style pattern that I’m using to do the illustrations for the techniques on this project. It is easier for you to see, and I’m not infringing the copyright of the pattern designer in showing you this pattern.
Cartridge rib, which is also known as corrugated rib or vertical stripe stranded rib, is really simple. It’s knit 2 in the main [motif] colour and purl 2 in the background colour.
I’ll show you how you do that. Knit 2 in the main colour, bring background colour to the front and purl it. This is just [like] standard rib: knit and purl, [but] only [with] two colours. So now you have stranded the main colour behind the purl stitches. Take your purl [background colour] back, spread the stitches out a little bit on the needle, and knit the main colour again. Bring the [background] yarn forward, stretch out again so that the stranding at the back doesn’t pull it tight, and purl the two stitches. [Return the yarn to the] back, knit the two [main colour] stitches. Bring the [background] yarn to the front, PURL two stitches.
So, it is as simple as that, but you have to remember to allow enough slack at the back. Let me show you when I do it too tightly. Here’s my main colour. Knitting 2, and now to the purl 2, which this time I am going to really tug that tight and purl these two stitches stitches, and then I am going to tug this one tight. And that one, really tight. Then I’ll finish the round and show you what it looks like when I’ve knitted [another] few rounds. So here’s that really tight area that I was pulling tight after I have done a few ROUNDS of knitting, and you can see that the tight area is narrower, and if I hold it up like this you might just see that the purl section is now sitting proud of the surface and the knit section is lying slightly depressed. This is the opposite of what you’d expect from normal rib, and also from cartridge rib (or corrugated rib) that you’d expecting to be more or less even, though. Because the strands across the back are stopping the purl stitches moving backwards (as they would in a normal rib). So, pulling too tight in corrugated rib stops it being stretchy, it also makes the purl stitches more prominent than the knit stitches. It’s not a great sin, but you might find it annoying. It certainly makes it even less stretchy than corrugated rib normally is.
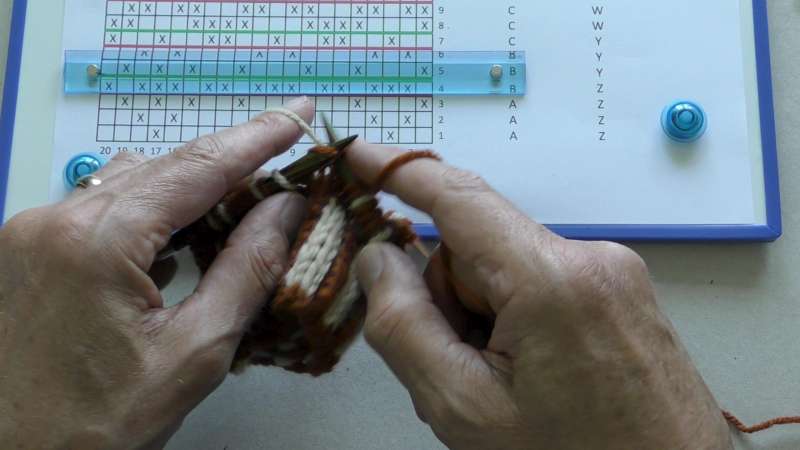
So how do you go about knitting with more than one colour?
One way, if you’re following this line on the pattern here, is to knit in one colour, the motif colour, then you swap your yarns and do the 3 stitches in that colour. Drop the yarn, pick the other one up, knit in that colour, and keep going on like that.
Another way some people prefer is to loop the 2 yarns over your finger, and then knit with the colour yarn that you are using. I have done 2 in background [colour] and now do 1 in the foreground. Now 3 in the background, and 1 in the foreground. You keep going like that.
I prefer to hold one yarn in my right hand, and one yarn in my left hand. I knit [using the] English [method] with my right hand, and continental [method] with my left hand. So it’s up to you which way you choose to knit, provided you’ve got an even tension with each stitch it’ll work fine.
I’ll continue using the [two hand] continental [and English] method, because that’s the one I normally use. Or, [rather,] the two handed method. Starting again beginning of the round, here. (And disentangle myself). Start off with the motif colour. Then 3 (2, 3) of the background colour, I need make sure that those stitches are actually sitting comfortably and not bunched up on the right-hand needle. Because then, when I strand the other yarn across, it is not going to be pulling them tight. So that’s that stitch. Being careful not to pull too tight across that earlier one. 1, 3, 1, 2, 1, 1, 1, 1, 1, 1, 1. There we have the next round of the [this repeat of the] column. And we continue on the next side.
I’ll talk you through other things I’m doing at the same time. Move up a round [so that I am at] the start of the round. The first thing I’m looking for is whether this pattern, of [1] motif, 3 background stitches, [1] motif [1] motif, 3 backgrounds, [1] motif match up what’s already on the needle. If it didn’t match up, then I’d have a problem, and I’d need to find out what’s gone wrong. So, background – now I’m doing 3 of the motif stitches here.
I’ll have to strand 3 stitches across the back. To strand 3 stitches is fine, it’s short. But if you are getting a strand like this one across a lot more stitches, one of these 6-ones down here, here you could get that caught in your finger if it is in a sleeve, and then it is not only going to pull but of course you could get your hand stuck as you put it in.
So, for very long floats, you want to use a technique to stop the float being so big, but you don’t want to change the pattern. Although there’s only 3 stitches here, the technique is the same. I’ll show you what you do.
So you knit, typically for 2 or 3 stitches, to give you a 2 or 3 stitch float (obviously here it’s only 1 stitch) then before you knit the next stitch, you wrap the yarn that you are stranding round the needle, then you wrap the main colour yarn as normal, knit it and take it off [and unwind the stranded yarn]. I’ll do that again when we come the next group of 3.
What I am looking for now – I just knit that background on on top of that motif yarn. I’ve got 2 background yarns. I’ve got 2 background yarns and 2 motif yarns. So I’m still keeping the pattern going correctly. Background yarn on top of motif yarn.
And now I’ve got to do 3 motif. Remember I am going to catch this one, I wouldn’t normally, there’s only 3, so around the back, knit the stitch as normal, take it [the background yarn] back around again, and you’ve caught that yarn, and that is the three stitches. I’ll show you how to catch those stitches again. Background stitch. I want to catch this stitch, so the background yarn around the needle wrap the yarn that we’re going to make the stitch with, and then take the background yarn back again. I will do it once more.
If you notice, I am keeping the motif yarn on in my left hand all the time. You will see this when I show you other clips as well, and the background yarn is always in my right hand. That’s to manage something called “yarn dominance”. Roxanne Richardson has discussed this in her series of colour videos, and you might want to look at the URL on the screen [also in the links section of these show notes] to find out more about yarn dominance.
Back to the knitting. We now need another group of three. So again I’ll show you how to catch the stitch. Wrap the yarn you’re stranding round the back, make the stitch as normal, and take the yarn back again. And that’s caught it at the back of the piece of work. That will stop it catching on your fingers, By stopping the strand becoming too long. I’ll continue to the end of this ROUND and then you can see on the next that we have got three background-colour stitches. I’ll show you how to trap the motif [yarn] when we get there.
Here we are back at start of the next round and we got a run of 3 background colour stitches here. Remember you don’t need to trap floats on only 3 stitches. When you get up to 5, 6, 7, 8 or more than that strand becomes longer and you can catch your fingers in it on the garment. It also means that is more difficult to have the right tension on that strand. There is a tendency to make a too loose or too tight in the finished item.
I’ll show you how to strand, to catch a strand of foreground colour [the yarn I am holding in my left hand – it is the fact that it is in the left hand that is important]. So, the first stitch is foreground colour. The next stitch is background. We want to trap the foreground colour this time, so you go to make the stitch, but before you use your background colour, just slip the motif yarn across the top of the needle.
I’ll show this again. You insert the needle, just lay it [the motif yarn] across the top, so you are winding it in the opposite direction than you would if you were knitting a stitch, you then form the knit stitch with the background colour, take motif colour back over the end of needle again, so it’s just lying over the top of the background yarn, and you have made a stitch and caught the [motif] float.
I’ll do that again at the next run of 3. The first stitch is normal, the second stich is started as normal, put the motif yarn over the needle, form a stitch, take the motif yarn back, and continue knitting. So, to catch the right hand yarn, you would wrap it round the needle before making stitch with the other yarn, and to catch the left-hand yarn, place it over the top of the needle before making the stitch.
And that’s it for trapping the yarn. I’ll just finish this round.
I’ve now finished round 6 and I’m about to start round 7. On this round I’ll show you how to find some simple mistakes, and how you can correct them.
So we are starting round 7 with 2 [stitches in] background colour, followed by [1 stitch in] motif colour. And that should be background, motif, background, motif in row 6. But what I’ve got here is background, background, motif, background. So, just check the front to make sure we have got a row of stitches there, and to make sure that the floats are going as you’d expect [on the back]. The background colour is being carried across, and the motif colour has been knit there, We’ve got to correct these two stitches here.
So, on row 7, I start off by knitting a background stitch. This stitch is a mistake. So you want to drop that off the needle, and the next stitch is a mistake, and we want to drop that off the needle. The reason I’m doing both stitches at once is that it has now released a length of yarn from that stitch and from that stitch. So now, if I transfer this stitch here, the one that’s got to be a motif stitch, to the needle I can now knit that and I’ve used up that spare yarn, and that second stitch. And the next one has got to be in the background colour, so I will bring up that background float, and put it there.
So that’s round around 6 corrected to those two stitches, so I can now continue with round 7, which is 2 background colours, followed by a motif on top of a background. We now have two background, the first on motif, background, background, followed by 2 motifs on top of two backgrounds. Motif, motif, and the are both on backgrounds. Now 2 backgrounds.
The first on background, and, oh, the next one is on a motif but we have got a background colour here. What’s happened? Well, this one slightly different. You can see here, coming back a few rounds, those 2 stitches and those 2 stitches are in the same round, [but] that stitch and that stitch are in different rounds. This one is stretched, and that’s because, if you look on the back, the working [motif] yarn of the previous round. I’ve got that strand being floated there, and also the background colour is being floated. So I slipped that stitch rather than knitting it. I just need to go back and check what colour I need on there, and it should be the motif colour. Just bring that motif up here, that’s the strand from the back, knit that and now we are in the position to knit the second of those background colours. So I had slipped the stitch rather than knitting it, and that would be because I didn’t catch my motif yarn when I should have done, and ended up just slipping the stitch across.
Now continue with the round. We need motif on top of a background, 2 background with 1 on a motif, and 1 on a background. 2 motifs on the background, 2 background with the first on a background and second on a motif, now a motif on a background, followed by 2 backgrounds, 1 on a motif and 1 on a background, followed by a motif.
We’ve now done that first pattern repeat on that round, having have made a few corrections on the way across. The reason we can make those corrections without having to unpick everything is there we were only talking about one or two stitches having to transfer from one colour to the other, and in one case we just had to switch two stitches around, so we weren’t using up very much yarn. If you were to have to switch a run of stitches, you need to frog back because otherwise your motif or background colours would disappear as the yarn became very tight, as it stretched to make up those extra stitches.
At long last I’m going to show you how my project is actually getting on, knit with the real pattern and the real wool.
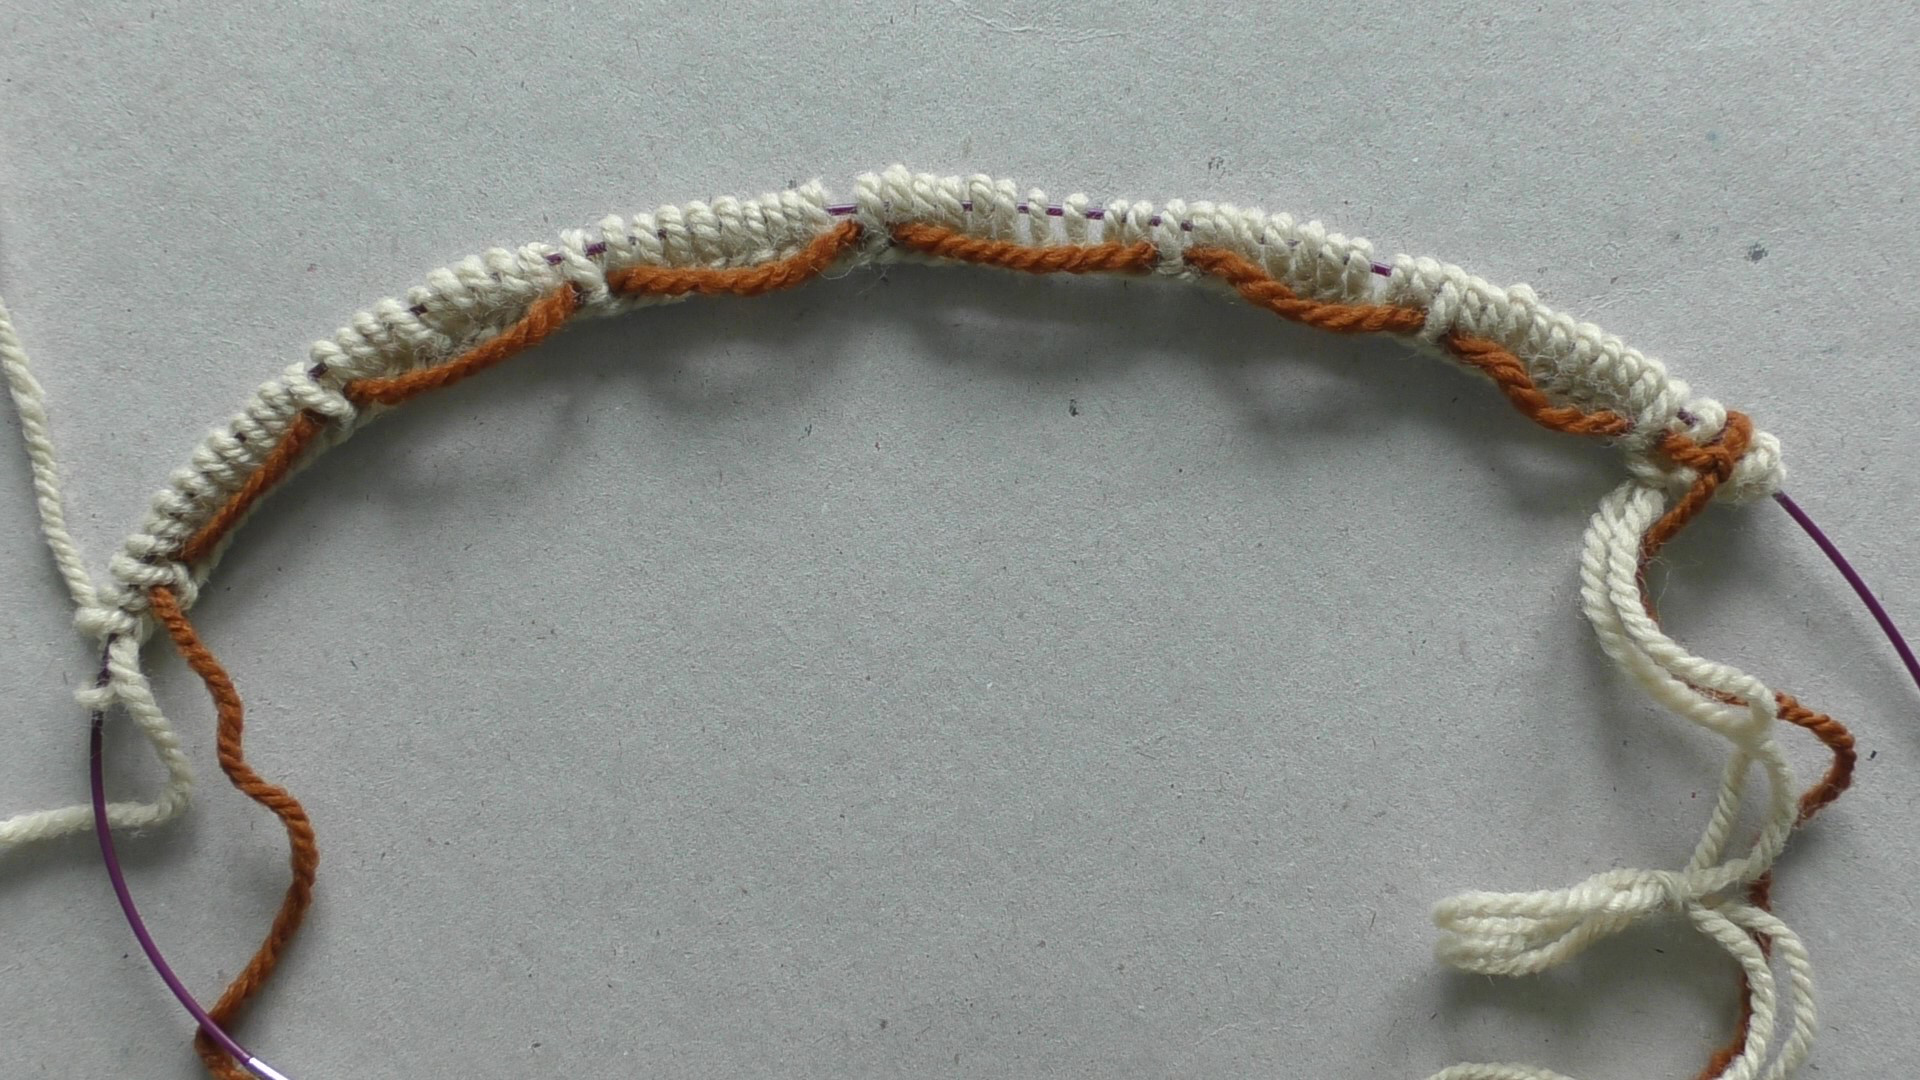
What we’re looking at here is the bottom part and around the cast-on area. So here it is the cast-on and here is actually the start of the round where the cast-on and cast-off finished. That’s why there’s this clump of wool here, that’s the cast-on wool [ends to be sewn in]. You can see round here the marker yarn that I used to help me count the number of stitches I had, and I also used it to help prevent me twisting that cast-on edge as I joined in the round.
It starts off with a section of cartridge rib and, as with most traditional Fair Isle, you can see here that the colours vary as you go up that rib section. In this case it’s the motif colours that are varying.
When you finish the rib section there’s a change in needle size. It’s one of the things you can forget to do as you’re going along. I remembered this time, and then you start into the pattern section.
To help me with the pattern I’ve put in a few stitch markers. As we work along the round, the first stitch marker I put in this one at the centre of the front of the vest. This is going to be at midpoint. It’s going to be the base of the Vee as you form the V-neck. This will help me check as I do each round that the correct column of the motif is occurring at that point. It is another those cross-checks that you can do to make sure that you’re not drifting off in the pattern.
Then the next stitch marker is at the edge of the front, so this as you are looking at the wearer will be the right hand side of the wearer. The size I’m knitting asks for an extra stitch to be put in there, and I’ve made that extra stitch look like a seam by purling it all the way up, and, regardless of where I am in the stitch pattern, I’ve made it a background colour. The reason for that is I wanted to create this appearance of having a seam there, and because it’s a purl stitch it is also another reminder to me that I have reached the end of one set of colour of pattern repeats, and it’s time to start the next set of pattern repeats. That’s also going to be where the steeks for the armholes are centred.
Then we come round to the centre of the back, and I’ve marked the centre of the back with another stitch marker. The centre stitch is actually the one to the left of it, and again it is so I can make sure that I’ve got the symmetry opf the pattern; it’s also where any shaping for the back of the neck is going to be taking place, centred on that.
Then the final stitch marker is at the end of the round to tell me I’ve reached the end of the pattern, and I have almost reached the end of the round, I’ve got to do another additional purl stitch to form the pseudo seam on the wearer’s left.
You’ll see that I’ve been cautious. I’ve not left this [piece] on the needles; I put the end stops on. That way I won’t accidentally slip the stitches off while I’m showing them to you.
What I have here is this stitch counter that I’m using to do my double check that I’m on the correct row, and if you’re eagle-eyed, you can see it is showing 48, which means, in the convention that I use when using a stitch counter, (that the stitch counter shows the number of the last round/row that I have completed), so if it says 48 I know that I should be starting on round 49.
What I am also doing with this particular pattern, because the pattern refers to either the length that you’ve knitted or it refers to the round number in the chart, I reset the counter when I reach [the top of the chart and] have to cycle through the chart vertically, so that the number on the stitch counter matches the number on the edge of the chart. It’s pretty obvious how many times you’ve gone through the chart and repeated it, so that’s another thing I’m going to use to make it easier to see where I am.
So the way I’m marking my progress through the chart is that I’ve got a magnetic marker that I move up the chart as I knit, and I’m also advancing the stitch counter every round I do. If I were travelling with this, I would also mark on the chart each time I finished a ROUND, because that row marker is going to slip, or I could catch the stitch counter.
The other thing that you need to do (obviously) as you check as you’re going along, is to check as you knit that the pattern that you should be knitting into, so the round before the one that you’re working on, actually matches up what’s in the chart, because I can (you can) forget to advance your stitch counter, you can forget to move your magnetic marker or, of course, they could get shaken or change for some other reason. So you want to do lots of cross checks, because the last thing you want to do is it unpull all this.
If I show you the inside, let’s start with the worst bit first, here is the beginnings of the rounds. Here is where I’ve had to change the yarns, and the yarns are all at the end here. You can see from the way I’m having to tug to pull them apart that the yarns are starting to stick together. What I will do in the end is weave these yarn [ends] in. I could have woven them in as I was going along, but I felt that, although it would mean a lot of work [at the end] not weaving them in as I go, there are advantages in weaving them in at the end, So that’s what I’m going to do.
I’ll just finish turning it inside out for you. You have seen the pattern from the outside. Here is the pattern from the inside, which I’m pleased is nice and even, and there are no very long floats in here. You can see in this area where I’ve caught floats where I was having a particularly long run in the pattern.
So that’s my progress.
As you saw on the stitch counter I’m 48 rounds into knitting that pattern, and I’ve got a fair way to go before I reach the neckline, which is where I’m going to be introducing the Vee for the neck, and come across the armholes, each of which is going to need steeking, which will have its own particular preparation for it.
For those of you have never come across steeking before, steeking is a technique where you can keep continuing knitting in the round, which is a lot easier than having to stop, and particularly to stop you having to change from knitting in the round to knitting backwards and forwards, because knitting backwards and forwards your tension is often different from knitting in the round. So it [steeking] has got a big advantages. It does mean, though, that you have to cut your knitting, which is something that needs a little bit of courage, but only the first time you’ve done it. Once you’ve done it you’ll discover that the wool holds together nicely. This is the wool that I separated before, and you can see that it is already starting to cling together a bit. That’s reassuring for when it comes comes to doing the steeks.
So, here is my project. This is where I have reached. I’ll put the camera away, and take it out again when I’m ready to start that steeking, and I’ll do an episode based on how I’m doing the steeks.
That’s the progress I’ve made with the project so far. I talked about how I’m using the charts for the colour work, how I knit with two colours, how I did the cartridge rib, and how I am knitting the Fair Isle pattern.
In the next podcast I’ll be talking about how I’m doing the steeking for the project. In the meantime, the show notes for this podcast are at the URL that you can see on the screen.
Until the next time, Happy Knitting!
Show notes for the marker thread for cast-on and joining in the round tutorial.
Continue reading “Marker thread for cast-on and joining in the round (T201904)”

Continue reading “Twisted knit half-hitch cast-on (T201903)”
Also known as: German twisted cast-on, Old Norwegian cast-on
Also known as: Fair Isle, fairisle, stranded colorwork.
Also known as: Stranded Ribbing, Cartridge Rib, Corrugated Rib, Two-colour Basque
Also known as: Swatching for circular knitting.