
Show notes for the marker thread for cast-on and joining in the round tutorial.
The underlined headings below are links that take you to that section in the YouTube video for this tutorial.
Paste and format the text from the script below.
Introduction
Hello. I’m Steve, also known as Teabreak Knitter on social media
In this T-torial I will be showing you how I use a marker thread to help me count my stitches at cast-on, and also to help me join in the round without twisting the cast-on edge. I hope you find this useful.
Preparing the yarns
I’ll show you how I cast-on in the round when I am working on a piece that has a very large number of stitches. I’ll be using a twisted knit half-hitch cast-on.
For this demonstration, because I will not [actually] be casting on a large number of stitches, I will also be using the magic loop for the circular knitting.
You can see here that I’ve got three yarns. This top yarn is the working yarn. It will go on to form the fabric.
The twisted knit half-hitch cast-on is a member of the long-tailed family, so I need a tail yarn. I’m using a separate ball of yarn of the same type as the working yarn for the tail end. The reason for this is that if I cast-on a very large number of stitches I don’t want to run the risk of running out of tail end because I’m not left enough room [tail end yarn].
The third yarn you can see is a marker yarn. For the purpose of the demonstration this is the same size as the working yarn. I would normally use a thinner yarn (and) a smooth yarn because it doesn’t play any part in the actual fabric, it is just there so I can see where the edge is and to help me count the stitches. If it’s smooth is easier to pull out from the finished item.
I want to remember which is the working yarn and which is the tail end yarn, so I’ll just slip a stitch marker onto the tail end. It doesn’t have to be removable marker, because before I start knitting the body of the fabric I will be snipping off the tail end yarn, so the marker will just fall off the end.
Normally with a long tail family cast-on you’d use a single piece of yarn to form both the working yarn and the tail [end]. The first step is to make that single piece of yarn [from the two strands], and to do that I leave enough [extra yarn] to sew in the ends, and make a slipknot just to join those ends together. I’ll then place this on the needle to hold them [the ends of the working yarn] and so that they don’t slither all over the place.
[This is] the marker yarn, I don’t need to sew in the end of this, but I want to stop it moving around. Again I’ll create a slipknot and put it over the end. That’s just held in place, so that I know where it is.
Adding an extra stitch for the join
Because I’m using the decrease type of join I need to create a stitch that I’m going to join with the last cast-on stitch. So just need to create a simple loop so that this, which would be tail end if I were using a continuous piece of yarn, is at the needle [tip] side of the loop. So, a little loop with the working yarn coming out from behind the loop.
Place the marker thread in the cast-on
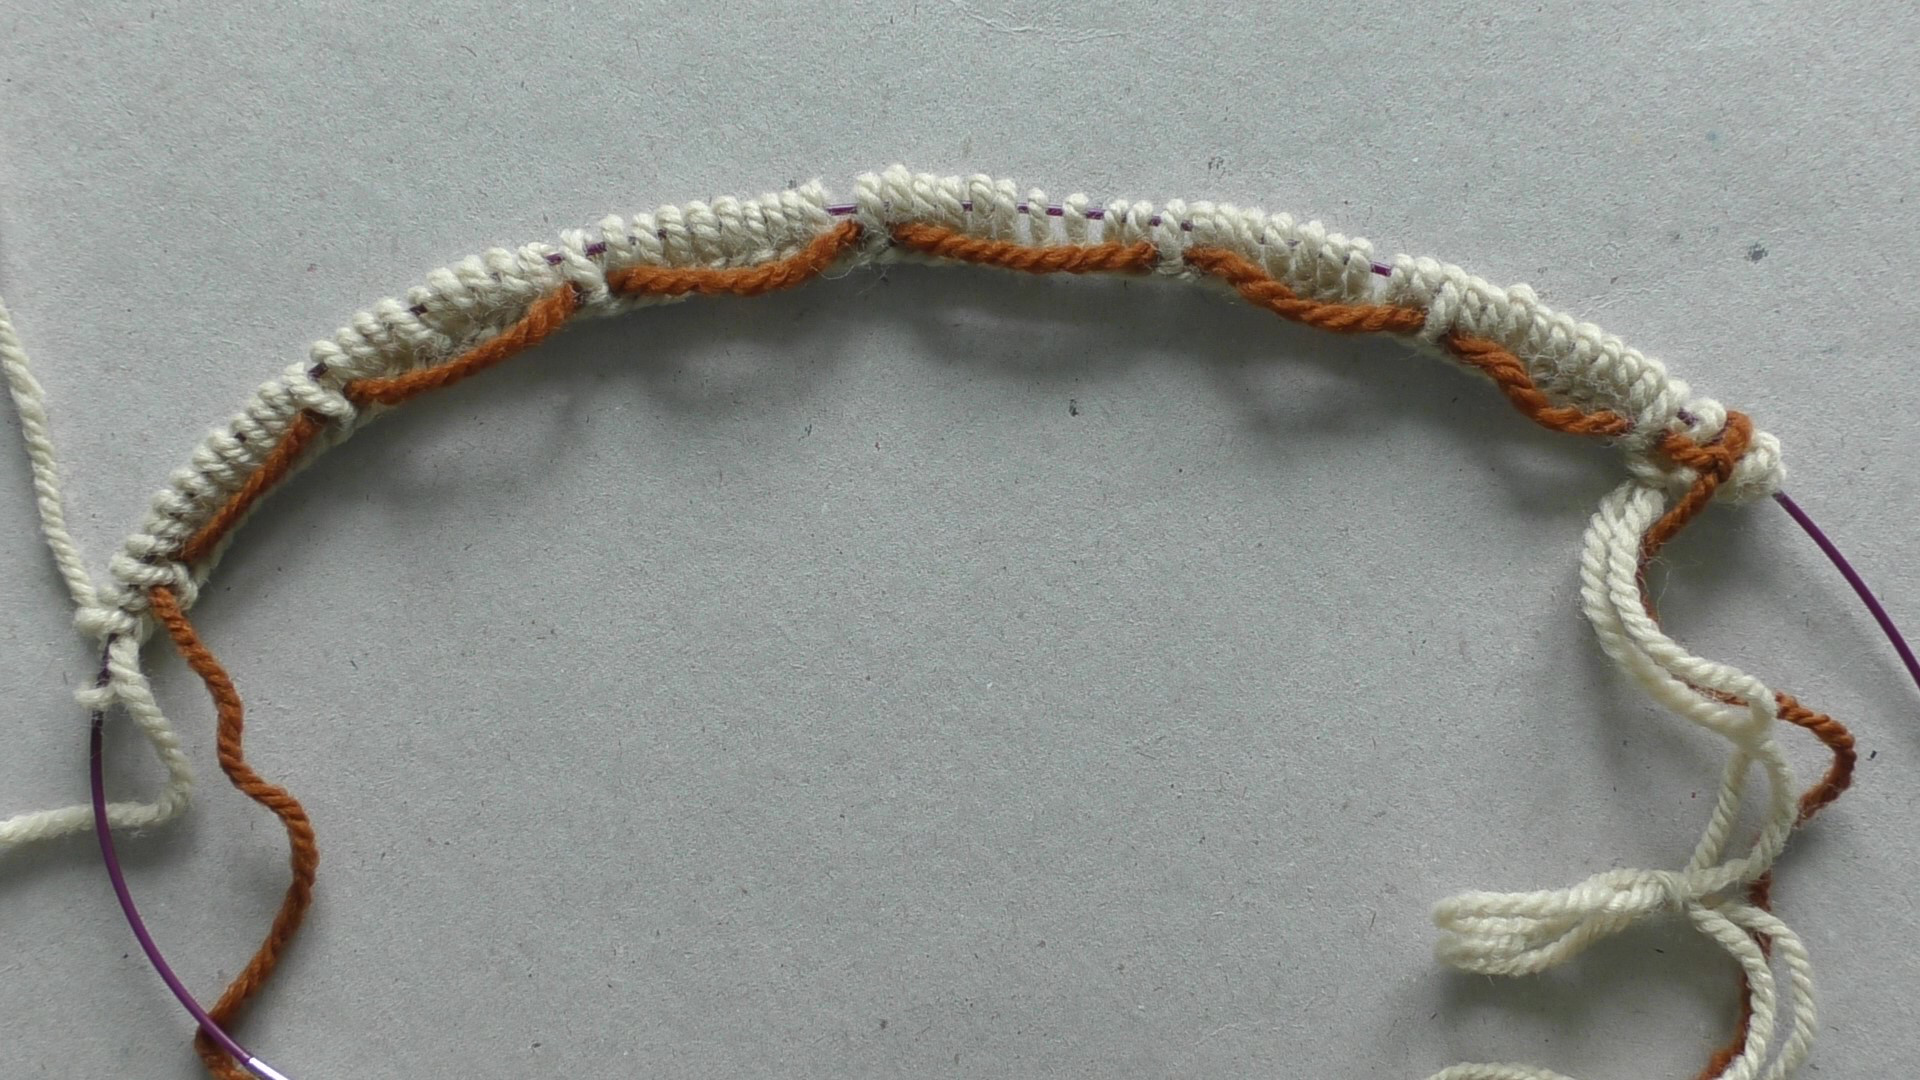
I now need to start casting-on. I’m going to cast-on and place a marker every tenth stitch.
I start my cast-on: 1, 2, 3, 4, 5, 6, 7, 8, 9. I want to mark every tenth stitch. I’ll just bring the marker [yarn] around here, wrap it round the end, placing it behind there [on the far side of the work], and then I cast on the tenth stitch. And bring it [the marker yarn] to the front.
And again. 1, 2, 3, 4, 5, 6, 7, 8, 9. Place the marker stitch – 10.
That’s 10, 20 stitches cast-on. I will continue until I have cast-on 64 stitches.
I have now cast-on 64 stitches, plus one extra stitch [the initial loop] to make the join.
Knit the first pattern row
We now have to join those in the round.
First I’ll explain the orientation of what I’ve got in front of me. Here are the last stitches I cast-on. Here, the 4 after the [marker for] 60. This is the working yarn that I’ll continue to work [with] on the fabric. Here is the tail end that I now just need to keep and weave in. Here’s the end of the marker yarn. This is the other end of the marker yarn, where I started the cast-on. And here are the working thread and the tail end from the start of the cast-on. They just need to be woven in later on in the project.
As you can see, because I cast on far fewer stitches and called for in the pattern [that needs a large number of stitches], these stitches don’t go right around the needle. Therefore I’ve got to use magic loop technique in order to join [the start to the end of the cast-on edge].
What I want to do is take the working yarn that I’m going to continue [to use] and put that round the back. So the stitches I’m going to knit into are here at the front. Also I want to use the magic loop, so I need to bring a loop [of the cable] through here so that I can get the working stitches close to the ones at the back. (I’ll just untie [untangle] the needles)
The other thing I’ve got to make sure [of] is that I haven’t twisted the knitting around the needles. This marker thread has got to go neatly around the bottom. It does that. As you can see here it is all the way down the bottom. It makes it easy to spot if I’ve twisted the [cast-on] stitches – like that – because you suddenly lose the marker.
When I did the cast-on I just held working yarn and tail end with a slipknot. I don’t need that slipknot anymore, I have finished with that. And I also held the marker yarn with a slipknot just to keep it out of the way, so I can get rid of that [too].
I’m now left with (here is) that additional loop. That’s going to be used for making the join. I insert my needle needle purlwise into that [loop] and take it onto the cable so it’s sitting here with the other stitches on the far side [cable].
So now I am just going to start working the stitches. In this case I’m going to be working in [2×2] rib. Knit 2, give that second stitch a bit of a pull. Purl 2. That tug [pull] was to help avoid laddering. Knit, knit, purl, purl.
Join the ends of the cast-on row together
I’ve now reached the point where I’ve got four remaining stitches plus that loop on my needle. I just want to knit, knit, purl. And here’s the final stitch and the loop. I want to join these together in a decrease. Because it’s a purl stitch, it is a purl decrease [p2tog].
Knit the second row of the pattern
I’m ready to start the next row as knitting.
Yet again, I just need to check that I’ve not twisted the stitches [cast-on edge], and so I check that the marker thread is all the way along the bottom.
What I can do is just pass the marker thread through there because, you may remember, I didn’t have it going through at the start of the knitting.
I’m putting the stitches on the needle to receive them, and pulling the thread (no, pulling the cable), so that the stitches on the back are now on the cable.
And we start again.
Here we are at the end of the second round, all ready continue knitting with the rest of the pattern. That was my cast-on and join in the round for a project with a large number of stitches.
Summary and show notes
That’s how I use a marker thread to help me count my cast-on stitches and help me avoid twisting the cast-on edge when I join in the round. The show notes are at the URL that is shown on the screen. Until the next time, Happy Knitting!
T-Reference
You can see a pictorial tutorial for the basic stranded cast-on in the T-reference section of this website