
This T-torial shows how to pick-up and knit stitches along the edge stitches of a steek. It shows how to do this using two needles, a crochet hook and a needle, and with a single needle. This method helps the steek stitches to lie flat against the body of the fabric.
Show notes for the T-torial “Pick-up stitches at a steek” (T202003)
The underlined headings below are links that take you to that section in the YouTube video for this tutorial.
The following text is a transcript of the spoken words on the video.
Introduction
Hello. I’m Steve, also known as Teabreak Knitter on social media.
In this T-torial, I want to show you how I pick up and knit stitches at the edge of a steek. I do this if I’m creating a button band, for example
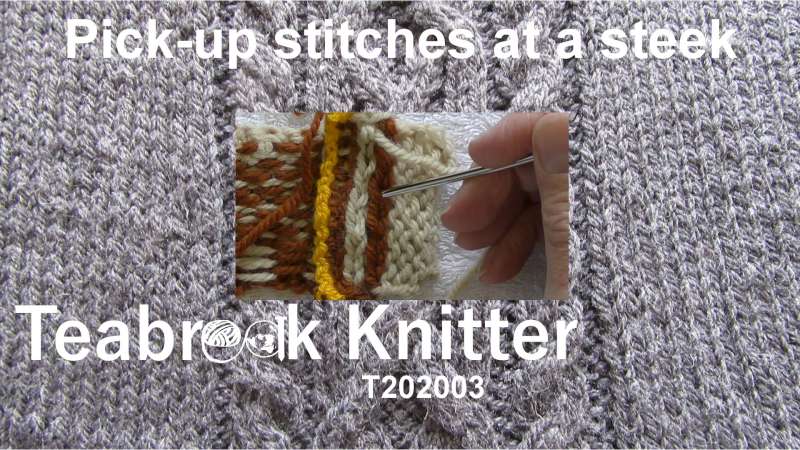
I want to show you how I actually pick up the edges. I would normally do this before I had cut the steek. I have reinforced the steek. I then pick up the stitches, start knitting from there, so [only] a few rows of knitting, and then cut the steek. (Not when I have completed the complete sleeve or something, but when I have got enough rows in there that I’m not going to be pulling and stretching and stressing the cut edge of the steek). I then cut the steek and continue [knitting]. The reason for not cutting the steek until I’ve started knitting the picked-up stitches is that the act of picking up is actually very stressful for the knitting. You are pulling the stitches and I don’t want to pull that steek out. I’m probably being far too cautious. However, in this demonstration, to make it easier to see what I’m doing I’ve already cut the steek so you can see where pick-up stitches are in relation to the centre of the steek and the rest of the knitting.
Three ways of picking-up stitches
I will now show you I do that.
I have here a swatch that is ready for picking up stitches. Normally, if it were a real project, I wouldn’t have cut the steek.
Here is the cut edge. I wouldn’t have cut the steek, until I had both picked up the stitches, (and here’s that edge stitch that I’m going to pick up stitches from), and knit a couple of rows of the picked-up fabric, and only then would I have cut the steek. The reason I would have waited is because, when you pick up a stitch, you put extra stress on the stitches next to it, and by waiting until after you cut the steek you are reducing the [already] low risk of pulling out stitches through your reinforced edge. But, it is going to be easier to show you using a swatch that has already been cut.
I’m going to show you three ways of picking up a stitch, [to produce exactly the same result]. When I say pick up a stitch I’m going to pick up and knit the stitch.
This is the edge stitch row [column!] that I want to pick up. I have knit from bottom to top.
I have here the steek, so the edge stitch, and here are the steek stitches.
I want to pick up so that my knitting comes out from this position, so that the edge of the garment or fabric is there, and the new edge grows out from that point onwards.
Pick-up using two needles
The first approach I want to use, that I would like you to see more clearly what’s happening, is I’m going to use two needles.
I’m using a [silver metal] needle smaller than was used to knit the fabric. This is going to help me lift the stitches, and here is the [black with silver tip] needle that I’m going to knit on to. And again, in this particular case it’s slightly smaller than the one I used to knit the fabric. Sometimes you might want to do this because it makes it easier to adjust your stitches from that, on the first round you knit after when the one you pick-up.
I’m going to knit and wrap my yarn as usual. I’m holding the yarn in my right hand, because I will be doing most of the manipulation with my right hand.
Here is that first stitch, that first edge stitch, the first stitch in the steek. I’m going to push this needle right the way through [under] that stitch [under both legs] and also catch the float underneath. That’s to hold the stitch, so that I can now put my needle in and knit the stitch.
Do that again on the next one. Put the needle in [under the edge stitch] and knit the stitch.
Now, because this is stockinette, you use a pick up ratio of 2 to 3, I am going to skip a stitch. This time I’m going to pick the stitch up differently.
Pick-up using a crochet hook
I’m going to use a crochet hook.
Put the crochet hook through, underneath that edge stitch. pull the yarn through and put it [the new stitch] on the [needle].
Again, pull the yarn through with the crochet hook and put it on your needle. You want to mount it on the needle so that the working yarn disappears off across the back.
Pick-up with one needle
The third way I want to show you is just to use the right hand needle.
Push it under the stitch and pull the yarn through.
I’ll do that again. Lift that stitch with the needle, push [the needle] through and knit [the stitch].
I’ll come up a bit closer to the camera this time.
Missing out that third stitch because of the 2 to 3 ratio.
Put the needle through, wrap, and pull it through.
And now the final stitch. Put it through, wrap, and pull it through.
How the pick-up works
What I’ve actually done is gone up there [along the column of edge stitches], I have created my stitches to knit on the needle by pulling the yarn through [behind] the back of this edge stitch.
You can see here, if I hold this very tight like that, you can see that here is the yarn, the working yarn, [running thread] and it comes through, so it’s holding the front and the back, on the left and the right, of that stitch together. (It gives things a bit more room to move if I put the stitches onto the cable.)
On this side we have got the stitches, and on that on that side we have the purl bumps looping themselves round the yarn of the steek.
How the picked-up fabric lies
So that is how I do the pick-up for a steek.
Now let me show you why do it like that. Here I’ve got a swatch where I have picked-up from a steek at each end.
Looking at this [from this angle] you can’t really see much difference.
If I hold it flat, again you can’t see much difference.
But if I put down like this, all of a sudden you can see that this edge, in this light pick-up, is lying flatter than this steek, with the dark picked-up edge.
The difference between the two is that I picked-up this end [the light colour] knitting through both sides of the edge stitch. If I fold that back, you can see the purl bumps lying underneath the edge stitch there.
On this [the darker] side I picked-up as you would do with a selvedge on a flat piece of knitting in which you had knit across in stocking stitch, turned at the edge and knit back in stocking stitch. There you would pick-up through the gaps between the first stitch and the edge, If that were the edge, you would pick up your stitch through there. Picking up like that the fabric doesn’t want to lay as flat, it’s not being turned by your pick-up.
So when you picking-up a stitch if you knit under the edge stitch so that your new stitch is formed on this side and your purl bumps are that side, underneath the loops of your edge stitch, your steek will naturally lie flat. Whereas, if you pick-up between the stitches, as you would normally for a stocking stitch edge, the steek doesn’t lie as flat It turns up, but it doesn’t turn back on itself, it’s not as flat. So this is going to form a smoother inside your to your knitted fabric and it’s going to lie flat, even if you don’t catch the stitches to hold them to the fabric.
That’s me, picking up my stitches at the edge of a steek.
Summary
So, that’s how I pick up and knit stitches at the edge of a steek, and I have also shown you why I do it that way.
I hope you found this useful.
Until the next time, Happy Knitting!
T-Reference
You can see a pictorial tutorial for the basic stranded cast-on in the T-reference section of this website.
Helpful links
- T-ref: Picking up stitches at a steek edge
- YouTube playlist for Roxanne Richardson's Techniques Tuesday posts on picking up stitches.
- Roxanne Richardson Techniques Tuesday video on the meaning of "pick up stitch" terms.
- T-torial on picking up stitches at a steek edge.
- T-reference article on steeks