
Steeks are used when knitting in the round to allow arm holes, cardigan openings and other cuts to be made in the fabric. This T-torial explains how to use the crochet technique to reinforce steeks, so that the loose ends at the cut do not pull loose.
Show notes for the T-torial: Reinforcing a steek with crochet (T202001)
The underlined headings below are links that take you to that section in the YouTube video for this tutorial.
Introduction
Hello. I’m Steve, also known as Teabreak Knitter on social media.
In this T-torial, I want to talk about how I use crochet to reinforce the steeks in my knitting. I’ll be talking about reinforcing a steek with an even number of stitches, and I’ll be talking about reinforcing a steek with an odd number of stitches.
Steek with an even number of stitches
I’ll start off by talking about reinforcing a steek with an even number of stitches.
I use steeks like this particularly when I’ll be changing colours in the middle of the steek, so where the steek is it is at the beginning of a round. By using a steek with an even number of stitches I can make sure that I catch both the old and the new colour yarns at the steek so they don’t become unravelled.
Structure of a steek with an even number of stitches
Here’s how I reinforce an even number of stitches in a steek.
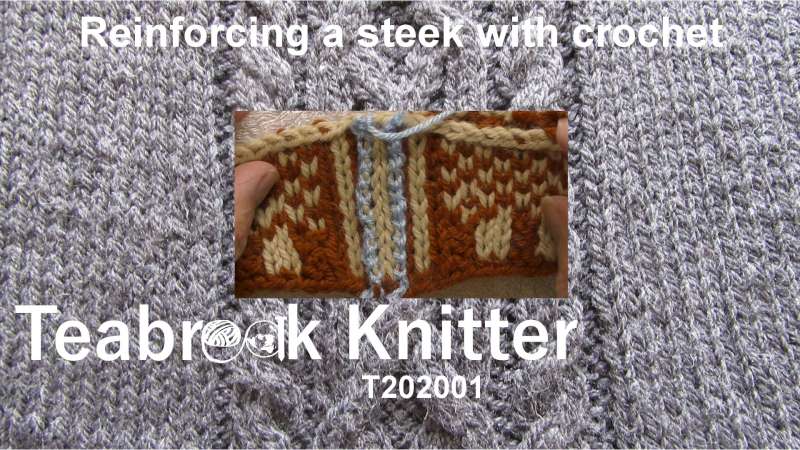
Here is the swatch that I am going to be using for my steek. As you can see, in the centre here I have two rows (two columns!) with the same colour, and that is the convention I have used to mark the centre of my steek. The steek is eight stitches wide. Here are the extra edge stitches that will be used to pick up a button band or any other knitting that needs picking up.
You’ll see here that I have started off the swatch in corrugated rib [cartridge rib], but the steek itself is in stocking stitch, even in that section. This not only makes it easier to see the steek and to reinforce it, but also means that after the steek is cut that fabric will lay flatter than it would do if it had a texture itself.
The purpose of the steek is to hold the yarns in place near the cut, so that any stresses and strains will not cause it to unravel. Using traditional Shetland wool or other “sticky” wools, that steek will soon felt itself after use, and some would argue that it’s not necessary to reinforce steeks. But I always do.
As you can see here, the steek has two colours going across it in the knitting, so there are going to be two cut ends that we have to secure. If you have [a steek with] an even number of stitches you want to tie, on the right hand side here, this left hand leg to the right hand leg of the column of the adjacent colour. That will firmly attach those two stitches to each other, and those [yarn] ends to each other. Similarly, on the other side [of the line to be cut], you join the left-hand edge of the central stitch to the right-hand edge of the stitch next to it.
I’m going to use a crochet technique for fastening those two stitches together. Some people who are confident with a sewing machine will use a sewing machine zigzag [stitch] to sew those two columns together, to tie those columns so the yarn doesn’t pull out. Or, if you prefer, you could hand stitch those two columns together.
Reinforce with crochet a steek with an even number of stitches
I’m going to show you the crochet technique.
The first thing I want to do is create a slip knot so that the crochet chain can be started. So I wrap the yarn round my thumb, put it onto my finger, and put that working yarn through the loop and pull it tight. So, I have now got a loop there.
It’s easier to work so that you working across your item [rather than up-and-down], and I’ll be working from right to left because I’m right-handed; if you are left-handed you might prefer to work in the other direction.
The first thing I want to do is to make sure I catch the cast-on [or bind-off, if I working from left to right] edges. So I can put the hook through both those stitches, wrap the yarn round it, and bring it through. You will notice that I’m using a thinner yarn than the yarn I used to knit the swatch. This avoids adding bulk to the steek. Having pulled it through you can make a loop. That’s the cast-on edge caught.
I now want to catch that stitch to that stitch, so I go across.
We start off and the first two are in the same colour. I push [the hook] under that leg, the leg that is closest to me, and up under the leg that is furthest from me. Wrap the yarn around the hook, pull it through, pull that through, and another loop, and pull that through. So we have now trapped that yarn there.
I’ll see if I can give you a closer look at that. You can see there that the yarn is trapped.
We now go on to the next stitch. I have changed the yarn to the other hand because I have now got an established loop. So I go under the far leg of the stitch that is closest to me, and through and up under the stitch that is further away from me. Under that first leg of the stitch, pull it through, and then catch again, and pull it through again to make sure everything is bound tightly.
I’ll show you that step by step. The next stitch. Here’s the second stitch away from the [centre of the] steek. Go under the far leg of that, keep going under and then [past the first leg] and [up] through the [centre of the ] of the stitch next [to the centre of the steek]. Hook the yarn with the crochet hook, pull it through both stitches, and then pull it through the loop that is already on the hook, as you can see you have still got those stitches free. You now pull that loop through there, make another loop and pull it through, and you have now trapped those stitches.
Keep going like that all the way up the steek.
At the top here, just tucked under the cast-off [bound-off] stitch, here’s the final pair of stitches. Down, up, catch the yarn and pull it through, pull it through that loop, catch it again, and pull it through that final loop.
And now we have now reached the cast-off edge. So now I want to catch those loops as well. Put it [the hook] through both of those loops, catch the yarn, pull it through, pull it through the loop on the hook, catch the yarn, pull it through that loop, and you can see it has now caught those stitches. Now we can snip the yarn off, then continue pulling it through the loop as you would for [binding-off in] knitting. You have now trapped that edge with a crochet chain.
Repeat for the other side of the steek
Now we need to work down the other side. I want to join that column of stitches to that column of stitches.
I start off again, making a slipknot, I’m putting it on the hook.
This time, these are the two [bound-off] stitches I want to catch, [I will show] what you do with cast-off/bind-off stitches stitches. Again, catch a loop, pull it through, and through that stitch. Make another loop and pull it through, and we’ve caught those stitches.
Push it through, down the far one, move the yarn over the other side, catch the yarn, pull it through, pull it through the loop that is already on the hook, and then loop it again, and pull that through the [loop on] the hook.
We work our way down again.
And here I am, down at the last stitch again.
Now I just need to trap the cast-on edge. It’s this loop and this loop. Making sure I also use the right thread. Pull that through, make sure that I have caught them. I can now cut that thread, and pull it through.
So, there’s my steek. It is now reinforced with a line of crochet either side of the centre. You can see the centre “stitch”, which is where it is going to be cut. That’s how I reinforce a steek with an even number of stitches.
Reinforcement with crochet of a steek with an odd number of stitches
If I’m using a steek with an odd number of stitches, its reinforcement is basically the same, but you do it in a slightly different place. Instead of having two stitches in the middle you only have one stitch along the middle. This gives you shorter ends, but it does mean that if you change colour there, it is more difficult to make sure that you’ve caught both the colours on each side of the steek.
This is how I reinforce a steek with an odd number of stitches.
Structure of a steek with an odd number of stitches
I have here a swatch that has got a steek with an odd number of stitches.
Here the two edge stitch columns and I’ve got 1, 2, 3, 4, 5 steek stitches. Here is the central line of the steek, and the cut will be made along the centre of those stitches.
The swatch itself has got a few rows of corrugated rib followed by stocking stitch in colour work, but you’ll see that the steek stitches themselves are stockinette all the way up. This will help it lie flat, and also makes it easier to identify the steek.
I’ll be starting off trying to join these two columns together, so [join] the left-hand leg of the central stitch to the right-hand leg of the stitch to the left of it and of course I need to also catch cast-on and bind-off edges. On the other side I want to join the right-hand leg of the central stitch to the left-hand leg of the column to the right of it, and again the cast-on and bind-off edges.
I start by making a slip knot where the bit you can pull and adjust it is going to be the working yarn. And put that on the crochet hook.
I want to start off, here’s that central stitch, I want to start off by making sure I’ve caught the cast-on properly. Put it through that stitch, if it was a two colour cast-on you would need to make sure you also caught the yarn that has been floated across the bottom. You can then catch the working yarn, pull it through, and pull it through the loop that’s already on the crochet hook. Then catch the yarn again, and pull it through. What that has done is that it has tied itself around that stitch to catch it.
We now start working our way up.
Down through the nearer [stitch under the far leg], up through the central stitch, catch the yarn, pull it through the loop, pull it through the stitches and then through the loop on the hook, catch the yarn again, and pull it through the [loop] that is on the hook.
I’ll show you again. This time we have got the colours that help us [see the stitches]. Through, down through the stitch closest to us, up through that central stitch, catch the yarn, pull it back through the stitches, (I’m not very good at crochet), and pull it back through that loop that is already on the hook, catch the yarn again, and pull it through the [loop] that is on the hook.
Now, I will try and show you that a bit closer for the next stitch. I’m going to go down through this stitch, up through the central stitch, catch the yarn, pull it through, then pull it through that loop, catch the yarn again, and pull it through the loop on the [hook].
And again …
Now, here are the last two stitches. Go through the stitches, pull it through, through that loop, and loop and pull it through again.
And how we need to catch that cast-off stitch. Put it through there, and I am catching the stitch underneath, pull it through, through the loop, and through the loop again. And you can pull that through.
We have now caught that with a chain of crochet stitches. In practice, I’d probably use a thinner yarn than this.
Repeat for the other side of the steek
This time I want to join this leg of the central stitch to that leg of the stitch to the edge of it.
Another piece of yarn. Another slipknot. Put it on the crochet hook.
This time I have turned [the fabric so that I am] working from right to left.
So now I want to catch that. I catch both those stitches and I catch that piece of yarn as well. It doesn’t matter if you catch too much. And you pull that tight. And pull that through the loop. Another loop, catch the yarn again and pull it through that loop, and we are now ready to start.
Down through the near, up through the far stitch, catch the yarn, and pull it back through the stitches, stitches, through the loop, catch the yarn again, and through that loop.
Down through the near, up through the far stitch, catch the yarn and pull it back, pull that through the loop that is already on the hook, catch the yarn again and pull it through the loop on the hook.
And work your way down the column of stitches …
Here we are, down at the bottom one again. I want to catch that leg to that leg. It is a little bit more difficult because they are the same colour, pull it through, pull it though the loop, and the final pull it through, catch the yarn and pull through the loop.
That leaves us with the cast-on edge. Again, we want to make sure that we catch that stitch down at the bottom there, making sure that if there are two colours there, at the cast-on you catch both colours. Pull it through, pull it through the loop, and the final catch it and pull it through the loop.
So, now we have reinforced that steek. We have the two lines of crochet, one down each side, and in the middle here you can see where we are going to cut.
That’s reinforcement of a steek with an odd number stitches.
Summary
That’s how I reinforce a steek with an odd number of stitches.
In this T-torial I’ve talked about how I use a crochet method to reinforce steeks. I talked about reinforcing steeks with an even number of stitches that are particularly useful if you change the colours in the middle of the steek, and I talked about how I reinforce a steek with an odd number of stitches that makes a steek slightly narrower.
I hope you found this useful. Until the next time, Happy Knitting!
T-Reference
You can see a pictorial tutorial for the basic stranded cast-on in the T-reference section of this website.
Helpful links
- T-ref: Reinforce a steek
- Show notes for the T-torial on "Reinforcing a steek with crochet" (T202001).
- Video tutorial by Very Pink Knits on steeking.
- T-reference article on steeks
- Tin Can Knits tutorial on steeking for their Strange Brew range.
One Reply to “Reinforcing a steek with crochet (T202001)”
Comments are closed.