
This is the second in a series of podcasts on how I knit my Nahanni River vest project. In it I discuss what I found out from my gauge swatch and casting-on and joining-in-the-round for this project.
This is a video. There is also an audio only version:
This my second podcast (more strictly a vlog) in a series in which I explain how I prepared to knit the Nahanni River Fair Isle pattern (designed by Betts Lampers and published by Simply Shetland) (the series is in a playlist in YouTube). In this episode I describe what I found out from my gauge swatch, and explain how I cast-on and joined in the round for this project.
You will have to wait for later podcasts to see how I knit the Fair Isle pattern and made the steeks – and whether the garment fits me!
The video version of the podcast is pubished on my YouTube channel. The sound channel from this is available as an audio podcast.
Links to items mentioned in the podcast
- p201902 - Casting on Nahanni River (Nahanni River 2)
- Page from which the Nahanni River pattern can be obtained.
- Using a marker thread for counting cast-on stitches and to avoid twisting a cast-on edge when joining in the round. It also shows how you can use two lengths of yarn to avoid running out of tail end when using a cast-on in the long-tail family.
- Teabreak Knitter podcast: Project planning for the Nahinni River vest knitting project in Fair Isle. Podcast 201901. This covers reading the pattern, planning the yarn, tools and techniques, and making a gauge swatch.
- Second T-break in the Nahanni River series - casting on.
- Third T-break in the Nahanni RIver series - starting to knit in colour work.
- Fourth podcast in the series on knitting the Nahanni River sleeveless jumper (sweater).
- Fifth T-break podcast on knitting the Nahanni RIver vest.
- Description of how to perform the twisted knit half-hitch cast-on.
- Description of how to do the twisted knit half-hitch cast-on (also known as the German twisted cast-on or the Old Norwegian cast-on).
- Description of how to swatch for a fabric that will be knit in the round.
- Description of how to make a gauge swatch.
- How to make a gauge swatch for an item that will be knit in the round.
- List of stockists of Jamieson's of Shetland Spindrift yarn.
Transcript
The headings in this transcript link to the point in the podcast where that topic starts. This transcript has been edited to correct errors and to clarify phrasing.
Introduction
Hello I’m Steve. I’m also known as TeabreakKnitter on social media. This is my second podcast.
If you watched the first I’m really pleased you came back again, and you also know I’m building this series of podcasts around a project, a project to knit a Fair Isle vest called the Nahanni River by a designer called Betts Lampers and sold by Simply Shetland.
Last time I talked about how I assess the pattern to see what’s in it: for the yarn, for the tools I need and for any techniques I need. Then I went on to talk about how I chose the size that I wanted to knit, and any modifications I might need to it, and I ended up talking about how I started the gauge swatch.
In this podcast what I want to talk about is what I found out from the gauge swatch, talk about how I cast on, and how I join that cast-on in the round. I hope you enjoy this.
Gauge swatch
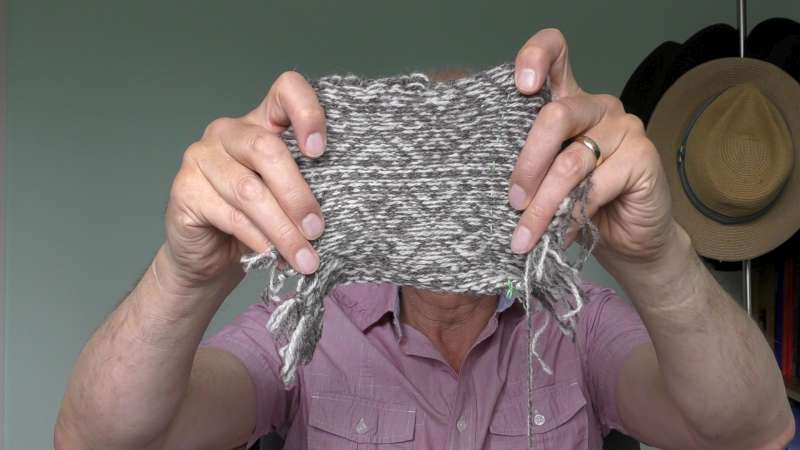
What did I find out from the gauge swatch? Well, before I show you in detail, here’s the gauge swatch. You see that it has quite a large amount of the pattern on. I’m quite proud of this. If you look at the back of the gauge swatch all the stranding has come out very evenly. It has also been washed and blocked and the wool is now very soft (you can’t I see see that it’s soft in the video, but it is beautifully soft). What I want you to see now is more detaisl of what I found out from the gauge swatch.
This is the gauge swatch for the Nahanni River vest. You will remember that I cast-on [the gauge swatch] using the basic stranded cast-on. I cast-off using the basic stranded cast-off. The cast-on and cast-off are loose, so they don’t actually control the shape and size of the swatch. I also knit this to imitate knitting in the round. I knit as usual from left to right, knit stitches all the way across. When I got to the end I slipped the needle through so that I was ready to start knitting again at the right hand side. I stranded the wool across the back loosely so that I had the wool on the correct side to start. I then knit all the way up. This particular swatch is 48 stitches by 48 rows. When I had finished knitting it, I cast it off the needles and cut the strands that had been across the back so that I could tie them up. Now I’ve got something that is flat that I can measure. I find it very difficult counting stitches, counting across columns or counting the number of rows. I only wanted to do that once, even though I’m going to be measuring this swatch several times. To help me do that, I’ve run threads horizontally and vertically using very thin contrasting colour yarn so that I can see them. That means I know how far it is, or how many stitches there are, between the two sets of threads, which means all I have to do now is measure that distance in order to work out the gauge.
The first time I measured this [swatch] was when I had taken it straight off the needles. I took it off the needles, put these threads in and measured the distance across and the distance up and down between the threads. That gave me what is called my “off the needles” gauge. For this particular swatch this gave me 34 stitches to 10 cm and 30 rows to 10cm. As I knit the finished item I expect that’s the gauge I would get if I use the same needles. Once I had done that, I then blocked the swatch. I put it in warm water with a little bit of wool soap mixed in with it for about 2 hours to let the wool really soak, relax and let the fibres work out how they actually wanted to lie. Then I took it out, I squeezed it taking care not to stretch or strain the gauge [swatch], wrapped it in a towel to support it and then wrung the towel out to get as much water as I could out of the swatch. I then laid it on a blocking tile, smoothed it out, pinned it where it wanted to be, and left it to dry. When it was dry, I measured again between the two sets of threads.
This time my gauge was 32 stitches but it stayed at 30 rows. So what does this tell me? Well, the first thing it tells me is that my stitch gauge changed. I got fewer stitches over the 10 cm distance after I’d washed this swatch than I did before. That means that it’s going to be a little bit wider after I’ve washed the garment than before. But the row gauge remains the same. The gauge I want to use to compare against the pattern is the gauge it is now after blocking. So 32 stitches and 30 rows. I did leave this a few days and came back and measured it again and the gauge has changed slightly. The stitch gauge remained unchanged at 32 stitches for 10 cm but the row gauge tightened up very slightly. [10 cm = 4 inches] It is now 32 rows over 10 cm rather than 30 rows over 10 cm.
How does that compare with a pattern? Well, the pattern is asking for 32 stitches along a row in 10 cm. That’s exactly what I’m getting. It asks for 34 stitches up and down (that’s 34 rows) over 10 cm. I’m actually achieving 32 rows after it has relaxed. So I’m knitting a little bit more loosely than I was before. I’d expect my finished garment to be the same width as in the pattern, but I’d expect it to be slightly longer than in the pattern.
If you recall, I was looking to make this jumper for this vest slightly larger than the size in the pattern. Actually, it is going to be slightly larger, so I need to do a bit of calculation to find out how much larger is going to be.
What I found out from my gauge swatch is that my gauge is the same stitch gauge as in the pattern, but the row gauge is slightly different. This means that my sweater should come out slightly longer than that in the pattern, which is good and is what I wanted. But how much bigger? Well, here is how I do the calculations to find out how long that sweater is actually going to turn out to be.
What does this mean for my finished garment? Well, the pattern is going to produce a garment of length 24.25 inches, but if I knit as I knit in my gauge swatch, I will actually get something that is 25.77 inches. That’s about an inch and a half bigger than the designer made in the pattern, which is about the extra length that I was looking to make. This means that I won’t need to add that extra motif on the bottom of the knitting. I can just knit according to the pattern and I will get a longer vest than in the original. So my gauge swatch was actually really useful. Of course it let me see what the pattern would look like in reality, although I only knit the gauge swatch in two colours rather than the full range used by the full pattern.
It also told me that I don’t actually need to add any pattern repeats on, because I’ve got a different row gauge than the on the designer got, and so my vest is going to be slightly longer. In fact that “slightly longer” is exactly the length that I was aiming for. So provided that when I need the project as a whole I’m knitting to the same gauge as I knit the gauge swatch, vest will end up the length I would like it to be. That’s really good.
The gauge swatch was really valuable in confirming that I’ll get the right width for the vest and the right length, and that the pattern would look good in the wool. Also the finished fabric had a really good feel to it.
That’s the gauge swatch.
Casting on
Now I want to talk to you about casting on.
The cast on used in the pattern is new to me. The German twisted cast-on is sometimes called the Old Norwegian cast-on or the twisted knit half hitch cast-on.
If I tried to show you the cast-on using the yarn in the project, you wouldn’t actually be able to see because the yarn is too fine to show up in a video. So in the short section of video I’m going to show you I’ll be using thicker yarn so that you can see what’s actually happening in the cast-on.
I’d like to show you the twisted knit half-hitch cast-on. You are using one piece of yarn. One end (this is the end of the yarn) is the tail end, and you want 3 or 4 times the width of your garment for the tail end. The other end is the yarn that’s attached to your ball and that will become the working on for the rest of the garment. I’ve just tied together two different coloured yarns here so that it is easier for you to see in the video which is the tail end and which is the working yarn.
You start off by putting the tail end over your thumb and the working yarn over your forefinger, holding the ends in your palm with your other fingers. For this is very first cast-on stitch you come up underneath the strand, bring it forward in front of the tail end, back past the other side of the tail end, into the middle; bring your needle up and bring it forward, put it through the loop (still working on the tail end), turn it round so it is now pointing towards the back, put it under the working yarn and now, with the tip of your needle underneath that little cross of the tail end, see that little cross there, and now you can leave go. And pull it.
Again. Take the tail end, catch it on your thumb, needle to the front, under the tail end nearest you, up the middle, over the tail end farthest from you, keep it going round in a circle, under the working yarn, and back, through and under that little cross at the bottom.
Forward, under, back, up, through the loop, back, under, and through the loop under the cross.
There is an alternative way of doing it that starts off the same but I find a little bit easier at the end.
So, again, keep going forward, back, up, through the loop (we are just exactly the same at the moment), under the working yarn. Now, instead of going through that little cross there, you undo that loop by rotating your thumb so that it is now a plain straight-forward loop that you can just throw over the end of the needle.
So, forward, back, thorugh, back, round, undo the cross and loop over the needle like that.
So, forward, back, forward, through, round the back, undo the loop by turning your thumb round, like that.
So just comparing the two again.
The first way. Forward, round, through the hole, round the back, under the working yarn, and through that little crossed bit at the bottom.
That one again: under, back, through the hole, under, over, and through the hole beneath the cross.
And the second technique: forward, back, through the loop, back, under, rotate your thumb, and drop the loop over the end.
And again, forward, back, through the loop, back, pick up the working yarn, rotate your thumb, and drop the loop over the end.
That one slipped off the top of the screen, didn’t it! Like that.
So, [there are] two ways of doing the cast-on. Both produce the same result. And that is the twisted knit half-hitch cast-on.
Marker thread
That’s how I’m going to do the cast-on for the final vest, but there is one additional thing I want to do to make myself ready for joining in the round. That is to place a marker thread while I’m doing the cast-on. This marker thread serves two purposes. The first one is to tell me how many stitches I have cast-on, because the pattern calls for more than 300 stitches being cast-on, and I’m just not that good at counting. The other purpose is so that I can see whether the cast-on has wrapped itself around the cable when I come to do the join. It will tell me whether the joined cast-on is twisted. Because if I twisted the join then the final sweater wouldn’t actually work out as a sweater, it would work out as a mobius strip – which is not very good. Using this technique of putting in a marker thread solves these two problems. It lets me mark every (in my case I’ve chosen) 10 stitches, so you can easily count the number of stitches (because I can count 10 stitches quite reliably) and I can count the number of groups of 10 quite reliably. It also lets me, when I come to join in the round, see that the cast-on hasn’t wound itself around the cable.
Again I’ll show you this technique using thicker yarns before you see the final version from the project.
I’d like to show you how to use a marker thread to help you count your cast-on stitches and also to help you avoid twisting your cast-on when you join it in the round. I’m using two threads. The first is the working yarn that’s going to make the fabric, and the second is a contrasting colour that I’m going to use for the marker thread. Normally the marker thread will be thinner and smooth. Thinner so that it doesn’t space out the cast-on, and smooth so that you can pull it out easily when you finished with it. But for this demonstration I’m using a thicker thread so that you can see what’s happening.
For the cast-on you start as normal. Give yourself enough tail if using a long tail type cast-on, and hold it as you would normally hold it for your cast-on. Here is the marker thread, and I’m going to hold that in my right hand so it’s ready when I need it. The first thing I’m going to do is cast-on 9 stitches. This is the twisted knit half-hitch cast-on. One, two, three, four, five, six, seven, eight, nine. I’m going to be using the marker thread to help me count stitches, so I’d better make sure I really have 9 stitches on there. 1, 2, 3, 4, 5, 6, 7, 8, 9. I have 9 stitches on the needle. Here is my marker thread. I slip it so the tail end [of the marker thread] is at the front and the working end [of the marker thread] is at the back, and it’s now between the end of the needle and the last stitch. Now I cast-on my tenth stitch. So I’ve now got 10 stitches on the needle. I move that marker yarn round the needle to the front.
I now cast on another 9 stitches. One, two, three, four, five, six, seven, eight, nine. Let’s count that up: 1, 2, 3, 4, 5, 6, 7, 8, 9. Yes, there are nine stitches. I run the marker thread loosely across the front of those, round the back of the needle. Not a yarn over, just slipping it round keeping it below the needle. I do my tenth stitch, and bring the [marker] yarn back to the front, around the bottom of the needle. So you can see what’s happening. I’m catching the [marker] yarn every 10th stitch. I’ll just do one more group: 1, 2, 3, 4, 5, 6, 7, 8, 9. And again check the 9 stitches: 1, 2, 3, 4, 5, 6, 7, 8, 9. Move the [marker] yarn to the back, do my tenth stitch, move the [marker] yarn to the front and keep going. I’ll just put on one more stitch to keep that yarn in place.
So, we have got the marker yarn forming a nice line along the bottom of our cast-on edge so that if we managed to twist it somehow when doing the join in the round, it would be quite obvious. You’d see the marker thread quite clearly if it went round the needle. And the other thing is now to count the stitches, all you have to do is count where marker yarn disappears. So 1, 2, 3; 30 stitches. So that’s how to use a marker thread to help you count your stitches in a cast-on and to help you avoid twisting your cast-on edge when you join it in the round.
That’s how to insert a marker yarn into the cast-on. What does it look like for the project? Well, it’s easier to show you this in a photograph.
That was my cast-on for the project.
Joining in the round
Now I need to join that in the round so it goes around as continuous circular knitting. There are two things to remember when joining in the round. The first is you don’t want to twist that cast-on, which is why I put the market thread in so I can spot if it that’s happening. The second one is that you find when you do the cast-on you can get a jog where the two ends of the cast-on meet in the round. I’ll show you a technique, one of many, that allows you to remove that jog, so that when you look around the bottom of the finished item you can’t actually see where that cast-on joined.
I’ll show you how I cast-on in the round when I’m working on a piece that has a very large number of stitches. I’ll be using a twisted knit half-hitch cast-on and, for this demonstration, because I’ll not be [actually] casting on a large number of stitches, I’ll also be using the magic loop for circular knitting.
You can see here that I’ve got 3 yarns. This top yarn is the working yarn. It will go on to form the fabric. The twisted knit half-hitch cast-on is member the long tail family, so I need a tail-end yarn, and I’m using a separate ball of yarn of the same type as the working yarn for the tail end. The reason for this is that if I’m casting on a very large number of stitches, I don’t want to run the risk of running out of tail end because I’ve not left enough room. The third yarn can see is a marker yarn. For the purpose of the demonstration this is the same size as the working yearn. I would normally use a thinner yarn and a smooth yarn because it doesn’t play any part in the actual fabric. It is just there so I can see where the edge is and to help me count the stitches. If it is smooth it is easier to pull out from the finished item. I want to remember which is the working yarn and which is the tail end, so I just slip a stitch marker onto the tail end. It doesn’t have to be a removable marker because before we start knitting the body of the fabric, we will be snipping off the tail end yarn, so the stitch marker will just fall off the end.
Normally with a long tail family cast-on, you’d use a single piece of yarn for both the working yarn and the tail end, so the first step is to make that single piece of yarn. To do that I’ll leave enough to sew in the ends and make a slip knot just to join those ends together. I’ll then place them on the needle to hold them so they don’t slither all over the place. Again, the marker yarn (I don’t need to sew in in the end of this) but I want to stop it moving around so, again, I create a slipknot and fit it over the end so that’s just held in place, so I know where it is. Because I’m using the decrease type of join [in the round] I need to create a stitch that I’m going to join with the last cast-on stitch. I just need to create a simple loop so that this, which would be tail end if you used a continuous piece of yarn, is at the needle end of the loop. So a little loop with working yarn coming out from behind the loop.
I now need to start casting-on. I’m going to cast-on and place a marker every tenth stitch. I will start my cast on; 1, 2, 3, 4, 5, 6, 7, 8, 9. I want to mark every tenth stitch. I just bring the marker around here, wrap it round the end, and placing it behind there. Then I cast-on a tenth stitch and bring it [the marker yarn] to the front. And again 1, 2, 3, 4, 5, 6, 7, 8, 9 … place marker stitch … 10. That’s 20 stitches cast-on. I’ll continue until I’ve cast-on cast on 64 stitches.
So, there we are, are 64 stitches cast-on.
I’ll now snip off this extra marker thread, and I’ll cut off the tail end thread, so I’m carrying less ends. I’ll put a knot in the end of that to keep it tidier. There are my 64 stitches. 10, 20, 30, 40, 50, 60, 1, 2, 3, 4. I now need to join these in the round to form a circular piece of knitting. I take the working yarn around to the back so that the needle with the working yarn is pointing from left to right. And the other needle is also going to point from left to right. I’m going to use magic loop, so I’m going to need to split the cast-on in the middle. So, there’s that first loop that we had, so 10, 20 30, and I want to split it at 32 stitches. The reason to split at the 32 is that I’m going to continue in rib, and so I would prefer to have to join at this end of the magic loop and at the cast on end as a join when I’m transferring from a purl to knit stitch. I find my ladders are far better if I do it that way round.
So, we now have stitches on each needle. If this was not a magic loop and I had a shorter cable, they [the stitches] would just be going around like that. You need to make sure they [the cast-on stitches] are not twisted which is the next use for this market thread. You can see it’s there running along the bottom, and it’s quite visible. If I’d managed to twist the stitches round, the marker thread just disappears around the needle.
I’m ready to start to join in the round. The first thing that I want to do is to take that extra loop and put it onto the needle at the back. To get to it I take those two slipknots off, and I want it [the extra loop] to go in front of the working yarn, so the working yarn wants to be behind it. And just slip that down to join the other stitches. I can now start knitting. I’m knitting in rib, so knit, knit. Give a bit of a tug. That will help tighten up the stitches so you don’t get laddering, and my purls. I’ll keep going all the way around until all the way round until I get to the last four stitches.
I’m now at the end of the first needle in the magic loop. So I pull the needle through, and I need to make sure that I’ve not twisted this. I put the needles together and the marker yarn hasn’t twisted over, so that’s good. I now continue knitting towards the end.
I’ve now reached the point where I have got four remaining stitches plus that loop on my needle. I just want to knit, knit, purl. And here’s the final stitch, and the loop. I want to join these together in a decrease that, because it’s a purl stitch, is a purl decrease [p2tog].
Now we’re ready to start the next round of the knitting. Yet again I just need to check that I’ve not twisted the [cast-on] stitches and so I check that the marker a thread is all the way along the bottom. What we can do is just put the marker thread through there because, remember, we didn’t have it going through at the start of the knitting [round]. I’m putting stitches onto the needle that receives them and pulling the the cable so that stitches on the back are on the cable. And we start again.
And so, there we are, at the end of the second round, all ready to continue knitting with the rest of the pattern.
That was my cast-on and join in the round for a project with a large number of stitches.
That was how I did the cast on.
Looking forwards
In this podcast I talked about the gauge swatch that I used to help me prepare for my project, and I talked about how I cast-on and joined in the round to start off the project.
Next time I’ll be talking about the corrugated rib, that is the first section of the pattern.
Until then happy knitting!