Finishing the Nahanni River (P202002)

Teabreak Knitter wearing his Nahanni River vest.

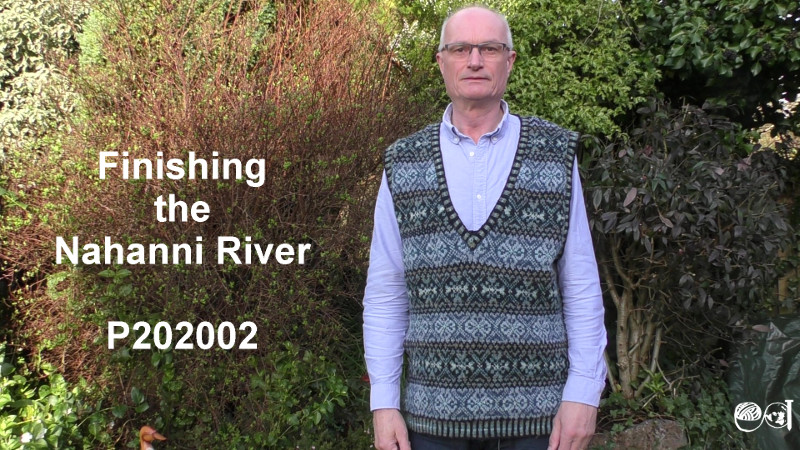
This is the fifth and final podcast in a series about how I knit the Nahanni River vest designed by Betts Lampers and published by Simply Shetland. In it I show how I knit backwards for the short rows, how I reinforced and cut the steeks and how I picked up and knit the stitches for the arm holes and neck band. I also show you the final garment, and talk about the lessons I learned while knitting it.

Audio only version:

Teabreak Knitter
Teabreak Knitter
Nahanni River 5. Finishing the Nahanni River (P202002)
Loading
/

Transcript

The headings in this transcript link to the point in the podcast where that topic starts. This transcript has been edited to correct errors and to clarify phrasing.

Introduction

Hello I’m Steve, also known as Teabreak Knitter on social media.

This is the fifth podcast in a series that shows you how I’m knitting the Nahanni River vest. This is a pattern by Betts Lampers and published by Simply Shetland. The yarn I’m using is Spindrift from Jamiesons of Shetland.

In the first podcast I showed you how I read the pattern to find out what I needed to do and any techniques I needed to learn, how I chose the size I wanted to knit, and how I was planning to do the gauge swatch.

In the second podcast I showed you what I had learned from the gauge swatch. I showed you how I had cast-on for the project, and how I joined in the round.

The third podcast was on how to use charts for colour work, how I knit in two colours, how I did the cartridge rib [corrugated rib], and how I do the Fair Isle knitting.

In the fourth podcast I showed you how I was knitting the body and the progress I had made with that. I showed you how I started the steeks, and how I was going to do the decreases the for armholes.

This is the fifth podcast and it’s the last in the series. It [covers] how I finish the project. The techniques that I was going to have to use, like knitting backwards, reinforcing the steeks, picking up stitches, cutting the steeks, and then dressing the final project. I’ll show you what it looks like at the end.

One of the things I did as I was knitting was to [done to] help me find where I was in the pattern when I started each round. On the round that I finished decreasing for the armholes, I marked on the chart where the start of the round was going to be for the patterns [motifs]. This was particularly important when I passed through a section of the motif that had a 4 stitch repeat and then progressed on to a 24 stitch repeat [in later rounds]. But that was several rounds [rows] later, so trying to work out where you were within the 24 stitch repeat was quite difficult. Marking where it was on the edge of the chart made it very easy.

And similarly when it came to the neck band, you could use the symmetry to find out where you were in the chart to pick up [restart after the steek] from that. That’s one thing I did as I was moving up.

Having found that useful, when I came towards the end of the project, where you had finished knitting up the arm holes, finished at the neck, and you came to the shoulders,where there is a short stretch of short rows. I found it very useful to mark up on the chart where each section of the short row started and where it finished. Again that save me from searching for I was in the pattern where there was a change from 4 to 24 stitch repeat. The other thing this did was that it showed that I had slightly misinterpreted the pattern, so that I was going to put the neck slightly offset, by only a couple of stitches, so you probably wouldn’t have noticed, but by marking on the pattern where the rows were [starting] and ending, I could see that I was going to put the stitches on hold for the neck off-centre. That was good because it saved me making a mistake that would have been really annoying if I had found that later on.

Finished knitting the body

I have now reached the end of the main knitting for this project, so I’ve finished the short rows at the shoulders. I’d like to show you where I have got to so far, and make some comments about what I did to get to here.

This is the front, the start of the V-neck is down there, we have got the two steeks for the arms on the side, and the V-neck comes up the middle here. As you go up you are doing decreases at the arm hole side. But after a while you do no more decreases.

To help me find my place when I starting each round, after the end of the armhole decreases I marked on the chart where the start of each round would be,  so that would be on this side, The start of each round. The reason for doing that is that at several points in the motif you go from a repeat of 24 stitches to a repeat of 4 stitches, which is fine when you going from the big repeat to the small repeat you can tell where you are very easily when you start the round. But when you go from the four stitch repeat to to the 24 stitch repeat then there’s no very quick indicator of where you should be starting the round, and you have to look back down to the next 24 stitch repeat. That takes time. That is a bit fiddly. I marked the chart to show me where that was happening.

Of course, when you come the other side of the steek for the V-neck, you have exactly the same issue: where do you restart the 24 stitch repeat? that’s where the symmetry comes in useful, because all you have to do is look where you finished the run-up to the streek, on the other side, you start off with a pattern in mirror image, which makes it very easy to find where you are in the chart and to continue. That was a very useful thing, and it’s speeded up knitting considerably. The other thing, of course, that speeded up the knitting is that, as you go up, you are continuing with the neck decreases, so you end up with far fewer stitches that at the bottom than near the top. At least, that’s what happens at the front. At the back you continue right the way up to the start of the short rows with the full width.

Knitting backwards

The first technique I want to show you in this this video is the technique I use for knitting backwards.

Knitting backwards is not essential, but what it does mean is that you are knitting with the public side of your work always facing you, which one you are using a colour pattern is very useful because you can then more easily compare what you are knitting with what is in the chart.

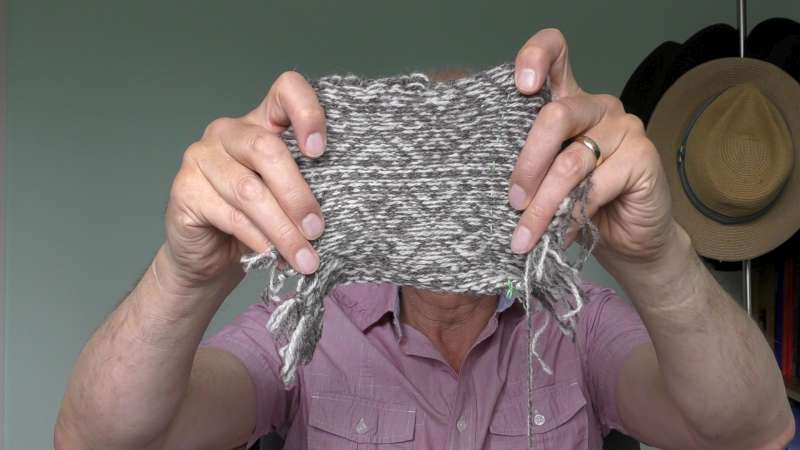
So this is how I go about knitting backwards. Here is a [stocking stitch] swatch and I’m going to show you how I knit backwards. The first way I’m going to show you is how I knit backwards in the equivalent of the English style. This means I’m going to hold the yarn in the same hand as the needle that receives the stitches. I am going to wrap my yarn around the little finger and put it over my index finger. I insert the needle through the back of the loop knitwise, wrap the yarn, and I have knit the stitch. Again. Left-hand needle through the back loop of the [stitch], wrap it [the yarn] round the needle from the back left, round the front to the top right, and you form the stitch. You are wrapping it in the same direction as you would if you knit normally. So again. Into the back. Wrap round and form the stitch. Into the back. Wrap round. Form the stitch. 1, 2, 3, 4, 5. I’ll keep going until I have done 10 stitches. 6. Into the back of the loop, round, make the stitch. Two more. In, round, off. Into the back, round and off. That’s 10 stitches on the needle. 1, 2, 3, 4, 5, 6, 7, 8, 9, 10.

I’ll now show you how to do that continental style. Continental style is when you hold the yarn in the opposite hand to the receiving needle. If I was knitting normally I’d be knitting from left to right. Now I’m knitting from right to left. Once again, insert the needle into the back of the stitch [pointing towards the back] move the yarn round the needle from back left, cross the front to the right. Again. Insert the needle at the back of the loop [in front of the back leg] wrap the yarn round the needle, and knit. I’ll now do that using the Continental picking technique. You can see most of the movement is being done with my left hand. In through the back, round, but taking [the stitch] off the needle I’m doing with right needle. That’s probably because I’m right-handed. Into the back loop, wrap by picking, take it off the front. Into the back loop, off. That’s the end of that row.

So I’ve now got a knit row that was knit English and Continental.

Short rows

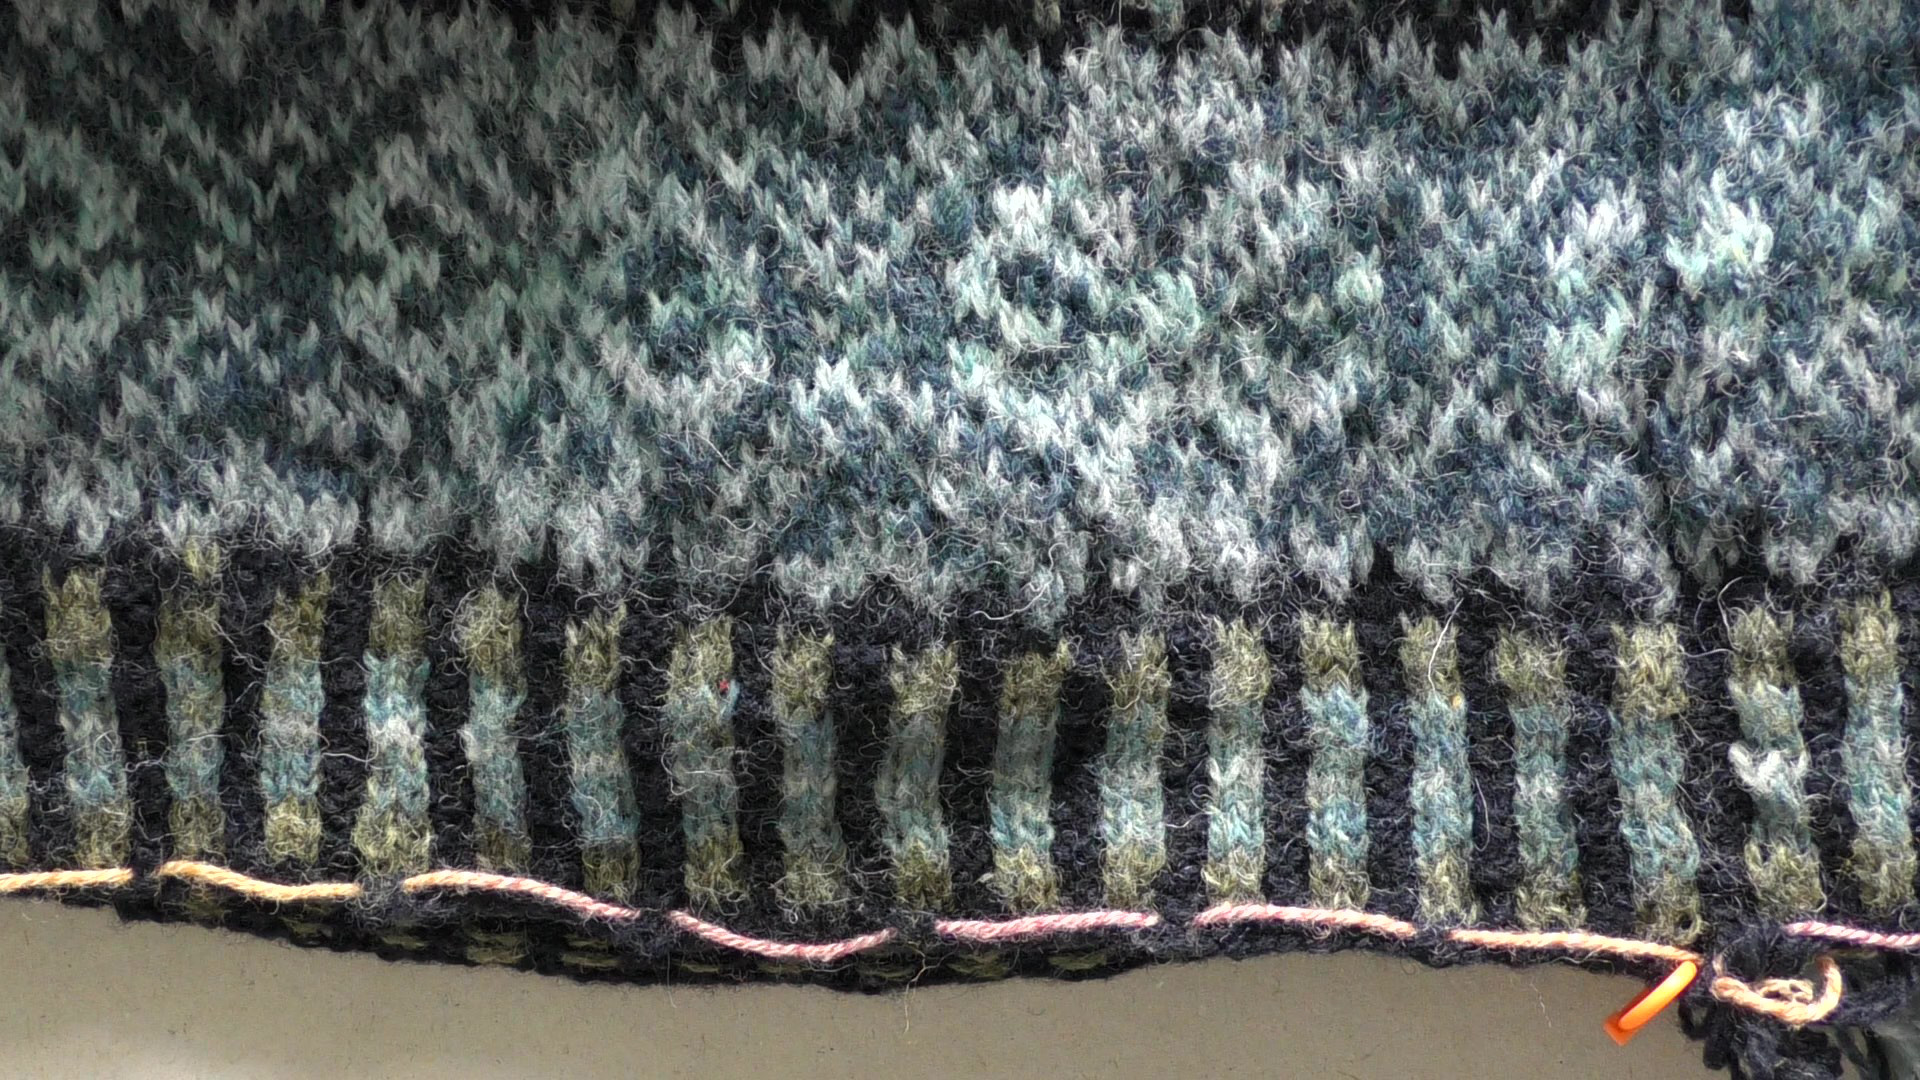
The pattern has got short rows  – I will pull that down slightly so that you can see here.

Here is the top row in the arm hole side of the shoulder and here is the top row at the neck side of the shoulder. And so you are getting two, two and a half, three centimetres there (an inch and a quarter). You can see that by following this row here, and you can see there is considerably more fabric there that there is on that side

If you are eagle-eyed, you can just see a loop of it here, when I reached the end of the bulk of the knitting and started the short rows, I did put in a life-line for two reasons: first of all, in case I made a mistake in doing the short rows themselves, and secondly because for the top, the short row sections, I used knitting backwards, so on the first round [row] I went [passed the stitches] left to right as usual.

You are knitting flat for this section, so on the way back, instead of turning the work and purling, I kept knitting, but knit from left to right [passing the stitches from right to left], then from right to left. That was a way of practising doing that, and it has turned out reasonably OK.

Remember that I have not yet blocked this.

The other thing I did in preparing for these short rows was, learning from what I did down here, and how difficult it was sometimes to work out where I was in the pattern, it becomes even more difficult on the short row to find where you should be in the pattern, so on the chart, I marked for each of these short rows where I should start after the steek and where I should do the turn, so that I knew exactly where I was on the chart. So I didn’t need to look back and up to work out where I was. That, of course, gets particularly difficult if you are near this edge here where you have several different parts of the motif that are not complete, so on the left here you have more vertical components of the motif than you have on the right here.

If I turn it over on the back, although the pattern  goes through with just the arm hole decreases, and no V in the back, when you get to the short rows on the back, you do take some stitches off and hold them ready for the neck band. Here are the shoulder short rows, and there is an extra steek in the middle there. So you knit those as “long” short rows rather than “short” short rows.

So that is how I knit backwards. The final step before handling the arm holes and the neck was to do a three needle bind-off [joinery cast-off] on the shoulders. This gives a very neat shoulder join.

o I did the three-needle bind-off, and then I was ready to reinforce the steeks. Reinforcing the steeks is important because this is what stops you pulling the yarn through the steek after you have cut it when you are working with the project. When you have finished, it is fine. It will very rapidly stabilise. But it is when you are pulling or tugging on the yarn that you stand a risk.

Reinforce the steeks

This is how I reinforced the steeks.

The first thing I want to do is create a slip knot so that the crochet chain can be started. So I wrap the yarn round my thumb, put it onto my finger, and put that working yarn through the loop and pull it tight. So, I have now got a loop there.

It’s easier to work so that you working across your item [rather than up-and-down], and I’ll be working from right to left because I’m right-handed; if you are left-handed you might prefer to work in the other direction.

The first thing I want to do is to make sure I catch the cast-on [or bind-off, if I working from left to right] edges. So I can put the hook through both those stitches, wrap the yarn round it, and bring it through. You will notice that I’m using a thinner yarn than the yarn I used to knit the swatch. This avoids adding bulk to the steek. Having pulled it through you can make a loop. That’s the cast-on edge caught.

I now want to catch that stitch to that stitch, so I go across.

We start off and the first two are in the same colour. I push [the hook] under that leg, the leg that is closest to me, and up under the leg that is furthest from me. Wrap the yarn around the hook, pull it through, pull that through, and another loop, and pull that through. So we have now trapped that yarn there.

I’ll see if I can give you a closer look at that. You can see there that the yarn is trapped.

We now go on to the next stitch. I have changed the yarn to the other hand because I have now got an established loop.

So I go under the far leg of the stitch that is closest to me, and through and up under the stitch that is further away from me. Under that first leg of the stitch, pull it through, and then catch again, and pull it through again to make sure everything is bound tightly.

I’ll show you that step by step.

The next stitch. Here’s the second stitch away from the [centre of the] steek. Go under the far leg of that, keep going under and then [past the first leg] and [up] through the [centre of the ] of the stitch next [to the centre of the steek]. Hook the yarn with the crochet hook, pull it through both stitches, and then pull it through the loop that is already on the hook, as you can see you have still got those stitches free. You now pull that loop through there, make another loop and pull it through, and you have now trapped those stitches.

Keep going like that all the way up the steek.

At the top here, just tucked under the cast-off [bound-off] stitch, here’s the final pair of stitches. Down, up, catch the yarn and pull it through, pull it through that loop, catch it again, and pull it through that final loop.

And now we have now reached the cast-off edge. So now I want to catch those loops as well. Put it [the hook] through both of those loops,  catch the yarn, pull it through, pull it through the loop on the hook, catch the yarn,  pull it through that loop, and you can see it has now caught those stitches.

Now we can snip the yarn off, then continue pulling it through the loop as you would for [binding-off in] knitting.

You have now trapped that edge with a crochet chain.

So that is how I reinforced the steeks, although the pattern does not actually call for you to reinforce them at this stage, but I like to do it now because I’m going to be picking up stitches around the arm holes, around the neck, and that is going to put quite a bit of stress on the fabric there.

Pick up and knit stitches

So the next thing I want to show you is how I pick up the stitches.

I’m going to show you three ways of picking up a stitch, [to produce exactly the same result]. When I say pick up a stitch I’m going to pick up and knit the stitch.

This is the edge stitch row [column!] that I want to pick up. I have knit from bottom to top.

I have here the steek, so the edge stitch, and here are the steek stitches. I want to pick up so that my knitting comes out from this position, so that the edge of the garment or fabric is there, and the new edge grows out from that point onwards.

The first approach I want to use, that I would like you to see more clearly what’s happening, is I’m going to use two needles. I’m using a [silver metal] needle smaller than was used to knit the fabric. This is going to help me lift the stitches, and here is the [black with silver tip] needle that I’m going to knit on to. And again, in this particular case it’s slightly smaller than the one I used to knit the fabric. Sometimes you might want to do this because it makes it easier to adjust your stitches from that, on the first round you knit after when the one you pick-up. I’m going to knit and wrap my yarn as usual.

I’m holding the yarn in my right hand, because I will be doing most of the manipulation with my right hand.

Here is that first stitch, that first edge stitch, the first stitch in the steek. I’m going to push this needle right the way through [under] that stitch [under both legs] and also catch the float underneath. That’s to hold the stitch, so that I can now put my needle in and knit the stitch. Do that again on the next one. Put the needle in [under the edge stitch] and knit the stitch.

Now, because this is stockinette, you use a pick up ratio of 2 to 3, I am going to skip a stitch. This time I’m going to pick the stitch up differently. I’m going to use a crochet hook.

Put the crochet hook through, underneath that edge stitch. pull the yarn through and put it [the new stitch] on the [needle]. Again, pull the yarn through with the crochet hook and put it on your needle. You want to mount it on the needle so that the working yarn disappears off across the back.

The third way I want to show you is just to use the right hand needle. Push it under the stitch and pull the yarn through. I’ll do that again. Lift that stitch with the needle, push [the needle] through and knit [the stitch].

I’ll come up a bit closer to the camera this time. Missing out that third stitch because of the 2 to 3 ratio. Put the needle through, wrap, and pull it through.

And now the final stitch. Put it through, wrap, and pull it through.

Before the steeks are cut

So this is the next step in my knitting. I have bound off the top edges with a three-needle bind-off [joinery cast-off], so the shoulder seams are done. I am now starting on the arm bands. When I have done the two arm bands, I will then do the neck as well.

So here we have the steek with the reinforcement. I’ve left the ends on there; I’ll cut them off after I dress the the final product, and I’ve gone through and I’ve picked up stitches all the way round in this dark background colour.

I’ve got several markers on this. This marker is on the sleeve to tell me where that top sleeve stitch is. I don’t really need that anymore, and here is the beginning/end of round marker. These two are marking the edge of the stitches that were held on the needle before, and again I don’t need those markers, and I will get rid of those when I knit round. These other markers are to [help me] correct the number of stitches that I picked up.

I picked up more stitches than I needed, because it is easier to reduce your stitch count than it is to increase them evenly. And so every time I meet one of these markers I will knit two stitches together, and that will bring me back down to the correct stitch count.

As you see, with the steek in place, there is no stretch there, so knitting the bottom and the top around there is going to be very, very difficult. I would need to use two [circular] needles or a huge loop. So instead, now is the time to cut the steek.

That is how I picked up the stitches. If you want a bit more information there is a link below.

I have now finished putting stress on those steek stitches, so it is safe to cut the steek now. Cutting the steek will change the shape of the garment totally. It will open up the arm holes, it will open up the V-neck. For the first time I will actually be able to see the shape and how it is going to fit.

Cutting the steeks

This is how I cut the steeks for this particular project.

I have here a steek with an even number of stitches. Here are the edge stitches, and here is the centre line along which I’m going to cut. Now, I have already reinforced the steek. If this were a real piece of knitting I would probably be joining a button band, or sleeve, or something like that, to this line of edge stitches. And, because joining something like that involves picking the stitches up, that puts quite a lot of stress on the stitches nearby, so I would actually pick up those stitches before I cut the steek. But this is a swatch just to show you how it works, and it’s a lot easier for you to see without anything on the edge there to hide what I’m doing.

This is is the swatch with a  steek with an even number of stitches, and what I want to do is cut between the two central stitches, to cut up along this line here. I’m going to use a pair of sharp scissors.

And here we go.

There’s the line I want to cut up. I cut up the middle [between] those stitches.

And there we are, there is the steek cut.

And you can see a few ends on there because the whole stitch [was left behind] on either side. So that line of reinforcement is going to hold those stitches and stop them pulling out.

I am now ready to cut this steek.

So, here we have got the steek. Here are the picked-up stitches on the cable, with the needle. The edge stitch has been picked-up. Here is the first stitch in, the second stitch of the steek, the third stitch here is that right-hand leg, and you’ll see here [that] the left-hand leg is under the crochet and [let me pull that out a bit so you can see more clearly] here is  the left-hand leg of the right-most of the two central stitches, and its right leg is also caught by that crochet. Coming across, here is the left-hand stitch, free right leg, left leg is crocheted together with the next steek stitch, and the dark, the light steek stitches, and once again on the other side there is the cable with the stitches picked-up on it. I am going to cut up between these two central stitches here.

I am going to take some sharp scissors, and I’m going to cut up the centre there.

I will put my hand on the inside of the fabric so I can be sure I don’t cut through the other side. I am going to start off by cutting at the bottom, between those two central stitches.

And keep going, making sure as I go along that it also cuts through the floats that might be going across the centre. Aiming to go between those central stitches This is not as awkward when you’re not trying to film, but I’m trying to watch your view as well is being able to see what I’m cutting.

It is a light coloured background here, which makes it easier to see the stitches.

Those yarns across the back are just the ends, and they have knit together a bit while I’ve been doing the rest of the knitting.

Almost at the end. And the last little cut or two.

That’s a steek cut now. I waited until I had picked-up the stitches, because that puts up a lot of stress on the steek stitches themselves, but I needed to cut the steek before I start knitting, because with an eight stitch steek but a 16 stitch or 17 stitch underarm to pick-up, you just couldn’t stretch the yarn enough to do that (knit that) in the round without having cut that steek.

One are the things that you can see, I will put that back together again, is is that you cannot see the steek. Because I picked up the stitches through [the edge stitches of] that steek, that steek automatically, by itself, without me having to do anything, folded back up against the inside of the fabric. This is what you would expect to happen, and it didn’t need any help to do that.

As long as you are patient, cutting steeks is not that difficult. You can see more information on steeks in the reference below.

The final steps

Now I had cut the steeks, I could start knitting the arm bands and the neck band. If you are really clever, you can pick-up the correct number of stitches as you go round. Usually, I find I pick up a couple extra or miss a few. You can correct this on the first round of knitting. So, if you have missed a few you can either do an increase in that round, or if you have got a spare stitch available to pick-up from, you can pick-up using the yarn from the previous round. If you have too many stithches, you can do a knit two together, or a purl two together, depending on your pattern. to get rid of the extra stitch. You can then continue round.

Once I had knit the bands, the whole thing was looking like the finished article. I have now finished putting the corrugated rib around the first of the arm holes of the vest. You can see it is sitting there quite nicely on the edge. If I just turn it over, inside you can see that the steek stitches are now lying very nicely against the inside.

All by themselves.

What I needed to do now was tidy up all the ends. The ends around the steeks, that were cut when the steeks were cut in the middle and you had the ends right next to that, I just trimmed off to leave a few centimetres in there so it was easier to block and pin out. The other ends I had to weave in. Below the arm holes, all those ends needed leaving in. The ends on the short rows for the shoulders needed weaving in. The ends for the arm bands and the neck band needed weaving in. And also the ends I had in the middle of rounds where I had to add on a ball of the same colour because I had misjudged being able to get all the way round. So, all those ends needed weaving in, but I left tails on those so that the yarn was able to adjust itself during the blocking without undoing the weaving.

The next step was to block. To do this I put some wool soap in warm water in a basin and thoroughly soaked the garment in that. I did not scrub it – I just pushed it down under the water, making sure it was fully soaked. I left it for about 20 minutes. Then I emptied out the bowl, just pushed down on the wool to get out most of the water, refilled the bowl with warm water, so I was rinsing out the soap. And with the soap, out went any dirt from my hands while I had been knitting it. Rinse out again until no more soap is coming out, and then just squeeze it, don’t turn it, just squeeze it to get most of the water out. I then wrapped it in a towel. So, I rolled it up in a towel, so that I could then wring the towel but I was not going to be felting the wool, because I was not moving the wool. That got a lot of the extra moisture out. This just speeds up the drying process. I was doing this in winter, when the weather was quite cold, and also quite damp, so anything to speed up that drying process is useful. I then put it out on my blocking mats, spread it out with my hands to get it to the right shape, and then put a few pins in to keep it straight. Then I let it dry.

When it was dry it was blocked, and almost finished. There were two more things to do. The first thing was to cut off all those ends, taking them right down now. The yarn had had time to adjust. And pull them [the ends] down, to just leave half a centimetre at most on the inside for those yarn [ends]. The other thing I wanted to do was to tack down the edges of the steeks, those free edges that had been cut. This is when in the pattern it asks you to tack those down using a cross stitch, because that is the way in the pattern that those steeks are reinforced. I had already reinforced them, so I used a very loose running stitch, just to stop those edges pulling up when I put it on. They were lying flat naturally anyway, but what I didn’t want was for the edges to flap round and be visible from the front when I put the garment on.

That done, the very final thing to do was to lightly press it. I turned it inside out, used a cool iron, and very gently pressed the inside, using a tea towel on top to avoid touching the yarn directly. That just evened out any little creases that were there.

So, now I can show you what the finished item looks like.

So this is it, the finished Nahinni [River] vest. [With bird song in the background] I will turn around so you can see the whole thing. This is the Nahinni River project finished.

Here it is, the finished item.

What have I learned?

What have I learned from knitting this project?

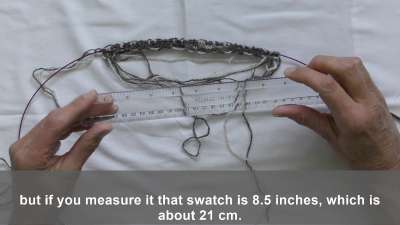
Well, the main thing has been about gauge. As you know, I used a gauge swatch to help me decide what size I wanted to knit, and to help me work out how I would achieve that size. I chose to knit the 45 inch (114 cm) version of the pattern, because that would give me the length that I wanted and be a reasonable fit width ways if I was knitting at the gauge of the swatch. I then started knitting, and found that my gauge was slightly looser than in the gauge swatch. Even though I had taken care to knit the gauge swatch simulating knitting in the round. I now put this down to having switched from wood to carbon fibre needles.

As I was knitting, I took a fairly long break from this project, because I was knitting other projects. And one of those happened to be another Fair Isle project. When I came back, I continued knitting, and found that on that final section of knitting, my gauge was a bit looser still. Whereas with the initial gauge I had knit the 45 inch pattern (114 cm) expecting to get something about 46 inches (117 cm), I actually ended up with something about 48 inches (122 cm). This was still perfectly wearable, it looks good, but not quite what I was expecting.

So I have got to pay more attention to how I measure my gauge and how I track my gauge as I am going through. The first thing I have to do is to make sure that I am doing a gauge swatch that mimics as well as I possibly can the finished item. So, instead of knitting a conventional gauge swatch simulating knitting in the round, I would knit a hat using the same stitch pattern That would be closer to how I knit the final thing. I also want to make sure that I don’t change my [knitting] style, because I think that one of the things that I possibly did later on in the project was to pay more attention to stretching out the floats in the project. That might have made my knitting a little bit looser. As it turns out, I don’t have a problem with float length in the initial part, so I was probably alright in the first place.

The other thing is “don’t switch the material”. I switched to carbon fibre because I often sit on my needles [by mistake] and break them. I haven’t broken carbon fibre ones, but I did get a slightly different gauge.

The biggest lesson is to do the gauge swatch mimicking as closely as you can the final garment. If it is a child’s garment you might as well start knitting a few rows of that because it is not going to be a lot to frog back. If it is a garment for someone the size of me, you’d probably want it [the gauge project] to be a bit smaller than the final garment itself.

So, knit something that mimics what you want to do; make sure you use the same yarn, the same type of needle, and the same stitch patterns as you are going to be using for the final item. That should help you get better gauge.

Until the next time…

But for now, I have finished this project, I am wearing the outcome, and it is the end of this podcast. I hope to do other podcasts on different topics in the future.

So, until the next time,

Happy Knitting!

Links to items mentioned in the podcast

Up to the armholes in the Nahanni River (P202001)

Front of Nahanni River project showing neck steek.

This is the fourth podcast in a series that shows how I am knitting the Nahanni River sleeveless pullover, and describes techniques used in knitting the Nahanni River project: casting on for a steek, decreasing in colour work, and using symmetry to spot mistakes. It shows progress at the end of the second vertical pattern repeat.

Audio only version:

Teabreak Knitter logo
T-break
Nahanni River 4. Up to the armholes in the Nahanni River (P202001)
Loading
/

Transcript

The headings in this transcript link to the point in the podcast where that topic starts. This transcript has been edited to correct errors and to clarify phrasing.

Introduction

Hello. I’m Steve, also known
as TeabreakKnitter on social media.

This is the fourth in a
series of podcasts in which I’m talking about how I am knitting the Nahanni
River vest. The pattern is by Simply Shetland, and the author is Betts Lampers.
I’m knitting it in Shetland wool from Jamieson’s of Shetland (in spindrift).

In the previous podcasts I’ve
talked about how I planned this project, how I cast on this project and how I’m
knitting the project in stranded knitting. In this podcast I want to show you
how I cast-on for the steeks (for the arms and the neck), how I’m doing the
decreases in the colour work to make sure I maintain the pattern, and how I’m
using symmetry to check whether I’ve made mistakes in the pattern or in a
decreases.

Cast-on for steeks

I will start off talking
about how I cast on for the steeks. I will do this by showing you a more detailed
view, using not the yarn for the project but a larger yarn so that you’ll be
able to see what I’m doing.

The steek that I’m going to
make is to cover these four stitches here, that I’ve marked with a pin, that
will be put on waste yarn, and might later be used to pick up an armhole, for
example. I’m going to use an eight stitch steek. I’m using an even number of
stitches, so that should I have to change the colour yarn in the middle of the
steek, I can be sure of catching both colours of the old yarn, and both colours
of the new yarn. I’m also going to be adding an edge stitch to each side of the
steek in the background colour, which would normally be used for picking up armholes
for the arms or button bands.

This is how I do it. I’m
going to be knitting up in pattern, so keeping this pattern with 2, 4, 4, 4, 4,
2 colours. Two dark stitches before the 4 stitches I want to pick up, so here
are the four stitches I’m going to take onto this yarn. You can see that I’ve
already threaded it through.

Here’s the stitch before the {first
steek} one, and what I want to do is to make an edge stitch, tied into this
one. So, knit that stitch as normal but leave the loop on the needle so I can
knit into the back of that. That’s the edge stitch. I want to mark that
position, because that’s actually the start of the steek. That stitch is always
going to be in knit in the background colour.

Now, before I do anything
with those other stitches, I’m going to make the stitches for the steek. The
first stitch in the steek is going to be contrasting with this one, so it’s
going to be in the light colour yarn. I make a loop with a dark colour yarn, and
knit into it with the light colour yarn. I’ve now got the first steek stitch.

I now use the light colour
yarn to form of the loop, {and} the dark colour yarn to form the stitch. That’s
two steek stitches.

Loop in one colour, knit in
the next {other colour}. {There are now} three steek stitches.

The fourth steek stitch is
going to be in the dark colour. Now, I want to be able to spot the middle of
the steek very easily, because it’s the middle of the steek that I’m going to
cut. So, I make another loop with the light colour, and knit with the dark
colour. I’ve now got those two dark colour stitches next to each other. They’re
what I’m going to look for when I cut the steek.

I now knit another three
steek stitches, starting off with a stitch in the light colour.

I’ve now got one edge stitch
and 1, 2, 3, 4, 5, 6, 7, 8 {steek} stitches. I want to make another edge
stitch.

Now I return back to the main
fabric. Here are the four stitches that I’m going to put on hold, and here’s
the first stitch of the fabric that’s going to be knit as a light coloured
stitch.

However, I want to create a
new edge stitch, so I’m going to knit into that with the dark yarn, put in a
placeholder {stitch marker} for the start of the steek, and then I’m going to
knit through the back of the loop {in the light yarn} to give me the light
stitch that I want.

And continue to the end of
the row. So, that’s my cast on. I’ve got the two edge stitches that were knit
into to the last stitch the fabric {before the start of the steek}. That ties
them in quite closely to that, and then I’ve got the alternating steek
stitches. As you can see each stitch is formed from a loop of the opposite
colour. This means that when I come to reinforce the steek I can make sure that
very bottom of the cast on edge and the stitches themselves are reinforced so
they don’t pull back.

The reason I used the eight
stitch steek is so that when I reinforce I’ll be tying those two stitches together
and those two stitches together so if I change colour in the middle, the two
old colours are going to be held together and the two new colours are going to
be held together, so that the whole fabric is reinforced even if I’m changing
colour.

So that’s how I cast on for
my steeks.

Decreases in colour work

In this next section, I want
to show you how I do decreases in the colour work so that I maintain the colour
pattern. The idea for this came from Roxanne Richardson, and the URL of her
video is shown in the list of “useful links” at the bottom of this page.

I’m going to show you what I
do, again by cutting away and using a larger yarn so that you can see more
easily what I’m doing.

I’m going to show you how I
do decreases when I’m {knitting} stranded colorwork, and I’m going to show you how
I decrease around this steek in the middle here.

So I’ve got an 8 stitch
steek, with 2 edge stitches on it. I’m going to decrease here, in these two
stitches, and in these two stitches in just the same way as I would for an
armhole. I’m working in a chequerboard pattern that makes it very easy to see
see how the stitches are lying. I’ll just work up towards the decrease. One
more stitch.

And we have a light and a
dark stitch that we going to do the decrease on. Now, if I was working in a
single plain colour, I would do a knit two together (k2tog) here, so that the {decrease}
stitch was lying parallel to the seam. So I’ve got a right leaning stitch so
that it will look neatly lined up against the seam, which will actually be made
into the edge stitch. But look what happens now in the colour work if I do
that. (I’ll just pull this back stitch tight a bit so that you can see what is
happening here). So you can here that you’ve got your colour work. You’ve got
white, brown, white, brown, white and when the next stitches tighten, those
stitches lie over each other each other, so we get two white stitches next to
each other – which is not what we want.

If we undo that, and instead
of doing a right-leaning knit two together, I do a left-leaning ssk {slip,
slip, knit} (I’m succeeding in making the stitches quite loose by re-working
them!) you can see what’s happened here now. We’ve got white, brown, white,
brown, white, brown, white and the dominant stitch here is the brown.

Let’s work our way over to
the other side {of the steek}.

On the other side the seam
will be leaning the other way, so it’s where I would normally do an ssk {slip,
slip, knit}. I’ve got a left-leaning stitch so that it follows the line of the
seam. Let’s see what happens if we do an ssk on the left-hand side of this.

Slip, slip, and it’s going to
end up with a dark stitch. And {now knit} the light stitch next to it.

Once again, when things are
tightened up, what do we find? We have two dark stitches next to each other.

Let’s see what happens if we
do knit 2 together {k2tog}, a right leaning stitch. Knit 2 together brings that
left hand light stitch on top. And again, I’ll knit through it so it is easier
to see what’s happening here.

Using the right-leaning knit
two together {k2tog} we have kept the light, dark, light, dark, light pattern. And
you can see that there’s a dark stitch tucked underneath.

If you look on the other
side, again the light stitch is tucked underneath the dark stitch, so you’ve
kept the continuity of pattern going better.

So, in colour work,  when you come to an area of decrease at the
edge of the fabric, you want to use a decrease that leans TOWARDS the edge.

So if you’re coming up the
fabric and to the left you’ve got an edge of the fabric at which you will be
decreasing, you decrease using the ssk {slip, slip, knit} left-leaning stitch to
do a decrease there. On the other side, where you are at the edge of the fabric
and moving in towards the centre of the fabric as you knit, you want a
right-leaning decrease, the {k2tog} knit 2 together. That way you lay the
correct colour on top on the public side of your work. This keeps {colour}
continuity of the row before the one you are knitting at the moment.

So that’s the rule: to do a
decrease in colour work lean the decrease TOWARDS the edge of the fabric.

That’s how I do the decreases
in my colour work.

Using symmetry

In a previous video I talked
about how I follow the chart and make sure I can see what the pattern was on
the previous row when I’m knitting the current row as a way of finding out
whether I’ve made mistakes or not quite early on. Something else I use is
symmetry.

Patterns are quite
symmetrical in this and most other stranded knitting, and you find what happens
at one arm hole happens at the other. What happens either side of a V-neck
tends to be symmetrical across the two sides. I can use that to spot whether I
have made mistakes in the colour work, whether I have done the right number of
decreases and things like that.

I’d like to start by talking
about the different types of symmetry.

You have translation symmetry
and reflection symmetry. These are particularly helpful to knitters. There are
also other symmetries called rotation and scaling, that I won’t talk about in this
podcast (or the T-torial whose link is in the “useful links” section below), but
designers might be particularly interested in those.

In terms of translation
symmetry, this is where a shape is repeated either horizontally or vertically. In
this case you can see the triangle is repeated as you go across a line. You
might see minor variations, in this case in the colour, but basically we’re
interested in the things that are common.

In a written knitting
pattern, translation symmetry could show up as a repetition in a row knit 2,
repeat (purl 2, knit 2) three more times, or
repeat (rows 3 to 5) 10 more times that would be a vertical repeat.

So this is a repeat within a
round or row, and this is a repetition of a group of rows. If you do one of
these repetitions, you can compare your current repetition with earlier ones to
see that they’re the same. If they’re not the same, you can work out where you
made your mistake before it is covered up by more complicated patterns coming
on later.

Looking at that another way, you
might have your knitting represented in a chart, and a chart would often have a
motif that is then repeated as you go along a row or you go up a row, just like
this one.

What’s not necessarily
obvious from the motif itself is what the overall pattern looks like, where you
will often see other symmetries appearing that you weren’t obviously aware of.

Here we have got the 1,2,3
horizontal repeats and the 1, 2, 3 vertical repeats. As the original motif is
repeated you can see that it’s forming an overall systematic design which is of
set of crosses on a background or, if you prefer, a set of diagonal lines with
the crosses between them.

You can use this as you are
knitting to be able to compare what’s happening in this repeat with what’s
happening it that repeat.

The other type of symmetry {that
I will discuss} is reflection (as things would appear in a mirror).

What happens as we move from
left to right is the opposite of what happens as you move from right to left. This
can useful in knitting when you’ve got something like an armhole or a v-neck.

Coming back to our pattern,
you can see this vertical {reflection} symmetry here. If you come up column 10,
if you look to its right, on the top row you’ve got a white, black, black,
black and on the left you got a white, black, black, black. So what’s happening
on one side of the line of symmetry is the opposite (is happening in the
opposite order) to what’s happening on the other side.

Translating that into
knitting, and say we’re here, and we have got a v-neck that we’re doing in the middle
of the front of a jumper {sweater in the USA}. What happens if you have a
v-neck? The V is normally placed along a line of symmetry in your design, so
that the left-hand side of the garment looks like the right hand side of the
garment, and everything is nice and symmetrical – balanced left and right.

As you do your decreases,
what you actually see here, starting at the bottom, is that what’s happening on
the right hand side (as you look at it in your knitting) is that things are
happening in the opposite sequence to on the left, and the same as you go up
through all these {rows}. As you knit across your V-neck, once you get to the
far side you can check that you have the same sequence black, white, white, as
you move away from the V.

You can also use this is as a
way of working out where {in your pattern} you should start knitting again after
the V. As you have got the chart, you’re working your way across and often this
{the starting point} will be set in from the edge of the motif as is it shown
in your pattern. When you pick up the other side of the V-neck you can just say
“where am I in the pattern? I’ve got to be looking for where it goes white,
white, black, black, black” and you can look for that sequence on the
other side just to check you are picking up and knitting your chart from the
right place.

As for armholes, often you’ll
find the armholes are symmetrical. You’ve got the same pattern as you leave the
armhole on what to you as you knit is the right hand side as you looking at it,
as you have on the opposite side. So again, you can check that at the beginning
of the part of the garment you are knitting you have got the same sequence in
reverse as you have on the opposite side.

That doesn’t always work,
though. This {example pattern} is offset slightly. It isn’t symmetrical. {For
example, if you} take this line you’ve got one black there and 2 blacks there. However
you will often find that the front and the back of the garment are the same, so
if you’re looking at the front as you knit it and you’ve got the sequence two
blacks anda white on this round then as you’re knitting the back and you come
away from the armhole you’d also expect to see two blacks and a white. And the
same {principle} the at other armhole.

So that’s another way in
which you can do the checking, even if an individual part of the garment isn’t
symmetrical, you often see a symmetry with a different part of the garment that
you can check as you are knitting.

I’ve been talking about this
in terms of colours, colour work. It applies equally if you are using stitch
patterns, such as knits and purls, and for lace work and other open work where
things can get a bit more complicated. Certainly as you knit one repeat of your
pattern you can check that with the next repeat immediately you have finished
the second repeat to make sure you have the same sequence of stitches. At that
stage it is easier to go back and correct what you’ve done. Once you’ve done a
few more stitches, and even gone on to the next row {or round} of your
knitting, it becomes far more difficult to correct your open work.

Let’s have a look at what
that means in practice. Here’s an example of where we can use translation to
find a mistake in our knitting.

In this swatch you’ve got a
front which has a v-neck opening and armholes that you can see on the front and
on the back. What we have here, if you look in the vertical, we have the
pattern repeating there and there, is that that cross has got a white centre, and
that cross has got a brown centre. So there’s a mistake. This repeat is not the
same as that repeat. That centre is wrong.

Things get a bit more
complicated as we try and find the mistakes on the front here. Just to help you
orientate yourself, here is the front of the knitting, and I have highlighted
the edges of the steeks with those blue threads. You can see here if you got
the v-neck and you’ve got the two steeks on either side.

With that to help us, what
can we see?

First of all if we look at
what’s happening here and what’s happening here in this sequence, we see quite
clearly that there are two white stitches as we come away from the edge. And
here, we appear to have a brown and a white. If you compare what’s happening,
this is where I’ve used a knit two together which is sloping towards the
interior of the fabric, instead of an ssk which would have been sloping away. If
it had been sloping away, the white stitch would have been dominant, not the
brown stitch.

We have got a difference
here, that as we are coming in, you have got two clear white stitches
here,  and we have got two stitches being
joined together here. I forgot to decrease on this side. On this, down here, is
another sequence that if you look is incorrect. In this one I have used a slip,
slip, knit (ssk) which is a right leaning stitch, instead of a left leaning
stitch. You are getting a different appearance down on this bottom part, here.

Looking on the back and the
front at these armholes now.

You see here that we’ve got
two stitches in white and one white below them and a brown above that. Here
you’ve got the two {white} stitches, the one {white} stitch and a white above. That
should be the same {as on the other side}, of course.

We have got the armhole here.
We are starting the pattern away from the armhole should be the same, but it’s
not. Here you have got the mistake – that round should be a white.

On the left here you have
part of a cross up against the steek, Here I have got a full cross against the
steek. There must be a mistake there. In this particular case, the mistake was
that I forgot to decrease. Again, we are using the translational symmetry of comparing
the front and the back.

So by understanding that you
can use the various repeats in your pattern to see where things should be the
same, so you can compare them, and understanding how the shaping of your
pattern is symmetrical, either side of a centre line in a symmetrical pattern, or
between front and back, when you are knitting your piece, you can see where
there are differences where there should be no difference at all, and you can
go back and correct those problems before they get buried under the next few
rows {or rounds}.

That is how I use symmetry to
help me find mistakes in what I’ve done early, so that I can correct them.

Progress with the project

Now I’d like to show you the
progress I’ve made with this project.

I’m about halfway up the arm
holes at the moment. It’s a good time to take stock because I’ve knit the body,
I’ve started knitting the steeks so I can show you where the steeks are, what
they look like while I’m knitting them, and I can also show you something about
how I’m planning to do deal with the ends of the yarn.

So here it is.

This is the project so far,
and the first thing I want to show you is this, the steek at the front. You can
see that here is the gap at the start of the steek, and the stripes up here are
where I will actually cut the steek.

The other steeks are at the
edge of the arm holes. Here, the gaps how much are larger at the bottom because
I’m holding more stitches for the underarm, but the width of the steek switches
themselves, the banding here that I’m going to cut, is the same.

If you look inside, you’ll
see the ends. As I said {in an} earlier {podcast} I didn’t weave in the ends as
I went along. I’m going to weave in these ends later on. We then come to the
steek for the armhole. Above the arm hole all those ends are actually in the
middle of the steek, so once I’ve secured, reinforced, the edges of that steek
and cut down the middle, all those ends there will be exactly the same as the
knitted rows, in that there will be a cut down the middle there, and for every
single row the strand of wool will be finishing at the middle there, so this
set of ends I won’t need to weave in because they’re held by the reinforcement
of the steek.

So this is where I am. The
reason I stopped at this particular point is that I have reached the vertical
repeat in in the pattern. So it is a convenient place to stop, do the filming, and
remember where I got to.

What’s next?

So that’s my progress on the
Nahanni River vest, and in the next podcast, which I expect to be the final
podcast in the series, I’ll show you the last few techniques that I’m going to
have to use in order to knit it. I’m going to have to reinforce the steeks to
stop them unravelling, and I’m going to have to cut the steeks to make the arm
holes to make the V of the neck, and I’m going to have to pick up and knit the
arm bands and the neck band.

So that will be the topic of
the next podcast.

Until then Happy Knitting!

Links to items mentioned in the podcast

Starting to knit the Nahanni river (P201903)

Cartridge rib and start of pattern for the Nahanni River vest.

This is my third podcast in a series that shows how I knit my Nahanni River vest stranded knitting project. I talk about using charts for the colour work, how I knit with two colours, cartridge rib, and knitting the Fair Isle pattern.

This is a video. There is also an audio only version:

Teabreak Knitter logo
T-break
Nahanni River 3. Starting to knit the Nahanni River (P201903)
Loading
/

Links to items mentioned in the podcast

Transcript

The headings in this transcript link to the point in the podcast where that topic starts. This transcript has been edited to correct errors and to clarify phrasing.

Introduction

I’m Steve, also known as Teabreak Knitter on social media. This is my third podcast in a series on how I’m knitting the Nahanni River vest. This is based on a pattern by Betts Lampers that’s published by Simply Shetland, and I’m using wool called Spindrift from Jamieson’s of Shetland.

In the first podcast I talked about how I read the pattern to find out what I would need for the project, the wool, the techniques, the tools, things like that.

In the second podcast I talked about the cast-on and showed you how I was doing that.

In this the third podcast I’ll show you how I’m getting on with actually knitting the project, which means I’ll be talking about how I’m using the charts for the colour work, how I’m knitting with two colours, how I have have done the cartridge rib, and how I’m knitting the Fair Isle pattern.

In most of this video I’ll be showing you overhead shots because I’ll actually be showing the charts, and showing you the knitting as I’m doing it.

General chart properties

Before I show you how I interpret and use charts for colour work, there’s just a couple of things I want to say about charts for knitting in general. T

The first point is that the purpose of a chart is to give you a visual impression of how that knitting is going to be knit, and how it’s going to look when the final fabric is made. And so you can see on this chart that you can see the basic shapes that are going to be formed by the stitches. And it’s useful to remember that what you’re looking at is a picture, it might be simplified, of what your knitting is going to look like when it’s finished. That should help you remember some of the basics of a chart.

Charts are numbered up the side side for each of the rows. Whether you are knitting flat or rounds (if you are knitting in the round), you will often have the numbers repeated up the sides here. If you are knitting flat you might find odd numbers on the right hand side of the chart and even numbers on the left-hand side of the chart. That would be to remind you that when you’re on an odd number you’ll be working your way in stitches along in that order [right to left], and when working flat you’ll be working back along the [even numbered] row in the other direction. Because when you are knitting flat and you are knitting from your left needle to the right needle, then the first stitches you do will actually appear on the right hand side of the fabric, and the last stitches of that [row] will appear on the left-hand side of fabric (if you working on the front side of the fabric, on the outside of fabric). On the return, typically a purl row, you will actually be starting at the opposite side. You’ll be starting on the side that when the fabric is finished will be the the left hand side of the fabric and so you need to work your way across the chart in the other direction. Knitting flat you work one way then the other, then the other, then the other. And that’s why in many charts you’ll see the odd numbers written on the right hand side and the even rows numbered on the left-hand side, to remind you which side of chart you’ve got to start. If you are knitting in the round, you always go from right to left because you’re just keeping going knitting in the same direction. You don’t reverse knitting (the direction of knitting) when you working in the round, so you don’t reverse the direction on the chart. And that’s something that’s very important to bear in mind. A lot of people when they start knitting with charts can be confused about which way [direction] you are kintting.

These columns are also numbered, and that’s the stitch into the patern repeat. It is not necessarily the same as the number of a stitch in the row. That’s basic information about all charts used for knitting. That’s the basic difference between reading them for in the round when we are always going right to left, and when we are knitting in the flat where we’re going from the right side row to a wrong side row, going from right to left then from left to right. It is just like remembering that you’ve got to knit, if you are in stockinette, you knit on the outside, and purl on the inside of your fabric.

So, that’s the generic bit about knitting with charts, and I now I’ll talk a bit about knitting with colour in charts.

Using a colour chart

This is the style of chart used in the Nahanni River pattern. It is very clear, and it’s very easy to reproduce in black and white. It’s also very useful if you’re not good at distinguishing between different colours.

In the chart area, these are the various rounds from 1 to 20, and in the Nahinni River pattern and many others these will repeat several times as you work your way up the project. Across the way you have got the various stitches, and in almost every project these will repeat as you go round. The X represents a colour [stitch] in the motif colour. In this column here, this, the blank, represents a background colour.

In the pattern it will tell you what motif colour to use for each of those rounds, and which background colour to use for each of the rounds. There is no indication on the chart itself of where those changes take place. So you need have a system for reminding yourself when you need to change colour.

There are other ways of representing information on the chart, and here’s another example, perhaps a bit more obvious. In this the grid, as before, shows you which colour to knit in, but here the colours are represented by the shading of each square, so you’ve got light green, dark green, blue, red, and for each of those colours there will be a key to tell you which colour each coloured square represents. Here I have just recoloured the monochrome one [chart]. This is quite easy to read if you using a few colours, however if you are using many different colours (7, 8, 9, 10 colours) you won’t get enough contrast in the pattern to be able to put in a close representation of the yarn you are using into the colour pattern, and you’ll find the patterns not only have colours on, but also have different styles of shading to help you distinguish between them [the colours] and, of course, the colour in the chart isn’t necessarily the same colour as the yarn. This may happen with a designer publishing a pattern, but it will almost certainly happen if you choose to change the colour scheme of the item you are [making]. Then you’ll need to remember that a red square represents a white yarn, for example.

This is the principle you are using: each square represents the colour.

Let’s go back to the monochrome one [chart]. The Nahanni River pattern is like most Fair Isle patterns in that as you work your way up then the motif yarn changes. As you can see here in this pattern there are 3 [rounds of] colour A, 3 of colour B, 3 of colour C. Three colour B, 3 colour A, 3 colour B, etc. And these repeat as you go up. If you have more than 20 ROUNDS, then you go back from ROUND 20 to round 1 when you reach that stage. Similarly, almost every project has more stitches in a round than you have stitches shown in the chart, and in that case you go from 1 to 20, 1 to 20, 1 to 20, just repeating them round as they go.

Now, when you are knitting this yourself, you’re going to need to remember when to change your motif colour and when to change your background colour. The method I use do this is to actually mark up the chart, like this. What I done here is that I’ve highlighted between the various rounds when I’ve got to change one of the colours. I used the convention that a red line means I’m changing the motif colour and a green line means I’m changing the background colour. In this chart they don’t both change at the same time, but that thick line there, I use to tell me “look and see what colours you’ve got to change”. It’s a way of reminding me.

That’s the first thing I do to make it simple to use.

The other thing that you’ve got to work out is where you start in the chart.

If your pattern is for only one size, then you would normally be starting at column 1 and going through to 20 like that. But as soon as you get any shaping you start to run into the issue of where you start in the pattern, and if your pattern has multiple sizes, you’ll often find that some of the sizes start at column one, and others might start at column 10 depending on the size. So you may want to put on markings to show where you need to start. For example, I might want to put a mark there to show that in the size I’m making I’m actually starting in column 6 every time I start a new round.

Similarly, you may not start at the first row in the chart as you start your knitting. Some sizes of the pattern might, others might not, so you might want to mark on the chart where it is that you are going to be starting, and perhaps also mark where you’re finishing in the chart, both up and down and as you work your way around the round.

It’s your chart, your copy. You can mark it up in ways that are useful to you. And of course you can mark up the colour chart in exactly the same way.

Here I have still got those colour boundaries, they don’t necessarily show up as well, but just there as a reminder saying “hey, you’ve got to change the colours”, because even as you’re working your way up you may not notice that you change colours. Unbelievable as it seems, you may not notice while you are knitting, because you get so into the pattern that you forget how to do these things.

That’s the basic way I use the [chart] pattern.

The next thing is how on Earth do you remember where you are in the pattern? That’s why I use a board. I use a magnetic board, like this one, that I can put markers on to. Or, if I am travelling and more likely to knock things, because magnets can move, I would tend to use a clipboard, and ([I keep a supply ] on the back of here) put a transparent sticky label on to show where I’m up to.

Now how do I show where I’m up to? I’ll come back to the monochrome one [chart], because it is less fussy and so easier to see, and I will hold that steady on the board with a few magnets (and, of course, the board’s on a slope so it keeps slipping).

I have this transparent magnetic marker, so if I am about to start working row [round] 8, I’ll put the marker on so that it is showing me round 8. Because this is transparent I can also see the rows that are coming up, but they’re not as important as seeing the round that I am knitting and the rounds that came before it. I’ll explain why these are important.

First of all, it should be obvious why I need to show the round that I am knitting, because I have to remember that’s where I am on the chart.

It is important to see the row [round] below because that will help you avoid making mistakes, because as I’m coming across here, I could just count 1 motif, 3 background, 4 motif, 3 background, 4 motif. What comes next? Where am I? Is it that 4 motifs, or that 4 motifs? You can then look at the round below, and you can make sure your 4 motifs there are covering the background 2 motifs, a background underneath, and the same there. So that you can check that you’ve not missed out a stitch, or put in an extra stitch. So by being able to look back a round as you are knitting on you can check that you haven’t lost your place and that you are still matching up the pattern.

Moving up the marker, either the magnetic marker on a magnetic board, or transparent sticky marker if you are not using a magnetic board, that will show you which row you’re working on. But both the transparent magnetic marker and the transparent sticky marker can fall off.

When I’m working on a pattern I will often just [make] a check [mark] against each [round] row as I am going up, and each time I do a row I’ll add a check to it, and then use a bar-gate marker, so that I can see easily which round I’m on next. Many patterns will repeat many times as you go up and, of course, the one advantage of remembering to mark it in pencil on the side is that if you do move the marker (grandchildren, pets move the marker) then you can find where you are again.

Another way of helping you remember where you are is to use a row counter, and because we’re knitting in the round the row counter won’t fit neatly onto your needle. It will push the stitches apart. You want don’t want to do that, so I just tie mine onto a piece of yarn and put that at the start of the round, so as I move through the knitting and I come across this strand of yarn, I know I’m at the start of another round and I can advance the counter. So [that way] I know how many rounds I’ve done. It’s also useful to [set the counter] so that you’re counting where you are on the chart [remembering that you may not start on the first row and may cycle through the chart several times] rather than necessarily the number of rows, because it’s where you are on the chart that’s the important thing. How many times you’ve been through the chart is quite easy to count. That’s how I can remember where I am – a bit of belt and braces approach, I use two methods of counting. You definitely need a row marker on the chart you can see where you are on the chart, and you could either keep a record of where you are by writing in pencil on the chart or you can use a stitch counter. Of course you could use all three methods.

That is the basics of how I use a chart when I’m knitting a Fair Isle pattern.

One other thing to mention is that this is not the actual pattern for the Nahanni River, this is just a simple Fair Isle style pattern that I’m using to do the illustrations for the techniques on this project. It is easier for you to see, and I’m not infringing the copyright of the pattern designer in showing you this pattern.

Knitting corugated rib

Cartridge rib, which is also known as corrugated rib or vertical stripe stranded rib, is really simple. It’s knit 2 in the main [motif] colour and purl 2 in the background colour.

I’ll show you how you do that. Knit 2 in the main colour, bring background colour to the front and purl it. This is just [like] standard rib: knit and purl, [but] only [with] two colours. So now you have stranded the main colour behind the purl stitches. Take your purl [background colour] back, spread the stitches out a little bit on the needle, and knit the main colour again. Bring the [background] yarn forward, stretch out again so that the stranding at the back doesn’t pull it tight, and purl the two stitches. [Return the yarn to the] back, knit the two [main colour] stitches. Bring the [background] yarn to the front, PURL two stitches.

So, it is as simple as that, but you have to remember to allow enough slack at the back. Let me show you when I do it too tightly. Here’s my main colour. Knitting 2, and now to the purl 2, which this time I am going to really tug that tight and purl these two stitches stitches, and then I am going to tug this one tight. And that one, really tight. Then I’ll finish the round and show you what it looks like when I’ve knitted [another] few rounds. So here’s that really tight area that I was pulling tight after I have done a few ROUNDS of knitting, and you can see that the tight area is narrower, and if I hold it up like this you might just see that the purl section is now sitting proud of the surface and the knit section is lying slightly depressed. This is the opposite of what you’d expect from normal rib, and also from cartridge rib (or corrugated rib) that you’d expecting to be more or less even, though. Because the strands across the back are stopping the purl stitches moving backwards (as they would in a normal rib). So, pulling too tight in corrugated rib stops it being stretchy, it also makes the purl stitches more prominent than the knit stitches. It’s not a great sin, but you might find it annoying. It certainly makes it even less stretchy than corrugated rib normally is.

Knitting a stranded pattern

So how do you go about knitting with more than one colour?

One way, if you’re following this line on the pattern here, is to knit in one colour, the motif colour, then you swap your yarns and do the 3 stitches in that colour. Drop the yarn, pick the other one up, knit in that colour, and keep going on like that.

Another way some people prefer is to loop the 2 yarns over your finger, and then knit with the colour yarn that you are using. I have done 2 in background [colour] and now do 1 in the foreground. Now 3 in the background, and 1 in the foreground. You keep going like that.

I prefer to hold one yarn in my right hand, and one yarn in my left hand. I knit [using the] English [method] with my right hand, and continental [method] with my left hand. So it’s up to you which way you choose to knit, provided you’ve got an even tension with each stitch it’ll work fine.

I’ll continue using the [two hand] continental [and English] method, because that’s the one I normally use. Or, [rather,] the two handed method. Starting again beginning of the round, here. (And disentangle myself). Start off with the motif colour. Then 3 (2, 3) of the background colour, I need make sure that those stitches are actually sitting comfortably and not bunched up on the right-hand needle. Because then, when I strand the other yarn across, it is not going to be pulling them tight. So that’s that stitch. Being careful not to pull too tight across that earlier one. 1, 3, 1, 2, 1, 1, 1, 1, 1, 1, 1. There we have the next round of the [this repeat of the] column. And we continue on the next side.

I’ll talk you through other things I’m doing at the same time. Move up a round [so that I am at] the start of the round. The first thing I’m looking for is whether this pattern, of [1] motif, 3 background stitches, [1] motif [1] motif, 3 backgrounds, [1] motif match up what’s already on the needle. If it didn’t match up, then I’d have a problem, and I’d need to find out what’s gone wrong. So, background – now I’m doing 3 of the motif stitches here.

Trapping the right-hand yarn

I’ll have to strand 3 stitches across the back. To strand 3 stitches is fine, it’s short. But if you are getting a strand like this one across a lot more stitches, one of these 6-ones down here, here you could get that caught in your finger if it is in a sleeve, and then it is not only going to pull but of course you could get your hand stuck as you put it in.

So, for very long floats, you want to use a technique to stop the float being so big, but you don’t want to change the pattern. Although there’s only 3 stitches here, the technique is the same. I’ll show you what you do.

So you knit, typically for 2 or 3 stitches, to give you a 2 or 3 stitch float (obviously here it’s only 1 stitch) then before you knit the next stitch, you wrap the yarn that you are stranding round the needle, then you wrap the main colour yarn as normal, knit it and take it off [and unwind the stranded yarn]. I’ll do that again when we come the next group of 3.

What I am looking for now – I just knit that background on on top of that motif yarn. I’ve got 2 background yarns. I’ve got 2 background yarns and 2 motif yarns. So I’m still keeping the pattern going correctly. Background yarn on top of motif yarn.

And now I’ve got to do 3 motif. Remember I am going to catch this one, I wouldn’t normally, there’s only 3, so around the back, knit the stitch as normal, take it [the background yarn] back around again, and you’ve caught that yarn, and that is the three stitches. I’ll show you how to catch those stitches again. Background stitch. I want to catch this stitch, so the background yarn around the needle wrap the yarn that we’re going to make the stitch with, and then take the background yarn back again. I will do it once more.

If you notice, I am keeping the motif yarn on in my left hand all the time. You will see this when I show you other clips as well, and the background yarn is always in my right hand. That’s to manage something called “yarn dominance”. Roxanne Richardson has discussed this in her series of colour videos, and you might want to look at the URL on the screen [also in the links section of these show notes] to find out more about yarn dominance.

Back to the knitting. We now need another group of three. So again I’ll show you how to catch the stitch. Wrap the yarn you’re stranding round the back, make the stitch as normal, and take the yarn back again. And that’s caught it at the back of the piece of work. That will stop it catching on your fingers, By stopping the strand becoming too long. I’ll continue to the end of this ROUND and then you can see on the next that we have got three background-colour stitches. I’ll show you how to trap the motif [yarn] when we get there.

Trapping the left-hand yarn

Here we are back at start of the next round and we got a run of 3 background colour stitches here. Remember you don’t need to trap floats on only 3 stitches. When you get up to 5, 6, 7, 8 or more than that strand becomes longer and you can catch your fingers in it on the garment. It also means that is more difficult to have the right tension on that strand. There is a tendency to make a too loose or too tight in the finished item.

I’ll show you how to strand, to catch a strand of foreground colour [the yarn I am holding in my left hand – it is the fact that it is in the left hand that is important]. So, the first stitch is foreground colour. The next stitch is background. We want to trap the foreground colour this time, so you go to make the stitch, but before you use your background colour, just slip the motif yarn across the top of the needle.

I’ll show this again. You insert the needle, just lay it [the motif yarn] across the top, so you are winding it in the opposite direction than you would if you were knitting a stitch, you then form the knit stitch with the background colour, take motif colour back over the end of needle again, so it’s just lying over the top of the background yarn, and you have made a stitch and caught the [motif] float.

I’ll do that again at the next run of 3. The first stitch is normal, the second stich is started as normal, put the motif yarn over the needle, form a stitch, take the motif yarn back, and continue knitting. So, to catch the right hand yarn, you would wrap it round the needle before making stitch with the other yarn, and to catch the left-hand yarn, place it over the top of the needle before making the stitch.

And that’s it for trapping the yarn. I’ll just finish this round.

Finding mistakes early

I’ve now finished round 6 and I’m about to start round 7. On this round I’ll show you how to find some simple mistakes, and how you can correct them.

So we are starting round 7 with 2 [stitches in] background colour, followed by [1 stitch in] motif colour. And that should be background, motif, background, motif in row 6. But what I’ve got here is background, background, motif, background. So, just check the front to make sure we have got a row of stitches there, and to make sure that the floats are going as you’d expect [on the back]. The background colour is being carried across, and the motif colour has been knit there, We’ve got to correct these two stitches here.

So, on row 7, I start off by knitting a background stitch. This stitch is a mistake. So you want to drop that off the needle, and the next stitch is a mistake, and we want to drop that off the needle. The reason I’m doing both stitches at once is that it has now released a length of yarn from that stitch and from that stitch. So now, if I transfer this stitch here, the one that’s got to be a motif stitch, to the needle I can now knit that and I’ve used up that spare yarn, and that second stitch. And the next one has got to be in the background colour, so I will bring up that background float, and put it there.

So that’s round around 6 corrected to those two stitches, so I can now continue with round 7, which is 2 background colours, followed by a motif on top of a background. We now have two background, the first on motif, background, background, followed by 2 motifs on top of two backgrounds. Motif, motif, and the are both on backgrounds. Now 2 backgrounds.

The first on background, and, oh, the next one is on a motif but we have got a background colour here. What’s happened? Well, this one slightly different. You can see here, coming back a few rounds, those 2 stitches and those 2 stitches are in the same round, [but] that stitch and that stitch are in different rounds. This one is stretched, and that’s because, if you look on the back, the working [motif] yarn of the previous round. I’ve got that strand being floated there, and also the background colour is being floated. So I slipped that stitch rather than knitting it. I just need to go back and check what colour I need on there, and it should be the motif colour. Just bring that motif up here, that’s the strand from the back, knit that and now we are in the position to knit the second of those background colours. So I had slipped the stitch rather than knitting it, and that would be because I didn’t catch my motif yarn when I should have done, and ended up just slipping the stitch across.

Now continue with the round. We need motif on top of a background, 2 background with 1 on a motif, and 1 on a background. 2 motifs on the background, 2 background with the first on a background and second on a motif, now a motif on a background, followed by 2 backgrounds, 1 on a motif and 1 on a background, followed by a motif.

We’ve now done that first pattern repeat on that round, having have made a few corrections on the way across. The reason we can make those corrections without having to unpick everything is there we were only talking about one or two stitches having to transfer from one colour to the other, and in one case we just had to switch two stitches around, so we weren’t using up very much yarn. If you were to have to switch a run of stitches, you need to frog back because otherwise your motif or background colours would disappear as the yarn became very tight, as it stretched to make up those extra stitches.

The real project

At long last I’m going to show you how my project is actually getting on, knit with the real pattern and the real wool.

What we’re looking at here is the bottom part and around the cast-on area. So here it is the cast-on and here is actually the start of the round where the cast-on and cast-off finished. That’s why there’s this clump of wool here, that’s the cast-on wool [ends to be sewn in]. You can see round here the marker yarn that I used to help me count the number of stitches I had, and I also used it to help prevent me twisting that cast-on edge as I joined in the round.

It starts off with a section of cartridge rib and, as with most traditional Fair Isle, you can see here that the colours vary as you go up that rib section. In this case it’s the motif colours that are varying.

When you finish the rib section there’s a change in needle size. It’s one of the things you can forget to do as you’re going along. I remembered this time, and then you start into the pattern section.

To help me with the pattern I’ve put in a few stitch markers. As we work along the round, the first stitch marker I put in this one at the centre of the front of the vest. This is going to be at midpoint. It’s going to be the base of the Vee as you form the V-neck. This will help me check as I do each round that the correct column of the motif is occurring at that point. It is another those cross-checks that you can do to make sure that you’re not drifting off in the pattern.

Then the next stitch marker is at the edge of the front, so this as you are looking at the wearer will be the right hand side of the wearer. The size I’m knitting asks for an extra stitch to be put in there, and I’ve made that extra stitch look like a seam by purling it all the way up, and, regardless of where I am in the stitch pattern, I’ve made it a background colour. The reason for that is I wanted to create this appearance of having a seam there, and because it’s a purl stitch it is also another reminder to me that I have reached the end of one set of colour of pattern repeats, and it’s time to start the next set of pattern repeats. That’s also going to be where the steeks for the armholes are centred.

Then we come round to the centre of the back, and I’ve marked the centre of the back with another stitch marker. The centre stitch is actually the one to the left of it, and again it is so I can make sure that I’ve got the symmetry opf the pattern; it’s also where any shaping for the back of the neck is going to be taking place, centred on that.

Then the final stitch marker is at the end of the round to tell me I’ve reached the end of the pattern, and I have almost reached the end of the round, I’ve got to do another additional purl stitch to form the pseudo seam on the wearer’s left.

You’ll see that I’ve been cautious. I’ve not left this [piece] on the needles; I put the end stops on. That way I won’t accidentally slip the stitches off while I’m showing them to you.

What I have here is this stitch counter that I’m using to do my double check that I’m on the correct row, and if you’re eagle-eyed, you can see it is showing 48, which means, in the convention that I use when using a stitch counter, (that the stitch counter shows the number of the last round/row that I have completed), so if it says 48 I know that I should be starting on round 49.

What I am also doing with this particular pattern, because the pattern refers to either the length that you’ve knitted or it refers to the round number in the chart, I reset the counter when I reach [the top of the chart and] have to cycle through the chart vertically, so that the number on the stitch counter matches the number on the edge of the chart. It’s pretty obvious how many times you’ve gone through the chart and repeated it, so that’s another thing I’m going to use to make it easier to see where I am.

So the way I’m marking my progress through the chart is that I’ve got a magnetic marker that I move up the chart as I knit, and I’m also advancing the stitch counter every round I do. If I were travelling with this, I would also mark on the chart each time I finished a ROUND, because that row marker is going to slip, or I could catch the stitch counter.

The other thing that you need to do (obviously) as you check as you’re going along, is to check as you knit that the pattern that you should be knitting into, so the round before the one that you’re working on, actually matches up what’s in the chart, because I can (you can) forget to advance your stitch counter, you can forget to move your magnetic marker or, of course, they could get shaken or change for some other reason. So you want to do lots of cross checks, because the last thing you want to do is it unpull all this.

If I show you the inside, let’s start with the worst bit first, here is the beginnings of the rounds. Here is where I’ve had to change the yarns, and the yarns are all at the end here. You can see from the way I’m having to tug to pull them apart that the yarns are starting to stick together. What I will do in the end is weave these yarn [ends] in. I could have woven them in as I was going along, but I felt that, although it would mean a lot of work [at the end] not weaving them in as I go, there are advantages in weaving them in at the end, So that’s what I’m going to do.

I’ll just finish turning it inside out for you. You have seen the pattern from the outside. Here is the pattern from the inside, which I’m pleased is nice and even, and there are no very long floats in here. You can see in this area where I’ve caught floats where I was having a particularly long run in the pattern.

So that’s my progress.

As you saw on the stitch counter I’m 48 rounds into knitting that pattern, and I’ve got a fair way to go before I reach the neckline, which is where I’m going to be introducing the Vee for the neck, and come across the armholes, each of which is going to need steeking, which will have its own particular preparation for it.

For those of you have never come across steeking before, steeking is a technique where you can keep continuing knitting in the round, which is a lot easier than having to stop, and particularly to stop you having to change from knitting in the round to knitting backwards and forwards, because knitting backwards and forwards your tension is often different from knitting in the round. So it [steeking] has got a big advantages. It does mean, though, that you have to cut your knitting, which is something that needs a little bit of courage, but only the first time you’ve done it. Once you’ve done it you’ll discover that the wool holds together nicely. This is the wool that I separated before, and you can see that it is already starting to cling together a bit. That’s reassuring for when it comes comes to doing the steeks.

So, here is my project. This is where I have reached. I’ll put the camera away, and take it out again when I’m ready to start that steeking, and I’ll do an episode based on how I’m doing the steeks.

Summary

That’s the progress I’ve made with the project so far. I talked about how I’m using the charts for the colour work, how I knit with two colours, how I did the cartridge rib, and how I am knitting the Fair Isle pattern.

In the next podcast I’ll be talking about how I’m doing the steeking for the project. In the meantime, the show notes for this podcast are at the URL that you can see on the screen.

Until the next time, Happy Knitting!

Casting on the Nahanni River (P201902)

Back of the gauge swatch for Nahanni River

This is the second in a series of podcasts on how I knit my Nahanni River vest project. In it I discuss what I found out from my gauge swatch and casting-on and joining-in-the-round for this project.

This is a video. There is also an audio only version:

Teabreak Knitter logo
T-break
Nahanni River 2. Casting on the Nahanni River (P201902)
Loading
/

This my second podcast (more strictly a vlog) in a series in which I explain how I prepared to knit the Nahanni River Fair Isle pattern (designed by Betts Lampers and published by Simply Shetland) (the series is in a playlist in YouTube). In this episode I describe what I found out from my gauge swatch, and explain how I cast-on and joined in the round for this project.

You will have to wait for later podcasts to see how I knit the Fair Isle pattern and made the steeks – and whether the garment fits me!

The video version of the podcast is pubished on my YouTube channel. The sound channel from this is available as an audio podcast.

Links to items mentioned in the podcast

Transcript

The headings in this transcript link to the point in the podcast where that topic starts. This transcript has been edited to correct errors and to clarify phrasing.

Introduction

Hello I’m Steve. I’m also known as TeabreakKnitter on social media. This is my second podcast.

If you watched the first I’m really pleased you came back again, and you also know I’m building this series of podcasts around a project, a project to knit a Fair Isle vest called the Nahanni River by a designer called Betts Lampers and sold by Simply Shetland.

Last time I talked about how I assess the pattern to see what’s in it: for the yarn, for the tools I need and for any techniques I need. Then I went on to talk about how I chose the size that I wanted to knit, and any modifications I might need to it, and I ended up talking about how I started the gauge swatch.

In this podcast what I want to talk about is what I found out from the gauge swatch, talk about how I cast on, and how I join that cast-on in the round. I hope you enjoy this.

Gauge swatch

What did I find out from the gauge swatch? Well, before I show you in detail, here’s the gauge swatch. You see that it has quite a large amount of the pattern on. I’m quite proud of this. If you look at the back of the gauge swatch all the stranding has come out very evenly. It has also been washed and blocked and the wool is now very soft (you can’t I see see that it’s soft in the video, but it is beautifully soft). What I want you to see now is more detaisl of what I found out from the gauge swatch.

This is the gauge swatch for the Nahanni River vest. You will remember that I cast-on [the gauge swatch] using the basic stranded cast-on. I cast-off using the basic stranded cast-off. The cast-on and cast-off are loose, so they don’t actually control the shape and size of the swatch. I also knit this to imitate knitting in the round. I knit as usual from left to right, knit stitches all the way across. When I got to the end I slipped the needle through so that I was ready to start knitting again at the right hand side. I stranded the wool across the back loosely so that I had the wool on the correct side to start. I then knit all the way up. This particular swatch is 48 stitches by 48 rows. When I had finished knitting it, I cast it off the needles and cut the strands that had been across the back so that I could tie them up. Now I’ve got something that is flat that I can measure. I find it very difficult counting stitches, counting across columns or counting the number of rows. I only wanted to do that once, even though I’m going to be measuring this swatch several times. To help me do that, I’ve run threads horizontally and vertically using very thin contrasting colour yarn so that I can see them. That means I know how far it is, or how many stitches there are, between the two sets of threads, which means all I have to do now is measure that distance in order to work out the gauge.

The first time I measured this [swatch] was when I had taken it straight off the needles. I took it off the needles, put these threads in and measured the distance across and the distance up and down between the threads. That gave me what is called my “off the needles” gauge. For this particular swatch this gave me 34 stitches to 10 cm and 30 rows to 10cm. As I knit the finished item I expect that’s the gauge I would get if I use the same needles. Once I had done that, I then blocked the swatch. I put it in warm water with a little bit of wool soap mixed in with it for about 2 hours to let the wool really soak, relax and let the fibres work out how they actually wanted to lie. Then I took it out, I squeezed it taking care not to stretch or strain the gauge [swatch], wrapped it in a towel to support it and then wrung the towel out to get as much water as I could out of the swatch. I then laid it on a blocking tile, smoothed it out, pinned it where it wanted to be, and left it to dry. When it was dry, I measured again between the two sets of threads.

This time my gauge was 32 stitches but it stayed at 30 rows. So what does this tell me? Well, the first thing it tells me is that my stitch gauge changed. I got fewer stitches over the 10 cm distance after I’d washed this swatch than I did before. That means that it’s going to be a little bit wider after I’ve washed the garment than before. But the row gauge remains the same. The gauge I want to use to compare against the pattern is the gauge it is now after blocking. So 32 stitches and 30 rows. I did leave this a few days and came back and measured it again and the gauge has changed slightly. The stitch gauge remained unchanged at 32 stitches for 10 cm but the row gauge tightened up very slightly. [10 cm = 4 inches] It is now 32 rows over 10 cm rather than 30 rows over 10 cm.

How does that compare with a pattern? Well, the pattern is asking for 32 stitches along a row in 10 cm. That’s exactly what I’m getting. It asks for 34 stitches up and down (that’s 34 rows) over 10 cm. I’m actually achieving 32 rows after it has relaxed. So I’m knitting a little bit more loosely than I was before. I’d expect my finished garment to be the same width as in the pattern, but I’d expect it to be slightly longer than in the pattern.

If you recall, I was looking to make this jumper for this vest slightly larger than the size in the pattern. Actually, it is going to be slightly larger, so I need to do a bit of calculation to find out how much larger is going to be.

What I found out from my gauge swatch is that my gauge is the same stitch gauge as in the pattern, but the row gauge is slightly different. This means that my sweater should come out slightly longer than that in the pattern, which is good and is what I wanted. But how much bigger? Well, here is how I do the calculations to find out how long that sweater is actually going to turn out to be.

What does this mean for my finished garment? Well, the pattern is going to produce a garment of length 24.25 inches, but if I knit as I knit in my gauge swatch, I will actually get something that is 25.77 inches. That’s about an inch and a half bigger than the designer made in the pattern, which is about the extra length that I was looking to make. This means that I won’t need to add that extra motif on the bottom of the knitting. I can just knit according to the pattern and I will get a longer vest than in the original. So my gauge swatch was actually really useful. Of course it let me see what the pattern would look like in reality, although I only knit the gauge swatch in two colours rather than the full range used by the full pattern.

It also told me that I don’t actually need to add any pattern repeats on, because I’ve got a different row gauge than the on the designer got, and so my vest is going to be slightly longer. In fact that “slightly longer” is exactly the length that I was aiming for. So provided that when I need the project as a whole I’m knitting to the same gauge as I knit the gauge swatch, vest will end up the length I would like it to be. That’s really good.

The gauge swatch was really valuable in confirming that I’ll get the right width for the vest and the right length, and that the pattern would look good in the wool. Also the finished fabric had a really good feel to it.

That’s the gauge swatch.

Casting on

Now I want to talk to you about casting on.

The cast on used in the pattern is new to me. The German twisted cast-on is sometimes called the Old Norwegian cast-on or the twisted knit half hitch cast-on.

If I tried to show you the cast-on using the yarn in the project, you wouldn’t actually be able to see because the yarn is too fine to show up in a video. So in the short section of video I’m going to show you I’ll be using thicker yarn so that you can see what’s actually happening in the cast-on.

I’d like to show you the twisted knit half-hitch cast-on. You are using one piece of yarn. One end (this is the end of the yarn) is the tail end, and you want 3 or 4 times the width of your garment for the tail end. The other end is the yarn that’s attached to your ball and that will become the working on for the rest of the garment. I’ve just tied together two different coloured yarns here so that it is easier for you to see in the video which is the tail end and which is the working yarn.

You start off by putting the tail end over your thumb and the working yarn over your forefinger, holding the ends in your palm with your other fingers. For this is very first cast-on stitch you come up underneath the strand, bring it forward in front of the tail end, back past the other side of the tail end, into the middle; bring your needle up and bring it forward, put it through the loop (still working on the tail end), turn it round so it is now pointing towards the back, put it under the working yarn and now, with the tip of your needle underneath that little cross of the tail end, see that little cross there, and now you can leave go. And pull it.

Again. Take the tail end, catch it on your thumb, needle to the front, under the tail end nearest you, up the middle, over the tail end farthest from you, keep it going round in a circle, under the working yarn, and back, through and under that little cross at the bottom.

Forward, under, back, up, through the loop, back, under, and through the loop under the cross.

There is an alternative way of doing it that starts off the same but I find a little bit easier at the end.

So, again, keep going forward, back, up, through the loop (we are just exactly the same at the moment), under the working yarn. Now, instead of going through that little cross there, you undo that loop by rotating your thumb so that it is now a plain straight-forward loop that you can just throw over the end of the needle.

So, forward, back, thorugh, back, round, undo the cross and loop over the needle like that.

So, forward, back, forward, through, round the back, undo the loop by turning your thumb round, like that.

So just comparing the two again.

The first way. Forward, round, through the hole, round the back, under the working yarn, and through that little crossed bit at the bottom.

That one again: under, back, through the hole, under, over, and through the hole beneath the cross.

And the second technique: forward, back, through the loop, back, under, rotate your thumb, and drop the loop over the end.

And again, forward, back, through the loop, back, pick up the working yarn, rotate your thumb, and drop the loop over the end.

That one slipped off the top of the screen, didn’t it! Like that.

So, [there are] two ways of doing the cast-on. Both produce the same result. And that is the twisted knit half-hitch cast-on.

Marker thread

That’s how I’m going to do the cast-on for the final vest, but there is one additional thing I want to do to make myself ready for joining in the round. That is to place a marker thread while I’m doing the cast-on. This marker thread serves two purposes. The first one is to tell me how many stitches I have cast-on, because the pattern calls for more than 300 stitches being cast-on, and I’m just not that good at counting. The other purpose is so that I can see whether the cast-on has wrapped itself around the cable when I come to do the join. It will tell me whether the joined cast-on is twisted. Because if I twisted the join then the final sweater wouldn’t actually work out as a sweater, it would work out as a mobius strip – which is not very good. Using this technique of putting in a marker thread solves these two problems. It lets me mark every (in my case I’ve chosen) 10 stitches, so you can easily count the number of stitches (because I can count 10 stitches quite reliably) and I can count the number of groups of 10 quite reliably. It also lets me, when I come to join in the round, see that the cast-on hasn’t wound itself around the cable.

Again I’ll show you this technique using thicker yarns before you see the final version from the project.

I’d like to show you how to use a marker thread to help you count your cast-on stitches and also to help you avoid twisting your cast-on when you join it in the round. I’m using two threads. The first is the working yarn that’s going to make the fabric, and the second is a contrasting colour that I’m going to use for the marker thread. Normally the marker thread will be thinner and smooth. Thinner so that it doesn’t space out the cast-on, and smooth so that you can pull it out easily when you finished with it. But for this demonstration I’m using a thicker thread so that you can see what’s happening.

For the cast-on you start as normal. Give yourself enough tail if using a long tail type cast-on, and hold it as you would normally hold it for your cast-on. Here is the marker thread, and I’m going to hold that in my right hand so it’s ready when I need it. The first thing I’m going to do is cast-on 9 stitches. This is the twisted knit half-hitch cast-on. One, two, three, four, five, six, seven, eight, nine. I’m going to be using the marker thread to help me count stitches, so I’d better make sure I really have 9 stitches on there. 1, 2, 3, 4, 5, 6, 7, 8, 9. I have 9 stitches on the needle. Here is my marker thread. I slip it so the tail end [of the marker thread] is at the front and the working end [of the marker thread] is at the back, and it’s now between the end of the needle and the last stitch. Now I cast-on my tenth stitch. So I’ve now got 10 stitches on the needle. I move that marker yarn round the needle to the front.

I now cast on another 9 stitches. One, two, three, four, five, six, seven, eight, nine. Let’s count that up: 1, 2, 3, 4, 5, 6, 7, 8, 9. Yes, there are nine stitches. I run the marker thread loosely across the front of those, round the back of the needle. Not a yarn over, just slipping it round keeping it below the needle. I do my tenth stitch, and bring the [marker] yarn back to the front, around the bottom of the needle. So you can see what’s happening. I’m catching the [marker] yarn every 10th stitch. I’ll just do one more group: 1, 2, 3, 4, 5, 6, 7, 8, 9. And again check the 9 stitches: 1, 2, 3, 4, 5, 6, 7, 8, 9. Move the [marker] yarn to the back, do my tenth stitch, move the [marker] yarn to the front and keep going. I’ll just put on one more stitch to keep that yarn in place.

So, we have got the marker yarn forming a nice line along the bottom of our cast-on edge so that if we managed to twist it somehow when doing the join in the round, it would be quite obvious. You’d see the marker thread quite clearly if it went round the needle. And the other thing is now to count the stitches, all you have to do is count where marker yarn disappears. So 1, 2, 3; 30 stitches. So that’s how to use a marker thread to help you count your stitches in a cast-on and to help you avoid twisting your cast-on edge when you join it in the round.

That’s how to insert a marker yarn into the cast-on. What does it look like for the project? Well, it’s easier to show you this in a photograph.

That was my cast-on for the project.

Joining in the round

Now I need to join that in the round so it goes around as continuous circular knitting. There are two things to remember when joining in the round. The first is you don’t want to twist that cast-on, which is why I put the market thread in so I can spot if it that’s happening. The second one is that you find when you do the cast-on you can get a jog where the two ends of the cast-on meet in the round. I’ll show you a technique, one of many, that allows you to remove that jog, so that when you look around the bottom of the finished item you can’t actually see where that cast-on joined.

I’ll show you how I cast-on in the round when I’m working on a piece that has a very large number of stitches. I’ll be using a twisted knit half-hitch cast-on and, for this demonstration, because I’ll not be [actually] casting on a large number of stitches, I’ll also be using the magic loop for circular knitting.

You can see here that I’ve got 3 yarns. This top yarn is the working yarn. It will go on to form the fabric. The twisted knit half-hitch cast-on is member the long tail family, so I need a tail-end yarn, and I’m using a separate ball of yarn of the same type as the working yarn for the tail end. The reason for this is that if I’m casting on a very large number of stitches, I don’t want to run the risk of running out of tail end because I’ve not left enough room. The third yarn can see is a marker yarn. For the purpose of the demonstration this is the same size as the working yearn. I would normally use a thinner yarn and a smooth yarn because it doesn’t play any part in the actual fabric. It is just there so I can see where the edge is and to help me count the stitches. If it is smooth it is easier to pull out from the finished item. I want to remember which is the working yarn and which is the tail end, so I just slip a stitch marker onto the tail end. It doesn’t have to be a removable marker because before we start knitting the body of the fabric, we will be snipping off the tail end yarn, so the stitch marker will just fall off the end.

Normally with a long tail family cast-on, you’d use a single piece of yarn for both the working yarn and the tail end, so the first step is to make that single piece of yarn. To do that I’ll leave enough to sew in the ends and make a slip knot just to join those ends together. I’ll then place them on the needle to hold them so they don’t slither all over the place. Again, the marker yarn (I don’t need to sew in in the end of this) but I want to stop it moving around so, again, I create a slipknot and fit it over the end so that’s just held in place, so I know where it is. Because I’m using the decrease type of join [in the round] I need to create a stitch that I’m going to join with the last cast-on stitch. I just need to create a simple loop so that this, which would be tail end if you used a continuous piece of yarn, is at the needle end of the loop. So a little loop with working yarn coming out from behind the loop.

I now need to start casting-on. I’m going to cast-on and place a marker every tenth stitch. I will start my cast on; 1, 2, 3, 4, 5, 6, 7, 8, 9. I want to mark every tenth stitch. I just bring the marker around here, wrap it round the end, and placing it behind there. Then I cast-on a tenth stitch and bring it [the marker yarn] to the front. And again 1, 2, 3, 4, 5, 6, 7, 8, 9 … place marker stitch … 10. That’s 20 stitches cast-on. I’ll continue until I’ve cast-on cast on 64 stitches.

So, there we are, are 64 stitches cast-on.

I’ll now snip off this extra marker thread, and I’ll cut off the tail end thread, so I’m carrying less ends. I’ll put a knot in the end of that to keep it tidier. There are my 64 stitches. 10, 20, 30, 40, 50, 60, 1, 2, 3, 4. I now need to join these in the round to form a circular piece of knitting. I take the working yarn around to the back so that the needle with the working yarn is pointing from left to right. And the other needle is also going to point from left to right. I’m going to use magic loop, so I’m going to need to split the cast-on in the middle. So, there’s that first loop that we had, so 10, 20 30, and I want to split it at 32 stitches. The reason to split at the 32 is that I’m going to continue in rib, and so I would prefer to have to join at this end of the magic loop and at the cast on end as a join when I’m transferring from a purl to knit stitch. I find my ladders are far better if I do it that way round.

So, we now have stitches on each needle. If this was not a magic loop and I had a shorter cable, they [the stitches] would just be going around like that. You need to make sure they [the cast-on stitches] are not twisted which is the next use for this market thread. You can see it’s there running along the bottom, and it’s quite visible. If I’d managed to twist the stitches round, the marker thread just disappears around the needle.

I’m ready to start to join in the round. The first thing that I want to do is to take that extra loop and put it onto the needle at the back. To get to it I take those two slipknots off, and I want it [the extra loop] to go in front of the working yarn, so the working yarn wants to be behind it. And just slip that down to join the other stitches. I can now start knitting. I’m knitting in rib, so knit, knit. Give a bit of a tug. That will help tighten up the stitches so you don’t get laddering, and my purls. I’ll keep going all the way around until all the way round until I get to the last four stitches.

I’m now at the end of the first needle in the magic loop. So I pull the needle through, and I need to make sure that I’ve not twisted this. I put the needles together and the marker yarn hasn’t twisted over, so that’s good. I now continue knitting towards the end.

I’ve now reached the point where I have got four remaining stitches plus that loop on my needle. I just want to knit, knit, purl. And here’s the final stitch, and the loop. I want to join these together in a decrease that, because it’s a purl stitch, is a purl decrease [p2tog].

Now we’re ready to start the next round of the knitting. Yet again I just need to check that I’ve not twisted the [cast-on] stitches and so I check that the marker a thread is all the way along the bottom. What we can do is just put the marker thread through there because, remember, we didn’t have it going through at the start of the knitting [round]. I’m putting stitches onto the needle that receives them and pulling the the cable so that stitches on the back are on the cable. And we start again.

And so, there we are, at the end of the second round, all ready to continue knitting with the rest of the pattern.

That was my cast-on and join in the round for a project with a large number of stitches.

That was how I did the cast on.

Looking forwards

In this podcast I talked about the gauge swatch that I used to help me prepare for my project, and I talked about how I cast-on and joined in the round to start off the project.

Next time I’ll be talking about the corrugated rib, that is the first section of the pattern.

Until then happy knitting!

Project planning – the Nahanni River (P201901)

Ruler held against the first four rows of the swatch

This is the first in a series of podcasts on how I knit my Nahanni River vest project. In this podcast I explain how Iread the pattern to find out the yarn that I’ll need, any tools that I need and any techniques that I will need to learn to knit the pattern. I also talk about how I choose the size I want to make for the finished product, and how I do a gauge swatch for a project that will be knit in the round.

This is a video. There is also an audio only version:

Teabreak Knitter logo
T-break
Nahanni River 1. Project planning – the Nahanni River (P201901)
Loading
/

This my first podcast (more strictly a vlog). In it, I explain how I prepared to knit the Nahanni River Fair Isle pattern (designed by Betts Lampers and published by Simply Shetland). I look at how I read the pattern to find out about the yarn, tools and techniques that I would need to use, how I decided on the size I wanted to knit, and how I created a gauge swatch to check my decisions.

You will have to wait for later podcasts to see how I got on with the project and whether the approach I planned in this podcast works in practice!

The video version of the podcast is pubished on my YouTube channel. The sound channel from this is available as an audio podcast.

Links to items mentioned in the podcast

Transcript

The headings in this transcript link to the point in the podcast where that topic starts. This transcript has been edited to correct errors and to clarify phrasing.

Introduction

Hello, I’m Steve Foreman, known as TeabreakKnitter on social media.

This is my first podcast, and I thought that I would like to show you my thought process as I go about preparing and knitting a project. In this first podcast I am going through the planning stages.

The project I want to talk about is the Nahanni River vest. I purchased this [as a kit] at the Edinburgh Yarn Festival 2019. It is a Fair Isle project, and I bought it as a kit because I liked the colour scheme.

What I want to talk about in this podcast is how I read the pattern to find out the yarn that I’ll need, any tools that I need and any techniques that I will need to learn to knit the pattern. I also want to talk about how I choose the size I want to make for the finished product, and how I will do a gauge swatch.

Choosing the yarn

So, I have chosen the pattern and now need to read it to find out what I need to know.
The first thing to find out about is the yarn. One easy way to choose the yarn is to buy the pattern in a kit with all the yarn you need for it. Job done. Or, almost job done.

Let’s say that I’ve chosen the pattern and cannot get hold of the recommended yarn,
or I don’t like the colours in the recommended yarn, and I’d like to use a different set of colours. What do I need to know about the yarn to make a substitution?

The first thing is the type of yarn. In the UK we talk of 4-ply, DK, aran. This pattern used what is known as a 4-ply yarn (although I think the yarn is only made from 2 plies). It is the UK 4-ply weight (US fingering). On the ball band it gives us the gauge that the manufacturers think it will knit up to using the recommended needle. This information is also held in the Ravelry database, so it easy to look up other yarns that knit to the same gauge. Another thing that is important because I am knitting a Fair Isle project is that I want a yarn with good stitch definition. There is no point spending a large amount of time creating all those detailed patterns if what you end up with is all the colours merging into one, not contrasting, or being hidden behind a huge fuzz of wool. You want a wool that is going to show up your patterns well, which means using a wool with reasonably good stitch definition.

Skipping ahead, this pattern uses calls for you to “steek”. Steeking puts fear into the hearts of a large number of people because you are cutting into all that lovely fabric that you have just made. It is not as scary as it sounds, and when we come to a later podcast I’ll show you what I do when I’m steeking, but that’s looking several podcasts ahead from now.

But for now, what you need to know for your wool is that you want it to be slightly “sticky”, so, not absolutely smooth and slither everywhere, but that holds together a bit so that when you knit a few stitches and take them off the needle they still stay there and it takes a bit of pulling to pull them apart. When it is washed and worn, that means that the wool tends to bind together quite well over time. This stops the steek pulling apart. You don’t want wool that felts so easily that as soon as you look at it you get felt,
but you do need wool that clings a bit to itself, just to give that bit of encouragement to the steeks to stay put until the fabric has been worn a bit.

So, those are some qualitative aspects as well as the quantitiative aspects like the type of wool and the gauge it knits to. You also need to know how much weight there is in a ball of wool of your alternative (the recommended Spindrift comes in 25g balls) and how much length there is in a ball. This one is 105m, your substitute could be something different. But if you are looking to substitute with a wool and you find
that a 25g ball has a substantially different from 105 metres on it, then you want to start being a little worried that it is not going to knit up in the same way as the recommended yarn. If you get more length, then that wool is either going to be a lot thinner, or a lot more “open weave” or lofty than the Spindrift. The finished garment won’t have the same sort of drape, it won’t have the same sort of characteristics as this wool.

However, I’ve got it easy. I’m knitting with the recommended wool bought in a kit, so I should have enough wool, and it should knit up nicely.

Choosing your tools

The next thing I am going to look for in the pattern is what tools I need. Have I got the right needles? In this case, yes. But this particular pattern asks for me to use two circular needles of different length with 2.75 mm tips, and two circular needles of different lengths with 3.25 mm tips.

That’s not a problem, but the reason it asks for two different lengths is because as you knit you will change the size as you go up the body and do the steek, you will get fewer and fewer stitches per row [round] when you come to the armholes, and keeping the same length cable would mean that those stitches would be really stretched out. So, in the pattern it suggests that you change to a shorter cable so that those stitches still fit nicely around the cable.

I plan to keep using an 80 cm cable for this because I use the magic loop techniques (magic loop, travelling loop), which means I can knit as small a number of stitches on the needle as I like and still be able to continue with that same needle. If you find that you have problems with laddering when you do that, you might well want to change to a shorter needle. So, I’m quite happy to use two circular needles, one with 2.75 mm tips and the other with 3.25 mm tips. The larger one is an interchangeable, so if I do need a shorter cable changing is easy.

The other thing you find when you read through the pattern is that at some stage I am going to do a three needle bind-off. For a 3 needle bind off, I will need 3 tips. I need to make sure that I have another 3.25 mm tip available for doing that. An alternative is to make sure that I have some smaller tips that I can transfer the work onto, and use one of the 3.25 mm tips for doing that bind-off. But I need three needles of similar size for that bind-off. I just need to make sure that I have those extra tips available when I need them.

The pattern also calls for stitch holders (I have plenty of those).

And it calls for a coil-free safety pin to hold one stitch. Well, the stitch MARKERS I use are the ones that look like tiny little padlocks, so holding a single stitch on one of those is going to be really easy. I don’t have one of those on the desk in front of me, but in later podcasts when I am showing you my knitting you’ll see dozens of those stitch MARKERS lying around the various bits of knitting that I have. Of course, if you haven’t got one of those stitch MARKERS (I’m looking down at my desk) – there’s always a good old paperclip that you can pull out and use to hold a stitch.

Identifying the techniques

The last thing I am going to look at in the pattern are the techniques. Which techniques do I need to learn?

Let’s start in the very beginning with the cast-on. This pattern calls for the German twisted cast-on. I needed to do an internet search to find out what that is and I found that it is also called the Old Norwegian cast-on and the Twisted Knit Half-hitch cast-on.

I’ve done some research to find out how that is done, and looked it up in the “bible”
the Principles of Knitting by June Hiatt. This is a really good book. It’s a little bit … heavy … but in doing the decades of research for that book the author found that the same knitting techniques were called by different names around the world. That should be no surprise, as I’ve already told you different names for the same cast-on. She used a naming technique that tries to be independent of those old traditions and describe what you are doing – hence the twisted knit half-hitch cast-on. On my website I am trying to use that independent description to try to remove the associations with different knitting traditions that could be confusing.

A bit like the English/Continental way of describing how you hold the yarn when you are knitting. It’s not particularly English, and it’s certainly not continental. Some people in contenental Europe use what is called the English technique if that is how they were taught in their community, and in England people use the continental method
if that is how their commnity was taught. A lot of these names are meaningless in themselves, so in writing the reference book, the author tried to come up with a terminology that was fairly straightforward. Another example of terminology that can cause confusion when I read a pattern is when a pattern refers to the “right” side. Is that the side that is pretty and looks nice when you have finished your knitting, so in stockinette the nice smooth side, not the ridged side? Or is it the right-hand side of the finished product? And some times, patterns can be confusing. The author decided to use the terms “outside” and “inside” to describe the different sides, the different faces, of the knitting. But that’s a bit of an aside.

You will find on my website that I am trying to use the terminology in this book, where I can, but I do slip into using the terminology I have learned over the past few years as I’ve been learning knitting through the internet.

The other technique, that I’ve used before, but many people are coming to new, is stranded, or Fair Isle, knitting. Fair Isle is a particular type of stranded knitting. This is where you are knitting with more than one colour in one row, and you alternate so many stitches of one colour with so many of another and it goes right the way round. So you are using the colours all the way round. In Fair Isle it is only ever two colours in a row.
Other types of stranded knitting can use more than two colours. The big advantage of Fair Isle knitting is that if you are comfortable in knitting in both the English and the continental methods, with the yarn held in the right hand and also in left hand, then Fair Isle can be knit with one yarn in one hand and the other in the other. Some people hold both yarns in the right hand, others both in the left. Some will hold one yarn with the other lying on the table in front of them and when they change colour they swap over the yarns. It doesn’t matter so long as you get the fabric that you like. You can use any technique you like. I’ve used Fair Isle before, so it is not a technique that I need to learn.

The other technique, that is even more frightening to many people than Fair Isle,
is “steeking”. Steeking is where you have your fabric and you just knit round and round and round. So for a sweater you’d knit round and round and round, past the armholes and up to the top. And you make the armholes by cutting down that fabric. In a later podcast I’ll be taking about the steeks for this particular project, and that includes how you stop those cuts fraying back. But if you are using a yarn like a traditional shetland yarn, good Shetland wool, those steeks don’t need an awful lot of help to stop them fraying. They do not fray. The yarn holds itself together so well that you make those cuts and the fabric stays as it is.

All these techniques are referred to by my website and are linked from the show notes for the podcast.

Choosing the size

I have gone through the pattern, seen the yarn, the tools and the techiques. The next thing to choose is which size of the pattern I want to make.

I’m tall, and like my jumpers and vests to be longer than the average might be – otherwise I get a gap in the middle that can get cold in winter! I also need to be careful to make them wide enough, we all do, but for Fair Isle it is particularly important because there is not a lot of stretch in Fair Isle fabric, so you have to knit to the ease you want. It needs to be big enough to fit with enough space, and in my case I like to put a shirt on underneath without it being too tight.

The easiest way to do this is to find out what ease you really want, and to choose the final measurement you are aiming for, is to use a jumper (or other type of garment you are knitting) that you are really happy with the fit of. I measure that item and say that is the finished size I want to aim for in the garment I am about to knit. In this case, several years ago I knit a Fair Isle jumper, called Raga also sold by Jamieson’s of Shetland coincidentally, and that one fits, but a bit too snugly for me, particularly now that I have put on a bit more weight around my tummy.

So, this one I want to be probably 43 inch chest, to campare with the pattern that gives 42 inch or 45 inch chest. 43 inches is about 110 cm. As I said, the pattern gives me 42 or 45. I know I don’t want this to be tight, so I’ll make the 45 inch chest. Thats going to be about 115-116cm when finished.

The pattern tells me that if I knit a 45 inch chest, I’ll get a 24.25 inch length. That’s about 1.5 – 2 inches, say 4-5 cm, shorter than I would like ideally. So I’ll try to aim for a finished size that is a bit longer than that. To get the extra length isn’t just a case
of doing a few extra rows of stickinette, because you have a Fair Isle pattern. I don’t want to put the extra length in the ribbing at the bottom, because then the ribbing will become too prominent.

If you look, those extra 5 cm or so are going to be one pattern repeat of the major [motif] below where you start knitting in the design. The design calls for you to start at a particular point in the chart. If I started off with the motif below that then I would get about the 2 inches. But all that is dependent on what I’m going to talk about next, and that is the gauge.

Making a gauge swatch

The designer has designed the pattern using their own knitting style and standards, they have had kntting testers try out the pattern to make sure that it is right, and publishers can also have their “little thing” in the gaugethey may have standard gauges, that they think an average person would knit in that wool. The pattern in a guide line. The gauge is what the designer got, or the test knitters got, or the publishing house thinks you should be able to get. You need to test what you do against that.

If you are knitting a scarf, even a cowl, it doesn’t matter. But if you are knitting a sweater or a non-stretchy hat, or anything you are going to wear, or gloves, then it does matter what the gauge is. Because you’ll either find that you have something that is far too big, and falls over you, a hat that is always falling over your eyes, or too small like a sweater you cannot get over your head. The gauge is important, so we need to do a gauge swatch.

I’ve put some references on how to do a gauge swatch on my website, but I’ll put the link below on the screen as I’m talking.

The gauge swatch has to be big enogh to make a judgement. Everyone talks about a 4 inch (10 cm) gauge. That’s what ball bands talk about. That’s not quite big enough to do what you want. If you are dealing with a pattern, like this Fair Isle pattern, there’s a rule of thumb that says, across a row you want to have two pattern repeats. So that the variations is size as you knit groups of one colour togetherin a small number of stitches and then another average out; it is particularly important with cables that pull together very differently from the stocking stitch or garter stitch around them.

In this one [pattern], the pattern itself recommends that you use the pattern (motif) in the chart. This is good, because it means that the gauge you get, you can compare directly with the gauge in the pattern to see how things are going to work out.

The other thing is that this pattern is knit in the round. That is, you are on a circular needle and you keep going round and round and round. This means that you area always knitting stocking stitch, and your stocking stitch is made only of knit stitches – which is great! Most people refer just doing knit stitches over purl stitches. Most people find that their gauge in knit stitches is different from their gauge in purl stitches.

Why does this matter?

If I was to do a gauge swatch knitting flat and knitting two pattern repeats to the gauge here in the pattern, that would be a 15 cm swatch, which is what we want to aim for (that’s 6 inches). So its the 4 inches that you are going to measure the gauge over,
plus a couple of inches (2.5 cm either side), to avoid all those little stretchinesses and unevenesses around the very edge of the knitting that would upset your measurement.

We are going to try [for the swatch] to mimic what we are doing when we knit in the round. This means I can’t knit in one direction and purl in the other to do it flat, because the gauge would be different from when I am just doing knit stitches. There’s a link below to how you can do this. Effectively, what you do is knit one row, 15 cm, and instead of turning to purl, you slide all your stitches back along the needle to start again
but the wool is at the wrong end. You loop the wool loosely across the back, and you knit the next row. Slip it back, loop the wool round loosely, and knit again. You end up with nice even knitting on the front, and a right mess of strands of wool at the back.

When you have knit your gauge swatch, you can then bind it off loosely. All the strands at the back you cut in the middle and tie them off loosely on the edge to stop them coming totally undone.

Then you can handle that gauge swatch. The first thing you want to do is to measure the gauge as it has come off the needles. You take a 4 inch (10 cm) area – count how many stitches there are as you go across in a row, and how many rows as you go up 10cm. That is your “off the needles” gauge, and you need to make a note of that because that is the gauge that you will see as you are actually knitting. So if, as you are knitting and you relax into your knitting, and your fingers take over from your brain in controlling how the knitting is going to go, if your gauge changes you’ll be able to see how it has changed against the gauge swatch.

But that is the first part of the story, and that’s the bit of the gauge swatch that you need as you are going through to make sure your project is actually working out as you planned it. The second stage you have to go through is whether your gauge swatch matches the gauge in the pattern. To do that, you need to do a bit of processing (a posh term!).

Soak it [the gauge swatch] in water, perhaps with a little bit of wool-friendly detergent in there (ie soap) for at least 20 minutes, 2 hours might be better. Then you bring it out and squeeze it dry to get most of the water out – don’t twist it, don’t stretch it – and I then roll it up in a towel and wring the towel, so I’m not stretching the wool, but I’m pushing the water out as much as I can, because I don’t want it to be sitting around in the air too long wet, particularly if it is cold weather when that water is going to take a long time to evaporate. When I have done that I take it out of the towel, spread it out on a blocking pad which you could pay a lot of money for, or you buy children’s play tiles that are a lot cheaper, even if you buy them in local shops they are a lot cheaper than kniting blocking tiles. They do the same job. Lay it [the swatch] out on the tile, pin it loosely at the size it wants to be, let it dry and see what you get. That will give you the finished gauge. That’s the gauge you will actually get fo the finished garment after it has been washed. That, of course, is what you are interested in, becasue that is what you are going to wear. Again, count the number of stitches and rows across the 10 cm square. Compare that with what is in the pattern. If it is the same, it’s good.
If it is different, you could do a bit of arithmetic to find out whether the garment is going to be bigger or smaller, and how much bigger or smaller and is that what you would like to have.

Remember, in my case I could not get the exact size from the pattern, so it might be that my gauge makes it worse and I might need to change the size I was going to make, or it makes it better, or I might decide that it is knitting up too tight and I’m going to use bigger needles. Then I would swatch again with a bigger needle size. Or it it is already too loose, or I don’t like the fabric, it’s a too floppy fabric, not dense enough, in which case you need to try swatching again with a smaller needle.

That’s the other thing, it’s not just the size, though that’s important, but you also want to know whether the fabric feels right. Whether it is soft enough, whether it is too airy, whether it is too tight. The gauge swatch will tell you that as well. When you have done the gauge swatch you will have this information about how the fabric feels, about the stitch gauge, the row gauge. You can finalize your choice of needles and which size of the pattern you want to make.

I’ll now cut to a bit of video showing the start of the gauge swatch and some preliminary conclusions that I am drawing as I go through that. When I come back from that, I’ll talk about what I am going to do in the next podcast.

Starting my gauge swatch

I’m 4 rows into the gauge swatch for the Nahanni River vest.

First I’d like to explain to you what all the various bits of yarn are. The very first bit is Spindrift yarn of the same type but different colours from the ones I’ll be using in the main vest. On the right, this is the tail of the cast-on yarn. This is the tail of the contrasting colour, and these two [at the top left] are the working yarn. In the middle here we have the swatch, very small at the moment, and of course is stockinete – and is curling up.

As you can see, and may have guessed from the two colours, this is being knit in the Fair Isle pattern used within the vest. This gives me practice at doing that pattern, and also means that my tension will be the same as in the final garment.

To achieve that, I need to imitate circular knitting, rather than flat knitting, in the gauge swatch. Because if I was to knit this flat, I would have rows of knit and I’d have rows of purl. Like most people, my gauge is different if I knit purl than if I knit a knit stitch. The way I do that is to knit as normal from the left onto the right needle and when I have finished I slip back again so that I am ready to start again, moving from left to right needle again. And I just drape the working yarn across the back loosely so that it doesn’t pull tight. That’s what all these loops of yarn are at the bottom here. If I find this gets too complicated and in the way, I can just snip them and tie them in a knot on the side. They won’t come undone, particularly because it is a clingy yarn, which is just as well because the pattern will call for me to steek it later anyway.

So, how is it going?

Well, I started off with a very very stretchy cast-on. It’s so stretchy that it doesn’t put any constraints on the swatch, onto the size. This is the basic stranded cast-on. I have done 4 rows of enough stitches that I get a swatch big enough to measure against. You normally measure over [at least] a 4 inch sample of your fabric, (4 inches is 10 cm). This means that if you are going to measure over that amount, you have to have a bigger swatch to select the centre portion. That is particularly important for one of these swatches that is imitating circular knitting,because the stitches around the edge of this type will be particularly different from the stitches in the middle. That applies to all swatches – the edge stitches are always slightly different from stitches in the middle. But it is particularly important when you are imitating circular knitting.

I wanted to make this swatch about 6 inches wide, that’s 15 cm, so I used the gauge in the pattern [to calculate how many stitches I needed], and cast on the appropriate number of stitches to get something that is 6 inches wide. In this case, it is 48 stitches, which happens to be two pattern repeats. I’m now following two of the rules of swatch knitting.

The first rule is to knit it bigger than the area you want to measure, which I’m doing because I’m making it half as big again, and the second rule is to knit using a stitch pattern representative of the stitch pattern in the finished garment, because that way you will be knitting something that you can compare. And also, you need to do more than one repeat of the stitch pattern, because the tension will vary over the stitch patten. Perhaps not so much over a Fair Isle style stranded knitting, which has short floats, but if you are using longer floats or using cables, you will certainly get the tension varying across the pattern, so you want to be able to average that out.

So here I am, 4 ROWS in, how am I going? Well, you won’t be able to see this because the numbers on the ruler are too small, but if you measure it that swatch is 8.5 inches, which is about 21 cm. Remember, I was aiming for something about 6 inches.
I’m not worried about that. The reason I’m not worried about that is it is all very loose around the cast-on. – I’m very loose knitting – this is very looser knitting than I normally doI’ve been knitting a lot looser that normal because I’ve been worried about the stranding and getting myself going. I would expect that in about 4 or 5 more rows everything will have tightened up and I’ll be knitting close to gauge. We’ll see.

The last thing I’d like to talk about with this swatch is that I’ve prepared myself for having to do a second swatch. When I’ve done the two, how can I be sure which one is which? What I have done is tie a few knots in the cast-on tail. It’s a little difficult to see, so I’ll bring it up closer to you. If you look on the end here I’ve got one, two, three knots close together. That tells me it’s a 3 mm needle … but further on I’ve got a further knot here separated from the others so that’s three and one quarter – a 3.25 mm needle. If it was a 3.5mm needle, I’d have done two knots further up, and if it was 3.75 mm there’d have been 3. This is purely so that I can remember which swatch is which if I get more than one swatch. If you are using american needle sizes of course, you only need the one set of knots to tell you what size of needle it is. 2, 6, 8. Of course if you are using very fine needles, once you get to 0, 00 you’ve got a bit of a problem and will need to work out a system.

This is my swatch, 4 rows in. I’ll come back later and we’ll see how I’ve got on, and how I’m matching up to gauge.

Looking forward to the rest of the project

I’ve more or less finished this podcast now. I’ve talked about how I go through assessing the pattern, what considerations I want to make, about the yarn, the tools, the techniques, the size I want to make it, and how I draw the lessons from the gauge swatch. Now, I’ve got to go off, finish the gauge swatch, and I’ll come back in the next podcast to tell you how things have gone.

Where I am at the moment is that I think I want to make the 45 inches size, which will work aout about 114 cm round the chest. That should give me the ease that I want, because I want it to be loose, but not very loose. I think I’m going to need an extra band of motif on the bottom to give me the extra length that I need, and I’m quite happy with the wool.

The other thing is that I’ve done some calculations that said that if I put in that extra band, am I going to have enough wool? It is very difficult to tell, because this pattern, although it tells the amounts of wool it needs for the various different sizes, has several of the colours that have only one or two balls of yarn that are used. So how do I know whether it is I’m going to need more balls of yarn if I increase the size?

I could just buy an extra ball of every piece of yarn, but it uses several colours, at least 7 colours [actually 10 colours], so that’s a lot of extra yarn to buy if I don’t need it. This is where Ravelry came to my rescue.

In Ravelry, there’s a projects page for this particular garment, and you can see how it has worked out for various people, and some people have put more explanation in their project notes than others. Someone called maevezana [on Ravelry] has put quite detailed notes on. One of the things she has made a note of is how much yarn she actually used in her version of the vest. It is her version, not mine, it is in her size, her gauge, but for the size she knit, she used appreciably less yarn than is called for in the pattern. This tells me that the amounts used in the pattern are only a small part of the ball. You can only buy the yarn in 25g, so there is no point in telling you that you only need 7g of one colour – because you can’t buy just 7g of one colour. For most of the colours, what that set of project notes in Ravelry is telling me is that there will be plenty of yarn and also for the main colours that I am using, I will have only just started the last ball of yarn in that knitting so adding the extra motif, I should have plenty to go on. Famous last words!

If I do end up knitting that extra motif, will I be playing yarn chicken and keeping my fingers crossed that I’ve got enough yarn, or will I have enough yarn to keep going? There’s only one way to find out, and that is to knit the garment and suck it and see.

What am I going to do in the next podcast?

First thing, I’m going to have finished the gauge swatch so I’ll know what gauge I am getting. So rather than talking “I might need this, I might need that” I can say “this is what I am intending to do”.

Once I’ve decided what I’m going to do, I’ll then be casting on. There are a couple of things I’d like to talk about in doing that cast-on. Obviously I’ll be showing you the cast-on technique itself, but I’m also going to be casting on for knitting in the round. There are techinques to help me join in the round and not end up with a twisted cast-on. This can be really annoying, particularly for a project that you’ve cast on over 300 stitches.

Next time I’ll be telling you what I’ve learned from the swatch, and I’ll be talking about the cast-on.

Until then, that’s it from me.

Happy Knitting!