
Context
Picking up stitches allows you to create a continuous fabric by knitting new stitches onto existing ones. Exactly how you pick up the stitches depends on where on the fabric you are picking up the stitches, where the new row of stitches will lie relative to the existing fabric, and the stitches used in the existing fabric and the new fabric to be created from the stitches you have picked up.
You can find information about how you make picked up stitches in these related articles.
- Pick up stitches at a stocking stitch edge.
- Pick up stitches at a garter stitch edge.
- Pick up stitches at a cast-off edge.
- Pick up stitches on body of fabric.
- Pick up stitches at a steek.
In addition to forming the stitches, you will need to decide which of the existing stitches will be used to create new stitches. For example, there are usually fewer stitches across 10 cm (4 inches) of a row in stocking stitch than there are in a 10 cm (4 inch) column. If you were to pick up every stitch along a stocking stitch edge, your new fabric would be wrinkled because you would be crowding the stitches into too short a space.
How to do it
In this article the word “row” is used to mean a row or a round of knitting. This is to avoid using the awkward row (or round) each time.
The steps in picking up stitches are:
- Decide how many stitches to pick up.
- Decide which stitches in the existing fabric you will use.
- Make the new stitches.
How many stitches to pick up?
Your pattern tells you how many stitches to pick up
Your pattern will usually tell you how many stitches to pick up. For example, “pick up and knit a stitch a total of 40 stitches”.
Do not worry if you pick up the wrong number of stitches – you can correct this on the next row by increasing or decreasing.
You are modifying or writing a pattern (or your pattern is vague on the number of stitches you need)
If you are modifying a pattern, for example to add a knit-on button band, you will need to work out how many stitches to pick up. For this you need to know the gauge of the existing fabric and the gauge of the fabric that you are creating.
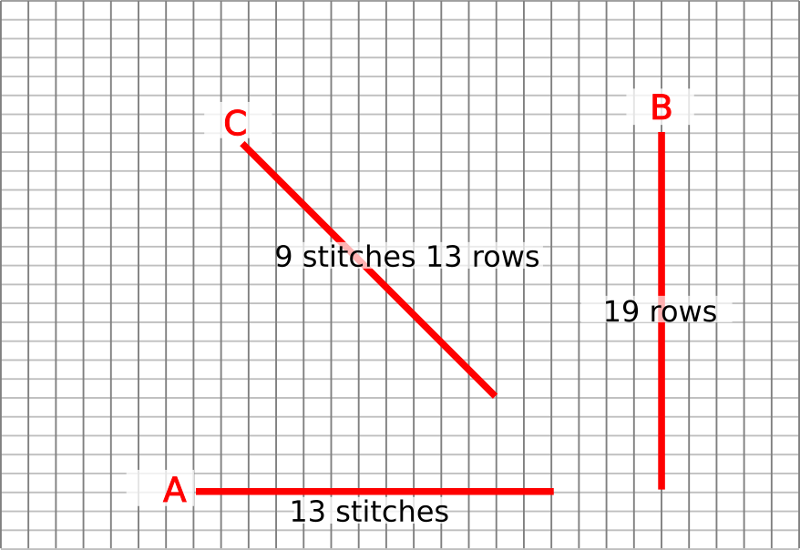
As illustrated in the diagram, stitch gauge (A – along a row) is usually different from the row gauge (B – up a column of stitches). It is different again for a diagonal line.
The rule of thumb for stockinette is that three rows are about the same distance as two stitches, and for garter stitch there are about two rows for the same distance as one stitch.
How do you use gauge in practice?
Picking up along a row
If you are picking up stitches in the direction of line A (along a row, such as for a pocket), then if you are using the same yarn, needle size and stitch pattern as for the existing fabric, then the gauge of the new fabric will be the same as the existing one and so you pick up every stitch.
If, however, you are making new fabric with a gauge that differs from the existing fabric, you will need to calculate how many stitches you need to pick up. You can use this calculator to help you.
Picking up along a column
When you pick up along a column, the row gauge of the existing fabric is unlikely to match the stitch gauge of the new fabric, even if you are using the same yarn, needle size and stitch pattern.
You can use the calculator to calculate how many rows (called stitches in the calculator) of the existing fabric to use, and how many stitches of the new fabric you need to create.
Choosing which stitches to pick up
You know the number of stitches you have to pick up, either because your pattern tells you or you have calculated it. Next, you need to decide which of the stitches in the original fabric you need to pick up in order to make the new fabric.
You know the number of stitches (or rows) in the original fabric to pick up
Use this approach if you know the number of stitches of the original fabric that will be covered by the new fabric (or rows, if you are picking up along an edge).
a) If there are more stitches (rows) in the original fabric than the number of stitches that you will need to make in the new fabric, you can use the calculator to work out how you should distribute the new stitches (N) among the stitches in the old fabric (R).
b) If there are the same number of stitches (rows) in the original fabric as in the new fabric, then make a new stitch into every old one.
c) If there are fewer old stitches (rows) than there are new stitches, then pick up every stitch in the old fabric, and in the next row increase to give you the correct number of stitches. To calculate how to distribute the increases (that are likely to be purl front-and-back), use the calculator “in reverse” – that is, use the number of new stitches for “R” and the number of old stitches for “N”, and instead of skipping stitches, increase that number of times into the stitches of that group. You may need to increase by more than one stitch into a single stitch.
Do not worry if you pick up the wrong number of stitches – you can correct this on the next row by increasing or decreasing.
You do not know the number of stitches (rows) in the original fabric to pick up.
It may be straightforward to work out how many stitches (rows) of the original fabric will be involved in picking up stitches, for example if the fabric is in colour work, you can easily count on the chart. It is not necessary to know the number of stitches (rows), because you can use distance as a substitute.
With a tape measure, measure the length of fabric over which the stitches will be picked up.
Place markers at regular intervals along the pick-up line at distances that allow you to easily count the number of stitches between them. You might need to have one of the intervals larger than the others if you want to use a spacing that is easy to measure.
Divide the number of stitches to be picked up by the number of spaces between the markers to find out how many stitches you need to pick up between each marker. You will usually find that you cannot have exactly the same number of stitches between each marker and still get the right total number of stitches.
This calculator will help you to place the markers and tell you how many stitches to pick up between them.
Do not worry if you pick up the wrong number of stitches – you can correct this on the next row by increasing or decreasing.
Make the new stitches
Now that you know how many stitches that you are going to pick up and how they will be distributed, you can make the new stitches. Here are links to methods that you can use depending on where in the fabric you are picking up stitches.
- Pick up stitches at a stocking stitch edge.
- Pick up stitches at a garter stitch edge.
- Pick up stitches at a cast-off edge.
- Pick up stitches at a steek.
Helpful links
- T-ref: Strategy to pick up stitches
- Roxanne Richardson Techniques Tuesday video on the meaning of "pick up stitch" terms.
- Roxanne Richardson Techniques Tuesday video on how to pick up stitches along a finished (cast-off/bound-off) edge.
- Picking up stitches along a selvedge.